ZyXEL MI-7248 User Guide - Page 143
LABEL, DESCRIPTION, SP TPID, Others, Access Port, Tunnel, SPVID, Port Setup, Apply, Cancel
 |
View all ZyXEL MI-7248 manuals
Add to My Manuals
Save this manual to your list of manuals |
Page 143 highlights
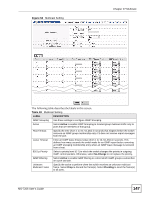
Chapter 26 VLAN Stacking The following table describes the labels in this screen. Table 47 VLAN Stacking LABEL DESCRIPTION Active Select this to enable VLAN stacking on the switch. SP TPID SP TPID is a standard Ethernet type code identifying the frame and indicates whether the frame carries IEEE 802.1Q tag information. Choose 0x8100 or 0x9100 from the drop-down list box or select Others and then enter a four-digit hexadecimal number from 0x0000 to 0xFFFF. 0x denotes a hexadecimal number. It does not have to be typed in the Others text field. Slot Select the slot at whose settings you want to look. Port This field displays the slot number and port number. * Settings in this row apply to all ports. Use this row only if you want to make some settings the same for all ports. Use this row first to set the common settings and then make adjustments on a port-by-port basis. Role SPVID Priority Apply Cancel Note: Changes in this row are copied to all the ports as soon as you make them. Select Access Port to have the switch add the SP TPID tag to all incoming frames received on this port. Select Access Port for ingress ports at the edge of the service provider's network. Select Tunnel Port (available for Gigabit ports only) for egress ports at the edge of the service provider's network. In order to support VLAN stacking on a port, the port must be able to allow frames of 1526 Bytes (1522 Bytes + 4 Bytes for the second tag) to pass through it. SPVID is the service provider's VLAN ID (the outer VLAN tag). Enter the service provider ID (from 1 to 4094) for frames received on this port. See Chapter 13 on page 83 for more background information on VLAN ID. On the switch, configure priority level of inner IEEE 802.1Q tag in the Port Setup screen. "0" is the lowest priority level and "7" is the highest. Click Apply to save your changes to the switch's run-time memory. The switch loses these changes if it is turned off or loses power, so use the Save link on the top navigation panel to save your changes to the non-volatile memory when you are done configuring. Click Cancel to begin configuring this screen afresh. MS-7206 User's Guide 143
-
 1
1 -
2
-
3
-
4
-
5
-
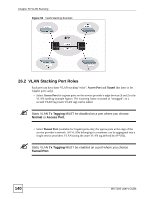
6
-
7
-
8
-
9
-
10
-
11
-
12
-
13
-
14
-
15
-
16
-
17
-
18
-
19
-
20
-
21
-
22
-
23
-
24
-
25
-
26
-
27
-
28
-
29
-
30
-
31
-
32
-
33
-
34
-
35
-
36
-
37
-
38
-
39
-
40
-
41
-
42
-
43
-
44
-
45
-
46
-
47
-
48
-
49
-
50
-
51
-
52
-
53
-
54
-
55
-
56
-
57
-
58
-
59
-
60
-
61
-
62
-
63
-
64
-
65
-
66
-
67
-
68
-
69
-
70
-
71
-
72
-
73
-
74
-
75
-
76
-
77
-
78
-
79
-
80
-
81
-
82
-
83
-
84
-
85
-
86
-
87
-
88
-
89
-
90
-
91
-
92
-
93
-
94
-
95
-
96
-
97
-
98
-
99
-
100
-
101
-
102
-
103
-
104
-
105
-
106
-
107
-
108
-
109
-
110
-
111
-
112
-
113
-
114
-
115
-
116
-
117
-
118
-
119
-
120
-
121
-
122
-
123
-
124
-
125
-
126
-
127
-
128
-
129
-
130
-
131
-
132
-
133
-
134
-
135
-
136
-
137
-
 138
138 -
 139
139 -
 140
140 -
 141
141 -
 142
142 -
 143
143 -
 144
144 -
 145
145 -
 146
146 -
 147
147 -
 148
148 -
149
-
150
-
151
-
152
-
153
-
154
-
155
-
156
-
157
-
158
-
159
-
160
-
161
-
162
-
163
-
164
-
165
-
166
-
167
-
168
-
169
-
170
-
171
-
172
-
173
-
174
-
175
-
176
-
177
-
178
-
179
-
180
-
181
-
182
-
183
-
184
-
185
-
186
-
187
-
188
-
189
-
190
-
191
-
192
-
193
-
194
-
195
-
196
-
197
-
198
-
199
-
200
-
201
-
202
-
203
-
204
-
205
-
206
-
207
-
208
-
209
-
210
-
211
-
212
-
213
-
214
-
215
-
216
-
217
-
218
-
219
-
220
-
221
-
222
-
223
-
224
-
225
-
226
-
227
-
228
-
229
-
230
-
231
-
232
-
233
-
234
-
235
-
236
-
237
-
238
-
239
-
240
-
241
-
242
-
243
-
244
-
245
-
246
-
247
-
248
-
249
-
250
-
251
-
252
-
253
-
254
-
255
-
256
-
257
-
258
-
259
-
260
-
261
-
262
-
263
-
264
-
265
-
266
-
267
-
268
-
269
-
270
-
271
-
272
-
273
-
274
-
275
-
276
-
277
-
278
-
279
-
280
-
281
-
282
-
283
-
284
-
285
-
286
-
287
-
288
-
289
-
290
-
291
-
292
-
293
-
294
-
295
-
296
-
297
-
298
-
299
-
300
-
301
-
302
-
303
-
304
-
305
-
306
-
307
-
308
-
309
-
310
 |
 |
