Cisco 2950 Hardware Installation Guide - Page 63
Installing the Switch on a Table, Shelf, or Desk, Installing the Switch on a Wall, Attaching
 |
UPC - 746320454504
View all Cisco 2950 manuals
Add to My Manuals
Save this manual to your list of manuals |
Page 63 highlights
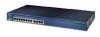
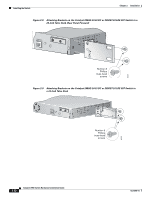
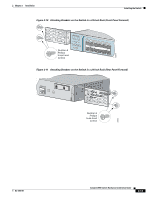
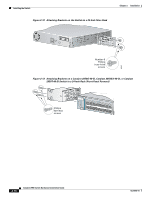
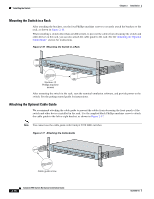
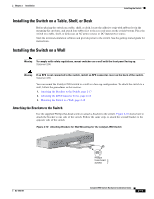
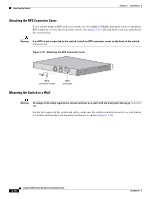
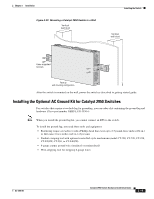
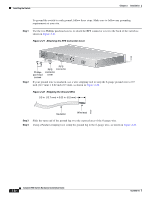
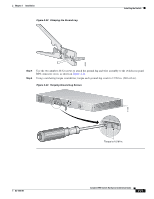
Chapter 2 Installation Installing the Switch Installing the Switch on a Table, Shelf, or Desk Before placing the switch on a table, shelf, or desk, locate the adhesive strip with rubber feet in the mounting-kit envelope, and attach four rubber feet to the recessed areas on the switch bottom. Place the switch on a table, shelf, or desk near an AC power source or DC-input power source. Start the terminal-emulation software and provide power to the switch. See the getting started guide for instructions. Installing the Switch on a Wall Warning To comply with safety regulations, mount switches on a wall with the front panel facing up. Statement 266 Warning If an RPS is not connected to the switch, install an RPS connector cover on the back of the switch. Statement 265 You can mount the Catalyst 2950 switch to a wall in a face-up configuration. To attach the switch to a wall, follow the procedures in this section. 1. Attaching the Brackets to the Switch, page 2-17 2. Attaching the RPS Connector Cover, page 2-18 3. Mounting the Switch to a Wall, page 2-18 Attaching the Brackets to the Switch Use the supplied Phillips flat-head screws to attach a bracket to the switch. Figure 2-18 shows how to attach the bracket to one side of the switch. Follow the same steps to attach the second bracket to the opposite side of the switch. Figure 2-18 Attaching Brackets for Wall-Mounting for the Catalyst 2950 Switch OL-6156-01 47303 Phillips truss-head screws Catalyst 2950 Switch Hardware Installation Guide 2-17
-
 1
1 -
2
-
3
-
4
-
5
-
6
-
7
-
8
-
9
-
10
-
11
-
12
-
13
-
14
-
15
-
16
-
17
-
18
-
19
-
20
-
21
-
22
-
23
-
24
-
25
-
26
-
27
-
28
-
29
-
30
-
31
-
32
-
33
-
34
-
35
-
36
-
37
-
38
-
39
-
40
-
41
-
42
-
43
-
44
-
45
-
46
-
47
-
48
-
49
-
50
-
51
-
52
-
53
-
54
-
55
-
56
-
57
-
 58
58 -
 59
59 -
 60
60 -
 61
61 -
 62
62 -
 63
63 -
 64
64 -
 65
65 -
 66
66 -
 67
67 -
 68
68 -
69
-
70
-
71
-
72
-
73
-
74
-
75
-
76
-
77
-
78
-
79
-
80
-
81
-
82
-
83
-
84
-
85
-
86
-
87
-
88
-
89
-
90
-
91
-
92
-
93
-
94
-
95
-
96
-
97
-
98
-
99
-
100
-
101
-
102
-
103
-
104
-
105
-
106
-
107
-
108
-
109
-
110
-
111
-
112
-
113
-
114
-
115
-
116
-
117
-
118
-
119
-
120
-
121
-
122
-
123
-
124
-
125
-
126
-
127
-
128
-
129
-
130
-
131
-
132
-
133
-
134
 |
 |
