Cisco 521SG Administration Guide - Page 61
Enabling Service Announcements, Customizing Phone Softkeys
 |
UPC - 882658248993
View all Cisco 521SG manuals
Add to My Manuals
Save this manual to your list of manuals |
Page 61 highlights
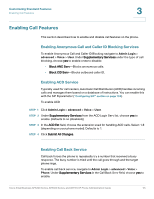
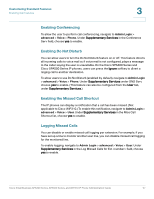
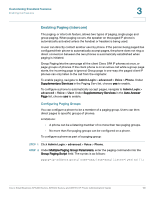
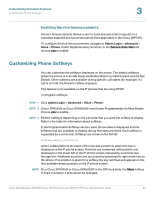
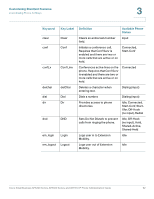
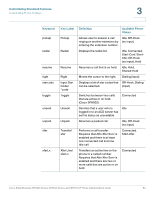
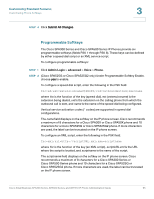
Customizing Standard Features Customizing Phone Softkeys 3 Enabling Service Announcements Service Announcements allows a user to send announcement requests to a customer-supplied announcement server. (Not applicable to the Cisco WIP310.) To configure Service Announcements, navigate to Admin Login > advanced > Voice > Phone. Under Supplementary Services, in the Service Annc Serv list, choose yes to enable. Customizing Phone Softkeys You can customize the softkeys displayed on the phone. The default softkeys (when the phone is in an idle state) are Redial, Directory, Call Forward, and Do Not Disturb. Other softkeys are available during specific call states (for example, if a call is on hold, the Resume softkey displays). This feature is not available on the IP phones that are using SPCP. To program softkeys: STEP 1 Click Admin Login > advanced > Voice > Phone. STEP 2 (Cisco SPA525G or Cisco SPA525G2 only) Under Programmable Softkey Enable, choose yes to enable. STEP 3 Edit the softkeys depending on the call state that you want the softkey to display. Refer to the table for information about softkeys. In the Programmable Softkeys section, each phone state is displayed and the softkeys that are available to display during that state are listed. Each softkey is separated by a semicolon. Softkeys are shown in the format: softkeyname|[position] where softkeyname is the name of the key and position is where the key is displayed on the IP phone screen. Positions are numbered, with position one displayed on the lower left of the IP phone screen, followed by positions two through four. Additional positions are accessed by pressing the right arrow key on the phone. If no position is given for a softkey, the key will float and appears in the first available empty position on the IP phone screen. NOTE On a Cisco SPA525G or Cisco SPA525G2 in the Off Hook state, the More softkey is fixed in position 4 and cannot be changed. Cisco Small Business SPA300 Series, SPA500 Series, and WIP310 IP Phone Administration Guide 60
-
 1
1 -
2
-
3
-
4
-
5
-
6
-
7
-
8
-
9
-
10
-
11
-
12
-
13
-
14
-
15
-
16
-
17
-
18
-
19
-
20
-
21
-
22
-
23
-
24
-
25
-
26
-
27
-
28
-
29
-
30
-
31
-
32
-
33
-
34
-
35
-
36
-
37
-
38
-
39
-
40
-
41
-
42
-
43
-
44
-
45
-
46
-
47
-
48
-
49
-
50
-
51
-
52
-
53
-
54
-
55
-
 56
56 -
 57
57 -
 58
58 -
 59
59 -
 60
60 -
 61
61 -
 62
62 -
 63
63 -
 64
64 -
 65
65 -
 66
66 -
67
-
68
-
69
-
70
-
71
-
72
-
73
-
74
-
75
-
76
-
77
-
78
-
79
-
80
-
81
-
82
-
83
-
84
-
85
-
86
-
87
-
88
-
89
-
90
-
91
-
92
-
93
-
94
-
95
-
96
-
97
-
98
-
99
-
100
-
101
-
102
-
103
-
104
-
105
-
106
-
107
-
108
-
109
-
110
-
111
-
112
-
113
-
114
-
115
-
116
-
117
-
118
-
119
-
120
-
121
-
122
-
123
-
124
-
125
-
126
-
127
-
128
-
129
-
130
-
131
-
132
-
133
-
134
-
135
-
136
-
137
-
138
-
139
-
140
-
141
-
142
-
143
-
144
-
145
-
146
-
147
-
148
-
149
-
150
-
151
-
152
-
153
-
154
-
155
-
156
-
157
-
158
-
159
-
160
-
161
-
162
-
163
-
164
-
165
-
166
-
167
-
168
-
169
-
170
-
171
-
172
-
173
-
174
-
175
-
176
-
177
-
178
-
179
-
180
-
181
-
182
-
183
-
184
-
185
-
186
-
187
-
188
-
189
-
190
-
191
-
192
-
193
-
194
-
195
-
196
-
197
-
198
-
199
-
200
-
201
-
202
-
203
-
204
-
205
-
206
-
207
-
208
-
209
-
210
-
211
-
212
-
213
-
214
-
215
-
216
-
217
-
218
-
219
-
220
-
221
-
222
-
223
-
224
-
225
-
226
-
227
-
228
-
229
-
230
-
231
-
232
-
233
-
234
-
235
-
236
-
237
-
238
-
239
-
240
-
241
-
242
-
243
-
244
-
245
-
246
-
247
-
248
-
249
-
250
-
251
-
252
-
253
-
254
-
255
-
256
-
257
-
258
-
259
-
260
-
261
-
262
-
263
-
264
-
265
-
266
-
267
-
268
-
269
-
270
-
271
-
272
-
273
-
274
-
275
-
276
-
277
-
278
-
279
-
280
-
281
-
282
-
283
-
284
-
285
-
286
-
287
-
288
-
289
-
290
-
291
-
292
-
293
-
294
-
295
-
296
-
297
-
298
-
299
-
300
-
301
-
302
-
303
-
304
-
305
-
306
-
307
-
308
-
309
-
310
-
311
-
312
-
313
-
314
-
315
-
316
-
317
-
318
-
319
-
320
-
321
-
322
-
323
-
324
-
325
 |
 |
