Cisco 521SG Administration Guide - Page 81
Initiating Pairing from Your Bluetooth-Enabled Mobile Phone
 |
UPC - 882658248993
View all Cisco 521SG manuals
Add to My Manuals
Save this manual to your list of manuals |
Page 81 highlights
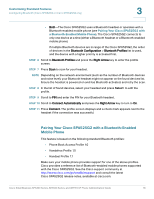
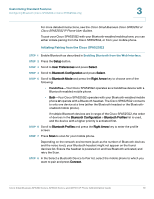
Customizing Standard Features Configuring Bluetooth (Cisco SPA525G or Cisco SPA525G2 only) 3 Initiating Pairing from Your Bluetooth-Enabled Mobile Phone The procedure varies depending on your phone model. The example in this section uses an Apple iPhone. Before starting, it is helpful to find the MAC address of your Cisco SPA525G2 IP phone. From your IP phone, go to the Setup menu and select Status. Select Product Information. The MAC address is displayed. STEP 1 On your iPhone, click Settings. STEP 2 Under General, choose Bluetooth. Ensure Bluetooth is turned on. STEP 3 In the Bluetooth Window, under Devices, find the MAC address of your Cisco SPA525G2 IP phone. STEP 4 Select the MAC address of the Cisco SPA525G2. STEP 5 Enter the PIN (the default is 0000) and press Connect. When paired with your mobile phone, the Cisco SPA525G2 IP phone screen assigns one of your line buttons to the mobile phone. A mobile phone icon with a flashing lightning bolt icon is displayed next to the mobile phone number. To verify the mobile phone configuration: STEP 1 On the Cisco SPA525G2, press the Setup Button. STEP 2 Scroll to User Preferences and press Select. STEP 3 Scroll to Bluetooth Configuration and press Select. STEP 4 Scroll to Bluetooth Profiles and press the Right Arrow key. The mobile phone appears in the list of Bluetooth devices. Cisco Small Business SPA300 Series, SPA500 Series, and WIP310 IP Phone Administration Guide 80
-
 1
1 -
2
-
3
-
4
-
5
-
6
-
7
-
8
-
9
-
10
-
11
-
12
-
13
-
14
-
15
-
16
-
17
-
18
-
19
-
20
-
21
-
22
-
23
-
24
-
25
-
26
-
27
-
28
-
29
-
30
-
31
-
32
-
33
-
34
-
35
-
36
-
37
-
38
-
39
-
40
-
41
-
42
-
43
-
44
-
45
-
46
-
47
-
48
-
49
-
50
-
51
-
52
-
53
-
54
-
55
-
56
-
57
-
58
-
59
-
60
-
61
-
62
-
63
-
64
-
65
-
66
-
67
-
68
-
69
-
70
-
71
-
72
-
73
-
74
-
75
-
 76
76 -
 77
77 -
 78
78 -
 79
79 -
 80
80 -
 81
81 -
 82
82 -
 83
83 -
 84
84 -
 85
85 -
 86
86 -
87
-
88
-
89
-
90
-
91
-
92
-
93
-
94
-
95
-
96
-
97
-
98
-
99
-
100
-
101
-
102
-
103
-
104
-
105
-
106
-
107
-
108
-
109
-
110
-
111
-
112
-
113
-
114
-
115
-
116
-
117
-
118
-
119
-
120
-
121
-
122
-
123
-
124
-
125
-
126
-
127
-
128
-
129
-
130
-
131
-
132
-
133
-
134
-
135
-
136
-
137
-
138
-
139
-
140
-
141
-
142
-
143
-
144
-
145
-
146
-
147
-
148
-
149
-
150
-
151
-
152
-
153
-
154
-
155
-
156
-
157
-
158
-
159
-
160
-
161
-
162
-
163
-
164
-
165
-
166
-
167
-
168
-
169
-
170
-
171
-
172
-
173
-
174
-
175
-
176
-
177
-
178
-
179
-
180
-
181
-
182
-
183
-
184
-
185
-
186
-
187
-
188
-
189
-
190
-
191
-
192
-
193
-
194
-
195
-
196
-
197
-
198
-
199
-
200
-
201
-
202
-
203
-
204
-
205
-
206
-
207
-
208
-
209
-
210
-
211
-
212
-
213
-
214
-
215
-
216
-
217
-
218
-
219
-
220
-
221
-
222
-
223
-
224
-
225
-
226
-
227
-
228
-
229
-
230
-
231
-
232
-
233
-
234
-
235
-
236
-
237
-
238
-
239
-
240
-
241
-
242
-
243
-
244
-
245
-
246
-
247
-
248
-
249
-
250
-
251
-
252
-
253
-
254
-
255
-
256
-
257
-
258
-
259
-
260
-
261
-
262
-
263
-
264
-
265
-
266
-
267
-
268
-
269
-
270
-
271
-
272
-
273
-
274
-
275
-
276
-
277
-
278
-
279
-
280
-
281
-
282
-
283
-
284
-
285
-
286
-
287
-
288
-
289
-
290
-
291
-
292
-
293
-
294
-
295
-
296
-
297
-
298
-
299
-
300
-
301
-
302
-
303
-
304
-
305
-
306
-
307
-
308
-
309
-
310
-
311
-
312
-
313
-
314
-
315
-
316
-
317
-
318
-
319
-
320
-
321
-
322
-
323
-
324
-
325
 |
 |
