Cisco 7921G Administration Guide - Page 108
Creating a Configuration Template, NETWORK PROFILES, BACKUP SETTINGS, Export, Save. - usb cable by
 |
UPC - 882658123108
View all Cisco 7921G manuals
Add to My Manuals
Save this manual to your list of manuals |
Page 108 highlights
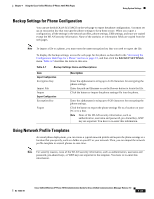
Using System Settings Chapter 4 Using the Cisco Unified Wireless IP Phone 7921G Web Pages Creating a Configuration Template To create a phone configuration template, follow these steps: Procedure Step 1 Step 2 Connect the USB cable to the phone and access the phone's web page using the instructions on "Accessing the Phone Web Page" section on page 4-3. On the phone web page, choose the NETWORK PROFILES menu and configure the Network Profile settings for your template configuration. Note You can leave the Username and Password fields blank so they can be configured individually. Step 3 Step 4 Step 5 Step 6 Step 7 Step 8 Step 9 Next, configure the USB Settings and Trace Settings for your template configuration. Choose the BACKUP SETTINGS menu, to access the export and import settings. In Export Configuration, enter an encryption key of from 8 to 20 characters. Record this key because you must enter this key to import the configuration template on other phones. Click Export and the File Download dialog displays, and then click Save. Designate a new file name for your configuration such as 7921template.cfg. Choose a location on your PC or on the network for the file and then click Save. The encrypted configuration file contains these fields: • Profile Name • SSID • Single Access Point • Call Power Save Mode • 802.11 Mode • WLAN Security • Authentication Method • User name • Password • Passphrase • Encryption keys • Use DHCP to get IP address and DNS servers • Static Settings (if configured) - IP Address - Subnet Mask - Default Router - Primary DNS Server - Secondary DNS Server • Use DHCP to get TFTP Server 4-38 Cisco Unified Wireless IP Phone 7921G Administration Guide for Cisco Unified Communications Manager Release 7.0 OL-15985-01
-
 1
1 -
2
-
3
-
4
-
5
-
6
-
7
-
8
-
9
-
10
-
11
-
12
-
13
-
14
-
15
-
16
-
17
-
18
-
19
-
20
-
21
-
22
-
23
-
24
-
25
-
26
-
27
-
28
-
29
-
30
-
31
-
32
-
33
-
34
-
35
-
36
-
37
-
38
-
39
-
40
-
41
-
42
-
43
-
44
-
45
-
46
-
47
-
48
-
49
-
50
-
51
-
52
-
53
-
54
-
55
-
56
-
57
-
58
-
59
-
60
-
61
-
62
-
63
-
64
-
65
-
66
-
67
-
68
-
69
-
70
-
71
-
72
-
73
-
74
-
75
-
76
-
77
-
78
-
79
-
80
-
81
-
82
-
83
-
84
-
85
-
86
-
87
-
88
-
89
-
90
-
91
-
92
-
93
-
94
-
95
-
96
-
97
-
98
-
99
-
100
-
101
-
102
-
 103
103 -
 104
104 -
 105
105 -
 106
106 -
 107
107 -
 108
108 -
 109
109 -
 110
110 -
 111
111 -
 112
112 -
 113
113 -
114
-
115
-
116
-
117
-
118
-
119
-
120
-
121
-
122
-
123
-
124
-
125
-
126
-
127
-
128
-
129
-
130
-
131
-
132
-
133
-
134
-
135
-
136
-
137
-
138
-
139
-
140
-
141
-
142
-
143
-
144
-
145
-
146
-
147
-
148
-
149
-
150
-
151
-
152
-
153
-
154
-
155
-
156
-
157
-
158
-
159
-
160
-
161
-
162
-
163
-
164
-
165
-
166
-
167
-
168
-
169
-
170
-
171
-
172
-
173
-
174
-
175
-
176
-
177
-
178
-
179
-
180
-
181
-
182
-
183
-
184
-
185
-
186
-
187
-
188
-
189
-
190
-
191
-
192
-
193
-
194
-
195
-
196
-
197
-
198
-
199
-
200
-
201
-
202
-
203
-
204
-
205
-
206
-
207
-
208
-
209
-
210
-
211
-
212
-
213
-
214
-
215
-
216
-
217
-
218
-
219
-
220
-
221
-
222
-
223
-
224
-
225
-
226
-
227
-
228
-
229
-
230
-
231
-
232
-
233
-
234
 |
 |