Cisco 7921G Administration Guide - Page 60
Charging the Phone Using the Power Supply, Assembling and Removing the AC Plug Adapter
 |
UPC - 882658123108
View all Cisco 7921G manuals
Add to My Manuals
Save this manual to your list of manuals |
Page 60 highlights
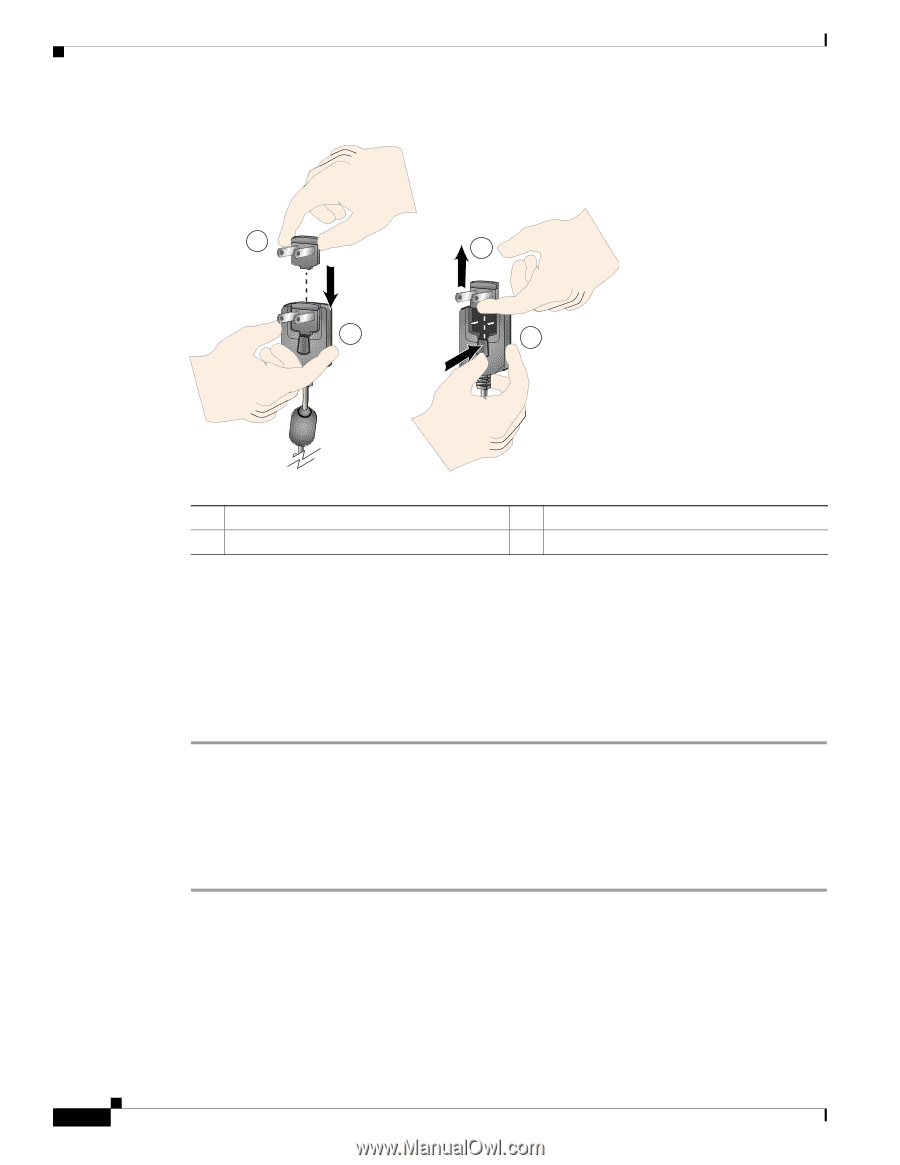
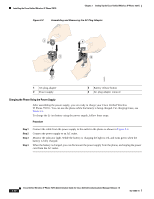
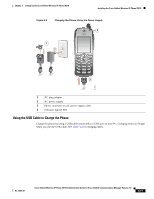
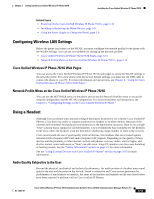
Installing the Cisco Unified Wireless IP Phone 7921G Chapter 3 Setting Up the Cisco Unified Wireless IP Phone 7921G Figure 3-2 Assembling and Removing the AC Plug Adapter 1 2 4 3 180455 1 AC plug adapter 2 Power supply 3 Battery release button 4 AC plug adapter removal Charging the Phone Using the Power Supply After assembling the power supply, you are ready to charge your Cisco Unified Wireless IP Phone 7921G. You can use the phone while the battery is being charged. For charging times, see Table 3-5. To charge the Li-ion battery using the power supply, follow these steps: Procedure Step 1 Step 2 Step 3 Step 4 Connect the cable from the power supply to the outlet in the phone as shown in Figure 3-3. Connect the power supply to an AC outlet. Monitor the indicator light. While the battery is charging the light is red, and turns green when the battery is fully charged. When the battery is charged, you can disconnect the power supply from the phone, and unplug the power cord from the AC outlet. 3-10 Cisco Unified Wireless IP Phone 7921G Administration Guide for Cisco Unified Communications Manager Release 7.0 OL-15985-01
-
 1
1 -
2
-
3
-
4
-
5
-
6
-
7
-
8
-
9
-
10
-
11
-
12
-
13
-
14
-
15
-
16
-
17
-
18
-
19
-
20
-
21
-
22
-
23
-
24
-
25
-
26
-
27
-
28
-
29
-
30
-
31
-
32
-
33
-
34
-
35
-
36
-
37
-
38
-
39
-
40
-
41
-
42
-
43
-
44
-
45
-
46
-
47
-
48
-
49
-
50
-
51
-
52
-
53
-
54
-
 55
55 -
 56
56 -
 57
57 -
 58
58 -
 59
59 -
 60
60 -
 61
61 -
 62
62 -
 63
63 -
 64
64 -
 65
65 -
66
-
67
-
68
-
69
-
70
-
71
-
72
-
73
-
74
-
75
-
76
-
77
-
78
-
79
-
80
-
81
-
82
-
83
-
84
-
85
-
86
-
87
-
88
-
89
-
90
-
91
-
92
-
93
-
94
-
95
-
96
-
97
-
98
-
99
-
100
-
101
-
102
-
103
-
104
-
105
-
106
-
107
-
108
-
109
-
110
-
111
-
112
-
113
-
114
-
115
-
116
-
117
-
118
-
119
-
120
-
121
-
122
-
123
-
124
-
125
-
126
-
127
-
128
-
129
-
130
-
131
-
132
-
133
-
134
-
135
-
136
-
137
-
138
-
139
-
140
-
141
-
142
-
143
-
144
-
145
-
146
-
147
-
148
-
149
-
150
-
151
-
152
-
153
-
154
-
155
-
156
-
157
-
158
-
159
-
160
-
161
-
162
-
163
-
164
-
165
-
166
-
167
-
168
-
169
-
170
-
171
-
172
-
173
-
174
-
175
-
176
-
177
-
178
-
179
-
180
-
181
-
182
-
183
-
184
-
185
-
186
-
187
-
188
-
189
-
190
-
191
-
192
-
193
-
194
-
195
-
196
-
197
-
198
-
199
-
200
-
201
-
202
-
203
-
204
-
205
-
206
-
207
-
208
-
209
-
210
-
211
-
212
-
213
-
214
-
215
-
216
-
217
-
218
-
219
-
220
-
221
-
222
-
223
-
224
-
225
-
226
-
227
-
228
-
229
-
230
-
231
-
232
-
233
-
234
 |
 |