Cisco SPA525G Administration Guide - Page 114
Configuring SIP, SPCP, and NAT, on Send Resp To Src Port
 |
UPC - 882658261688
View all Cisco SPA525G manuals
Add to My Manuals
Save this manual to your list of manuals |
Page 114 highlights
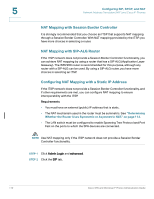
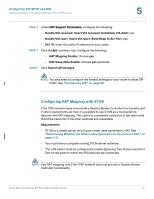
5 Configuring SIP, SPCP, and NAT Network Address Translation (NAT) and Cisco IP Phones STEP 1 Log in to the web administration interface. STEP 2 Click Admin Login and advanced. STEP 3 Click the SIP tab. STEP 4 Under NAT Support Parameters, configure the following: • Handle VIA received: yes • Handle VIA rport: yes • Insert VIA received: yes • Insert VIA rport: yes • Substitute VIA Addr: yes • Send Resp To Src Port: yes • STUN Enable: Choose yes. • STUN Server: Enter the IP address for your STUN server. STEP 5 Click the Ext tab. Configure the following: • NAT Mapping Enable: Choose yes. • NAT Keep Alive Enable: Choose yes (optional). NOTE Your ITSP may require the phone to send NAT keep alive messages to keep the NAT ports open permanently. Check with your ITSP to determine the requirements. STEP 6 Click Submit All Changes. NOTE You also need to configure the firewall settings on your router to allow SIP traffic. See "Configuring SIP," on page 89. 112 Cisco SPA and Wireless IP Phone Administration Guide
-
 1
1 -
2
-
3
-
4
-
5
-
6
-
7
-
8
-
9
-
10
-
11
-
12
-
13
-
14
-
15
-
16
-
17
-
18
-
19
-
20
-
21
-
22
-
23
-
24
-
25
-
26
-
27
-
28
-
29
-
30
-
31
-
32
-
33
-
34
-
35
-
36
-
37
-
38
-
39
-
40
-
41
-
42
-
43
-
44
-
45
-
46
-
47
-
48
-
49
-
50
-
51
-
52
-
53
-
54
-
55
-
56
-
57
-
58
-
59
-
60
-
61
-
62
-
63
-
64
-
65
-
66
-
67
-
68
-
69
-
70
-
71
-
72
-
73
-
74
-
75
-
76
-
77
-
78
-
79
-
80
-
81
-
82
-
83
-
84
-
85
-
86
-
87
-
88
-
89
-
90
-
91
-
92
-
93
-
94
-
95
-
96
-
97
-
98
-
99
-
100
-
101
-
102
-
103
-
104
-
105
-
106
-
107
-
108
-
 109
109 -
 110
110 -
 111
111 -
 112
112 -
 113
113 -
 114
114 -
 115
115 -
 116
116 -
 117
117 -
 118
118 -
 119
119 -
120
-
121
-
122
-
123
-
124
-
125
-
126
-
127
-
128
-
129
-
130
-
131
-
132
-
133
-
134
-
135
-
136
-
137
-
138
-
139
-
140
-
141
-
142
-
143
-
144
-
145
-
146
-
147
-
148
-
149
-
150
-
151
-
152
-
153
-
154
-
155
-
156
-
157
-
158
-
159
-
160
-
161
-
162
-
163
-
164
-
165
-
166
-
167
-
168
-
169
-
170
-
171
-
172
-
173
-
174
-
175
-
176
-
177
-
178
-
179
-
180
-
181
-
182
-
183
-
184
-
185
-
186
-
187
-
188
-
189
-
190
-
191
-
192
-
193
-
194
-
195
-
196
-
197
-
198
-
199
-
200
-
201
-
202
-
203
-
204
-
205
-
206
-
207
-
208
-
209
-
210
-
211
-
212
-
213
-
214
-
215
-
216
-
217
-
218
-
219
-
220
-
221
-
222
-
223
-
224
-
225
-
226
-
227
-
228
-
229
-
230
-
231
-
232
-
233
-
234
-
235
-
236
-
237
-
238
-
239
-
240
-
241
-
242
-
243
-
244
-
245
-
246
-
247
-
248
-
249
-
250
-
251
-
252
-
253
-
254
-
255
-
256
-
257
-
258
-
259
-
260
-
261
-
262
-
263
-
264
-
265
-
266
-
267
-
268
-
269
-
270
-
271
-
272
-
273
-
274
-
275
-
276
-
277
-
278
-
279
-
280
 |
 |