Cisco SPA525G Administration Guide - Page 66
Enabling Secure Call, Customizing Cisco SPA and Wireless IP Phones, Setting Security Features,
 |
UPC - 882658261688
View all Cisco SPA525G manuals
Add to My Manuals
Save this manual to your list of manuals |
Page 66 highlights
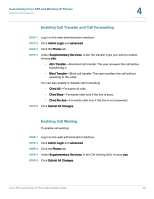
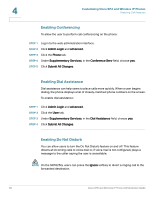
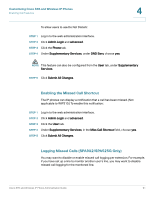
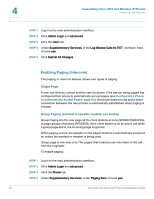
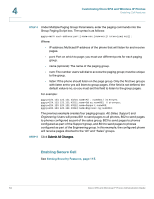
4 Customizing Cisco SPA and Wireless IP Phones Enabling Call Features STEP 4 Under Multiple Paging Group Parameters, enter the paging commands into the Group Paging Script box. The syntax is as follows: pggrp=multicast-address:port;[name=xxx;]num=xxx;[listen={yes|no}]]; Where: • IP address: Multicast IP address of the phone that will listen for and receive pages. • port: Port on which to page; you must use different ports for each paging group. • name (optional): The name of the paging group. • num: The number users will dial to access the paging group; must be unique to the group. • listen: If the phone should listen on the page group. Only the first two groups with listen set to yes will listen to group pages. If the field is not defined, the default value is no, so you must set this field to listen to the group pages. For example: pggrp=224.123.123.121:43210;name=All; num=801;listen=yes; pggrp=224.123.123.121:43211;name=Sales;num=802; listen=yes; pggrp=224.123.123.121:43212;name=Support;num=803; pggrp=224.123.123.121:43213;name=Engineering;num=804; The previous example creates four paging groups: All, Sales, Support, and Engineering. Users will press 801 to send pages to all phones, 802 to send pages to phones configured as part of the sales group, 803 to send pages to phones configured as part of the Support group, and 804 to send pages to phones configured as part of the Engineering group. In this example, the configured phone will receive pages directed to the "All" and "Sales" groups. STEP 5 Click Submit All Changes. Enabling Secure Call See Setting Security Features, page 115. 64 Cisco SPA and Wireless IP Phone Administration Guide
-
 1
1 -
2
-
3
-
4
-
5
-
6
-
7
-
8
-
9
-
10
-
11
-
12
-
13
-
14
-
15
-
16
-
17
-
18
-
19
-
20
-
21
-
22
-
23
-
24
-
25
-
26
-
27
-
28
-
29
-
30
-
31
-
32
-
33
-
34
-
35
-
36
-
37
-
38
-
39
-
40
-
41
-
42
-
43
-
44
-
45
-
46
-
47
-
48
-
49
-
50
-
51
-
52
-
53
-
54
-
55
-
56
-
57
-
58
-
59
-
60
-
 61
61 -
 62
62 -
 63
63 -
 64
64 -
 65
65 -
 66
66 -
 67
67 -
 68
68 -
 69
69 -
 70
70 -
 71
71 -
72
-
73
-
74
-
75
-
76
-
77
-
78
-
79
-
80
-
81
-
82
-
83
-
84
-
85
-
86
-
87
-
88
-
89
-
90
-
91
-
92
-
93
-
94
-
95
-
96
-
97
-
98
-
99
-
100
-
101
-
102
-
103
-
104
-
105
-
106
-
107
-
108
-
109
-
110
-
111
-
112
-
113
-
114
-
115
-
116
-
117
-
118
-
119
-
120
-
121
-
122
-
123
-
124
-
125
-
126
-
127
-
128
-
129
-
130
-
131
-
132
-
133
-
134
-
135
-
136
-
137
-
138
-
139
-
140
-
141
-
142
-
143
-
144
-
145
-
146
-
147
-
148
-
149
-
150
-
151
-
152
-
153
-
154
-
155
-
156
-
157
-
158
-
159
-
160
-
161
-
162
-
163
-
164
-
165
-
166
-
167
-
168
-
169
-
170
-
171
-
172
-
173
-
174
-
175
-
176
-
177
-
178
-
179
-
180
-
181
-
182
-
183
-
184
-
185
-
186
-
187
-
188
-
189
-
190
-
191
-
192
-
193
-
194
-
195
-
196
-
197
-
198
-
199
-
200
-
201
-
202
-
203
-
204
-
205
-
206
-
207
-
208
-
209
-
210
-
211
-
212
-
213
-
214
-
215
-
216
-
217
-
218
-
219
-
220
-
221
-
222
-
223
-
224
-
225
-
226
-
227
-
228
-
229
-
230
-
231
-
232
-
233
-
234
-
235
-
236
-
237
-
238
-
239
-
240
-
241
-
242
-
243
-
244
-
245
-
246
-
247
-
248
-
249
-
250
-
251
-
252
-
253
-
254
-
255
-
256
-
257
-
258
-
259
-
260
-
261
-
262
-
263
-
264
-
265
-
266
-
267
-
268
-
269
-
270
-
271
-
272
-
273
-
274
-
275
-
276
-
277
-
278
-
279
-
280
 |
 |