HP LaserJet Enterprise P3015 HP LaserJet P3010 Series - User Guide - Page 116
Set job storage options, Obtain support and product-status information, Job Storage, Services
 |
View all HP LaserJet Enterprise P3015 manuals
Add to My Manuals
Save this manual to your list of manuals |
Page 116 highlights
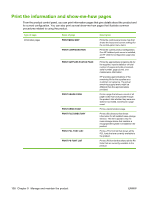
Set job storage options To perform the following tasks, open the printer driver and click the Job Storage tab. How do I Steps to perform Print one copy for proof before printing all the copies In the Job Storage Mode area, click Proof and Hold. The product prints the first copy only. A message appears on the product control panel that prompts you to print the rest of the copies. Temporarily store a private job on the product and print it later a) In the Job Storage Mode area, click Personal Job. b) In the Make Job Private area, enter a 4-digit personal identification number (PIN). Temporarily store a job on the product NOTE: These jobs are deleted if the product is turned off. In the Job Storage Mode area, click Quick Copy. One copy of the job is printed immediately, but you can print more copies from the product control panel. Permanently store a job on the product In the Job Storage Mode area, click Stored Job. Make a permanently stored job private so that anyone who tries to print it must provide a PIN a) In the Job Storage Mode area, click Stored Job. b) In the Make Job Private area, click PIN to print, and then enter a 4digit personal identification number (PIN). Receive notification when someone prints a stored job In the Job Notification Options area, click Display Job ID when printing. Set the user name for a stored job In the User Name area, click User name to use the Windows default user name. To provide a different user name, click Custom and type the name. Specify a name for the stored job a) In the Job Name area, click Automatic to use the default job name. To specify a job name, click Custom and type the name. b) Select an option from the If job name exists dropdown list. Select Use Job Name + (1-99) to add a number to the end of the existing name, or select Replace Existing File to overwrite a job that already has that name. Obtain support and product-status information To perform the following tasks, open the printer driver and click the Services tab. How do I Steps to perform Obtain support information for the product and order supplies In the Internet Services drop-down list, select a support online option, and click Go! Check the status of the product, including the level of supplies Click the Device and Supplies Status icon. The Device Status page of the HP embedded Web server opens. 104 Chapter 8 Print tasks ENWW
-
 1
1 -
2
-
3
-
4
-
5
-
6
-
7
-
8
-
9
-
10
-
11
-
12
-
13
-
14
-
15
-
16
-
17
-
18
-
19
-
20
-
21
-
22
-
23
-
24
-
25
-
26
-
27
-
28
-
29
-
30
-
31
-
32
-
33
-
34
-
35
-
36
-
37
-
38
-
39
-
40
-
41
-
42
-
43
-
44
-
45
-
46
-
47
-
48
-
49
-
50
-
51
-
52
-
53
-
54
-
55
-
56
-
57
-
58
-
59
-
60
-
61
-
62
-
63
-
64
-
65
-
66
-
67
-
68
-
69
-
70
-
71
-
72
-
73
-
74
-
75
-
76
-
77
-
78
-
79
-
80
-
81
-
82
-
83
-
84
-
85
-
86
-
87
-
88
-
89
-
90
-
91
-
92
-
93
-
94
-
95
-
96
-
97
-
98
-
99
-
100
-
101
-
102
-
103
-
104
-
105
-
106
-
107
-
108
-
109
-
110
-
 111
111 -
 112
112 -
 113
113 -
 114
114 -
 115
115 -
 116
116 -
 117
117 -
 118
118 -
 119
119 -
 120
120 -
 121
121 -
122
-
123
-
124
-
125
-
126
-
127
-
128
-
129
-
130
-
131
-
132
-
133
-
134
-
135
-
136
-
137
-
138
-
139
-
140
-
141
-
142
-
143
-
144
-
145
-
146
-
147
-
148
-
149
-
150
-
151
-
152
-
153
-
154
-
155
-
156
-
157
-
158
-
159
-
160
-
161
-
162
-
163
-
164
-
165
-
166
-
167
-
168
-
169
-
170
-
171
-
172
-
173
-
174
-
175
-
176
-
177
-
178
-
179
-
180
-
181
-
182
-
183
-
184
-
185
-
186
-
187
-
188
-
189
-
190
-
191
-
192
-
193
-
194
-
195
-
196
-
197
-
198
-
199
-
200
-
201
-
202
-
203
-
204
-
205
-
206
-
207
-
208
-
209
-
210
-
211
-
212
-
213
-
214
-
215
-
216
-
217
-
218
-
219
-
220
-
221
-
222
-
223
-
224
-
225
-
226
-
227
-
228
-
229
-
230
-
231
-
232
-
233
-
234
-
235
-
236
-
237
-
238
-
239
-
240
-
241
-
242
-
243
-
244
-
245
-
246
 |
 |
