HP LaserJet Enterprise P3015 HP LaserJet P3010 Series - User Guide - Page 99
Con trays, Con a tray when loading paper, Con a tray to match print job settings
 |
View all HP LaserJet Enterprise P3015 manuals
Add to My Manuals
Save this manual to your list of manuals |
Page 99 highlights
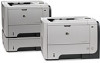
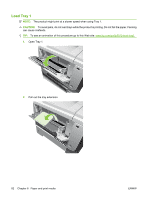
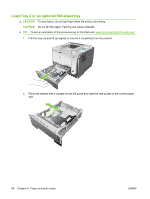
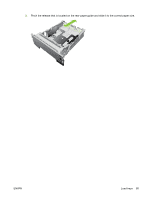
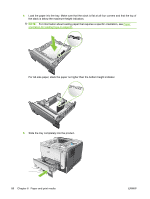
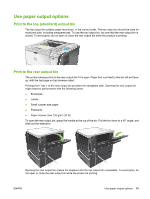
Configure trays NOTE: If you have used other HP LaserJet product models, you might be accustomed to configuring Tray 1 to First mode or Cassette mode. For this product, setting TRAY 1 SIZE to the ANY SIZE setting and setting TRAY 1 TYPE to ANY TYPE is equivalent to First mode. Setting TRAY 1 SIZE and TRAY 1 TYPE to any other settings is equivalent to Cassette mode. The product automatically prompts you to configure a tray for type and size in the following situations: ● When you load paper into the tray ● When you specify a particular tray or paper type for a print job through the printer driver or a software program and the tray is not configured to match the print-job's settings The following message appears on the control panel: TRAY [TYPE] [SIZE] To change size or type press OK. To accept settings press . NOTE: The prompt does not appear if you are printing from Tray 1, and it is configured for the ANY SIZE and ANY TYPE settings. Configure a tray when loading paper 1. Load paper in the tray. Close the tray if you are using Tray 2, 3, or 4. 2. The tray configuration message appears. 3. Press the back arrow to accept the size and type, or press the OK button to choose a different paper size or paper type. 4. To modify the tray size configuration, press the down arrow to highlight the correct size, and then press the OK button. 5. To modify the tray type configuration, press the down arrow to highlight the correct type, and then press the OK button. Configure a tray to match print job settings 1. In the software program, specify the source tray, the paper size, and the paper type, and then click Print. 2. If the tray needs to be configured, the LOAD TRAY [TYPE] [SIZE] message appears. 3. Load the tray with the specified type and size of paper, and then close the tray. 4. When the TRAY SIZE = message appears, press the OK button to confirm the size. To specify a custom size, first press the down arrow to highlight the correct unit of measure. Use the up or down arrows to set the X and Y dimensions, and then press the OK button. 5. When the TRAY TYPE= message appears, press the OK button to confirm the type and continue with the job. Configure a tray by using the Paper Handling menu 1. Press the Menu button . 2. Press the down arrow to highlight the PAPER HANDLING menu, and then press the OK button. ENWW Configure trays 87
-
 1
1 -
2
-
3
-
4
-
5
-
6
-
7
-
8
-
9
-
10
-
11
-
12
-
13
-
14
-
15
-
16
-
17
-
18
-
19
-
20
-
21
-
22
-
23
-
24
-
25
-
26
-
27
-
28
-
29
-
30
-
31
-
32
-
33
-
34
-
35
-
36
-
37
-
38
-
39
-
40
-
41
-
42
-
43
-
44
-
45
-
46
-
47
-
48
-
49
-
50
-
51
-
52
-
53
-
54
-
55
-
56
-
57
-
58
-
59
-
60
-
61
-
62
-
63
-
64
-
65
-
66
-
67
-
68
-
69
-
70
-
71
-
72
-
73
-
74
-
75
-
76
-
77
-
78
-
79
-
80
-
81
-
82
-
83
-
84
-
85
-
86
-
87
-
88
-
89
-
90
-
91
-
92
-
93
-
 94
94 -
 95
95 -
 96
96 -
 97
97 -
 98
98 -
 99
99 -
 100
100 -
 101
101 -
 102
102 -
 103
103 -
 104
104 -
105
-
106
-
107
-
108
-
109
-
110
-
111
-
112
-
113
-
114
-
115
-
116
-
117
-
118
-
119
-
120
-
121
-
122
-
123
-
124
-
125
-
126
-
127
-
128
-
129
-
130
-
131
-
132
-
133
-
134
-
135
-
136
-
137
-
138
-
139
-
140
-
141
-
142
-
143
-
144
-
145
-
146
-
147
-
148
-
149
-
150
-
151
-
152
-
153
-
154
-
155
-
156
-
157
-
158
-
159
-
160
-
161
-
162
-
163
-
164
-
165
-
166
-
167
-
168
-
169
-
170
-
171
-
172
-
173
-
174
-
175
-
176
-
177
-
178
-
179
-
180
-
181
-
182
-
183
-
184
-
185
-
186
-
187
-
188
-
189
-
190
-
191
-
192
-
193
-
194
-
195
-
196
-
197
-
198
-
199
-
200
-
201
-
202
-
203
-
204
-
205
-
206
-
207
-
208
-
209
-
210
-
211
-
212
-
213
-
214
-
215
-
216
-
217
-
218
-
219
-
220
-
221
-
222
-
223
-
224
-
225
-
226
-
227
-
228
-
229
-
230
-
231
-
232
-
233
-
234
-
235
-
236
-
237
-
238
-
239
-
240
-
241
-
242
-
243
-
244
-
245
-
246
 |
 |