HP LaserJet Enterprise P3015 HP LaserJet P3010 Series - User Guide - Page 141
Reinstall the right-side panel. Align the tabs on the panel with the slots in the product, and push
 |
View all HP LaserJet Enterprise P3015 manuals
Add to My Manuals
Save this manual to your list of manuals |
Page 141 highlights
XOXOXXOOXXOOXXOOXXOOXOXXOOXXOOXOXO XOXXOOXXXOOOXXXOOOXXOOXO XOXOXO XOXOXO XOXXOOXXXOOOXXXXOOOOXXXOOOXXOOXO XOXOXO OXIXO OXIXO OXIXO OXIXO XIOXIOXIXO XIOXIOXIXO XIOXIOXIXO XIOXIOXIXO XIOXIO XOXOXO XIOXIO XIOXIO XIOXIO 7. Push down on the DIMM until both latches engage the DIMM. NOTE: If you have difficulty inserting the DIMM, make sure the notch on the bottom of the DIMM is aligned with the bar in the slot. If the DIMM still does not go in, make sure you are using the correct type of DIMM. 8. Reinstall the right-side panel. Align the tabs on the panel with the slots in the product, and push the panel toward the front of the product until it latches into place. 1 2 ENWW Install memory, internal USB devices, and external I/O cards 129
-
 1
1 -
2
-
3
-
4
-
5
-
6
-
7
-
8
-
9
-
10
-
11
-
12
-
13
-
14
-
15
-
16
-
17
-
18
-
19
-
20
-
21
-
22
-
23
-
24
-
25
-
26
-
27
-
28
-
29
-
30
-
31
-
32
-
33
-
34
-
35
-
36
-
37
-
38
-
39
-
40
-
41
-
42
-
43
-
44
-
45
-
46
-
47
-
48
-
49
-
50
-
51
-
52
-
53
-
54
-
55
-
56
-
57
-
58
-
59
-
60
-
61
-
62
-
63
-
64
-
65
-
66
-
67
-
68
-
69
-
70
-
71
-
72
-
73
-
74
-
75
-
76
-
77
-
78
-
79
-
80
-
81
-
82
-
83
-
84
-
85
-
86
-
87
-
88
-
89
-
90
-
91
-
92
-
93
-
94
-
95
-
96
-
97
-
98
-
99
-
100
-
101
-
102
-
103
-
104
-
105
-
106
-
107
-
108
-
109
-
110
-
111
-
112
-
113
-
114
-
115
-
116
-
117
-
118
-
119
-
120
-
121
-
122
-
123
-
124
-
125
-
126
-
127
-
128
-
129
-
130
-
131
-
132
-
133
-
134
-
135
-
 136
136 -
 137
137 -
 138
138 -
 139
139 -
 140
140 -
 141
141 -
 142
142 -
 143
143 -
 144
144 -
 145
145 -
 146
146 -
147
-
148
-
149
-
150
-
151
-
152
-
153
-
154
-
155
-
156
-
157
-
158
-
159
-
160
-
161
-
162
-
163
-
164
-
165
-
166
-
167
-
168
-
169
-
170
-
171
-
172
-
173
-
174
-
175
-
176
-
177
-
178
-
179
-
180
-
181
-
182
-
183
-
184
-
185
-
186
-
187
-
188
-
189
-
190
-
191
-
192
-
193
-
194
-
195
-
196
-
197
-
198
-
199
-
200
-
201
-
202
-
203
-
204
-
205
-
206
-
207
-
208
-
209
-
210
-
211
-
212
-
213
-
214
-
215
-
216
-
217
-
218
-
219
-
220
-
221
-
222
-
223
-
224
-
225
-
226
-
227
-
228
-
229
-
230
-
231
-
232
-
233
-
234
-
235
-
236
-
237
-
238
-
239
-
240
-
241
-
242
-
243
-
244
-
245
-
246
 |
 |
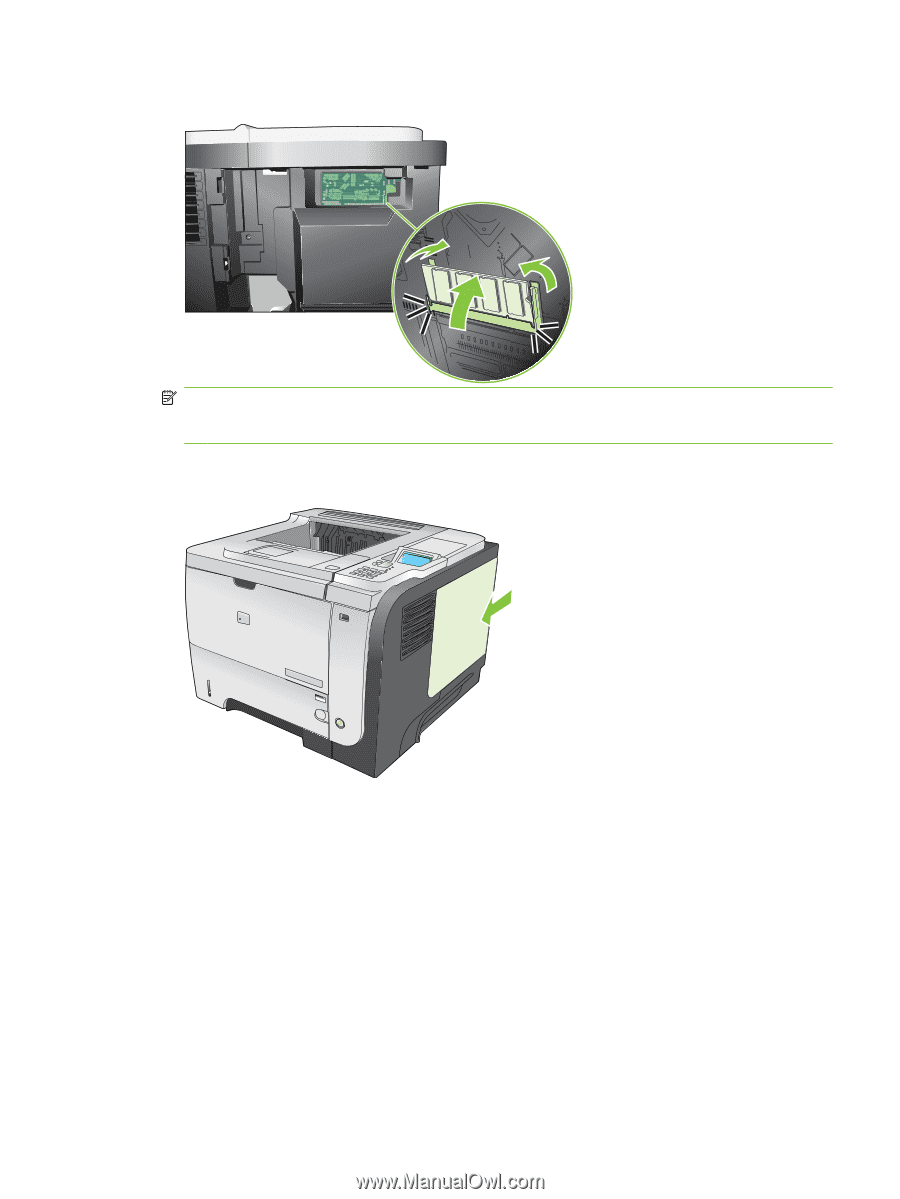
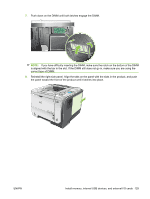
7.
Push down on the DIMM until both latches engage the DIMM.
NOTE:
If you have difficulty inserting the DIMM, make sure the notch on the bottom of the DIMM
is aligned with the bar in the slot. If the DIMM still does not go in, make sure you are using the
correct type of DIMM.
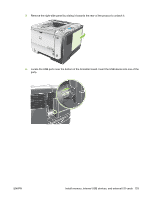
8.
Reinstall the right-side panel. Align the tabs on the panel with the slots in the product, and push
the panel toward the front of the product until it latches into place.
2
1
ENWW
Install memory, internal USB devices, and external I/O cards
129