HP LaserJet Enterprise P3015 HP LaserJet P3010 Series - User Guide - Page 28
Retrieve job menu, To display
 |
View all HP LaserJet Enterprise P3015 manuals
Add to My Manuals
Save this manual to your list of manuals |
Page 28 highlights
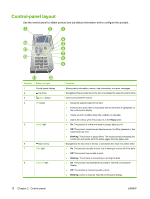
Retrieve job menu Use the RETRIEVE JOB menu to view listings of all stored jobs. To display: Press the Menu button , and then select the RETRIEVE JOB menu. Item Sub-item Options ALL JOBS (WITH PIN) PRINT PRINT AND DELETE DELETE ALL JOBS (NO PIN) PRINT PRINT AND DELETE DELETE PRINT PRINT AND DELETE DELETE Description Each user who has stored jobs is listed by name. Select the appropriate user name to see a list of stored jobs. This message appears if a user has two or more stored jobs that require a PIN. Either the PRINT option or the PRINT AND DELETE option displays, depending on the type of jobs listed. Use the COPIES option to specify the number of copies of the job to print. This message appears if a user has two or more stored jobs that do not require a PIN. Either the PRINT option or the PRINT AND DELETE option displays, depending on the type of jobs listed. Use the COPIES option to specify the number of copies of the job to print. Each job is listed by name. Either the PRINT option or the PRINT AND DELETE option displays, depending on the type of jobs listed. Use the COPIES option to specify the number of copies of the job to print. 16 Chapter 2 Control panel ENWW
-
 1
1 -
2
-
3
-
4
-
5
-
6
-
7
-
8
-
9
-
10
-
11
-
12
-
13
-
14
-
15
-
16
-
17
-
18
-
19
-
20
-
21
-
22
-
 23
23 -
 24
24 -
 25
25 -
 26
26 -
 27
27 -
 28
28 -
 29
29 -
 30
30 -
 31
31 -
 32
32 -
 33
33 -
34
-
35
-
36
-
37
-
38
-
39
-
40
-
41
-
42
-
43
-
44
-
45
-
46
-
47
-
48
-
49
-
50
-
51
-
52
-
53
-
54
-
55
-
56
-
57
-
58
-
59
-
60
-
61
-
62
-
63
-
64
-
65
-
66
-
67
-
68
-
69
-
70
-
71
-
72
-
73
-
74
-
75
-
76
-
77
-
78
-
79
-
80
-
81
-
82
-
83
-
84
-
85
-
86
-
87
-
88
-
89
-
90
-
91
-
92
-
93
-
94
-
95
-
96
-
97
-
98
-
99
-
100
-
101
-
102
-
103
-
104
-
105
-
106
-
107
-
108
-
109
-
110
-
111
-
112
-
113
-
114
-
115
-
116
-
117
-
118
-
119
-
120
-
121
-
122
-
123
-
124
-
125
-
126
-
127
-
128
-
129
-
130
-
131
-
132
-
133
-
134
-
135
-
136
-
137
-
138
-
139
-
140
-
141
-
142
-
143
-
144
-
145
-
146
-
147
-
148
-
149
-
150
-
151
-
152
-
153
-
154
-
155
-
156
-
157
-
158
-
159
-
160
-
161
-
162
-
163
-
164
-
165
-
166
-
167
-
168
-
169
-
170
-
171
-
172
-
173
-
174
-
175
-
176
-
177
-
178
-
179
-
180
-
181
-
182
-
183
-
184
-
185
-
186
-
187
-
188
-
189
-
190
-
191
-
192
-
193
-
194
-
195
-
196
-
197
-
198
-
199
-
200
-
201
-
202
-
203
-
204
-
205
-
206
-
207
-
208
-
209
-
210
-
211
-
212
-
213
-
214
-
215
-
216
-
217
-
218
-
219
-
220
-
221
-
222
-
223
-
224
-
225
-
226
-
227
-
228
-
229
-
230
-
231
-
232
-
233
-
234
-
235
-
236
-
237
-
238
-
239
-
240
-
241
-
242
-
243
-
244
-
245
-
246
 |
 |
