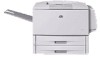
HP Q7699A HP LaserJet 9040/9050 - User Guide - Page 17
Layout and basic operation of the control panel, Callout, number, Button, Function
 |
View all HP Q7699A manuals
Add to My Manuals
Save this manual to your list of manuals |
Page 17 highlights
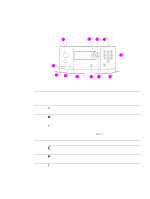
Layout and basic operation of the control panel The control panel includes three light-emitting diode (LED) indicator lights, four navigation buttons, dedicated Help, two job-specific buttons, a numeric keypad, and a graphical display (capable of showing up to four lines of text). 1 12 13 14 112 111 110 19 15 18 17 16 Callout Button number Function 1 MENU Enters or exits the menus. 2 Backs up one step from a selection or from a keypad entry. (Back Arrow) 3 Navigates to the previous item in the list. (Up Arrow) 4 ● Saves the selected value for that item. An asterisk ( * ) appears next (SELECT) to the selection, indicating that it is the new default. Default settings remain when the printer is turned off or is reset (unless you reset all factory defaults from the Resets menu). ● Prints one of the printer information pages from the control panel. 5 NUMERIC KEYPAD Can be used to specify numeric values. 6 (Clear) Returns a numeric entry to its default value. 7 Navigates to the next item in the list. (Down Arrow) 8 (Help) Gets help about the message that currently appears. ENWW Layout and basic operation of the control panel 15
-
 1
1 -
2
-
3
-
4
-
5
-
6
-
7
-
8
-
9
-
10
-
11
-
 12
12 -
 13
13 -
 14
14 -
 15
15 -
 16
16 -
 17
17 -
 18
18 -
 19
19 -
 20
20 -
 21
21 -
 22
22 -
23
-
24
-
25
-
26
-
27
-
28
-
29
-
30
-
31
-
32
-
33
-
34
-
35
-
36
-
37
-
38
-
39
-
40
-
41
-
42
-
43
-
44
-
45
-
46
-
47
-
48
-
49
-
50
-
51
-
52
-
53
-
54
-
55
-
56
-
57
-
58
-
59
-
60
-
61
-
62
-
63
-
64
-
65
-
66
-
67
-
68
-
69
-
70
-
71
-
72
-
73
-
74
-
75
-
76
-
77
-
78
-
79
-
80
-
81
-
82
-
83
-
84
-
85
-
86
-
87
-
88
-
89
-
90
-
91
-
92
-
93
-
94
-
95
-
96
-
97
-
98
-
99
-
100
-
101
-
102
-
103
-
104
-
105
-
106
-
107
-
108
-
109
-
110
-
111
-
112
-
113
-
114
-
115
-
116
-
117
-
118
-
119
-
120
-
121
-
122
-
123
-
124
-
125
-
126
-
127
-
128
-
129
-
130
-
131
-
132
-
133
-
134
-
135
-
136
-
137
-
138
-
139
-
140
-
141
-
142
-
143
-
144
-
145
-
146
-
147
-
148
-
149
-
150
-
151
-
152
-
153
-
154
-
155
-
156
-
157
-
158
-
159
-
160
-
161
-
162
-
163
-
164
-
165
-
166
-
167
-
168
-
169
-
170
-
171
-
172
-
173
-
174
-
175
-
176
-
177
-
178
-
179
-
180
-
181
-
182
-
183
-
184
-
185
-
186
-
187
-
188
-
189
-
190
-
191
-
192
-
193
-
194
-
195
-
196
-
197
-
198
-
199
-
200
-
201
-
202
-
203
-
204
-
205
-
206
-
207
-
208
-
209
-
210
-
211
-
212
-
213
-
214
-
215
-
216
-
217
-
218
 |
 |
