HP Q7699A HP LaserJet 9040/9050 - User Guide - Page 59
Printing envelopes, To load envelopes in optional Tray 1
 |
View all HP Q7699A manuals
Add to My Manuals
Save this manual to your list of manuals |
Page 59 highlights
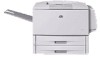
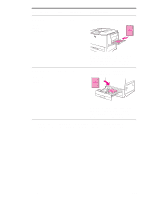
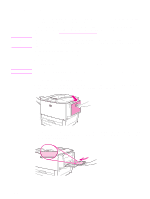
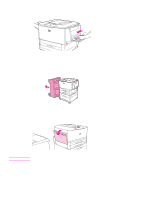
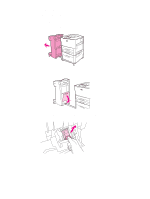
Printing envelopes CAUTION Note You can print on envelopes by using optional Tray 1, which holds up to 10 envelopes. Many types of envelopes can be printed on from optional Tray 1. Printing performance depends on the construction of the envelope. Always test a few sample envelopes before purchasing a large quantity. For envelope specifications, see Paper specifications or go to www.hp.com/support/lj905_lj9040. Envelopes with clasps, snaps, windows, coated linings, exposed self-stick adhesives, or other synthetic materials can severely damage the printer. Do not use envelopes with pressure-sensitive adhesive. The basic steps for printing envelopes are: 1 Move the fuser levers. See To change the fuser levers. 2 Load the envelopes. See To load envelopes in optional Tray 1. 3 Send the print job. See To print envelopes from a program. If envelopes are wrinkled when printed, see Preventing wrinkles on envelopes for instructions. To load envelopes in optional Tray 1 1 Open optional Tray 1, but do not pull out the extension. (Most envelopes feed best without the extension. However, oversize envelopes might need the extension.) 2 Load up to 10 envelopes in the center of optional Tray 1 with the side to be printed on facing up, and the postage end toward the printer. Slide the envelopes into the printer as far as they will go without forcing them. ENWW Printing envelopes 57
-
 1
1 -
2
-
3
-
4
-
5
-
6
-
7
-
8
-
9
-
10
-
11
-
12
-
13
-
14
-
15
-
16
-
17
-
18
-
19
-
20
-
21
-
22
-
23
-
24
-
25
-
26
-
27
-
28
-
29
-
30
-
31
-
32
-
33
-
34
-
35
-
36
-
37
-
38
-
39
-
40
-
41
-
42
-
43
-
44
-
45
-
46
-
47
-
48
-
49
-
50
-
51
-
52
-
53
-
 54
54 -
 55
55 -
 56
56 -
 57
57 -
 58
58 -
 59
59 -
 60
60 -
 61
61 -
 62
62 -
 63
63 -
 64
64 -
65
-
66
-
67
-
68
-
69
-
70
-
71
-
72
-
73
-
74
-
75
-
76
-
77
-
78
-
79
-
80
-
81
-
82
-
83
-
84
-
85
-
86
-
87
-
88
-
89
-
90
-
91
-
92
-
93
-
94
-
95
-
96
-
97
-
98
-
99
-
100
-
101
-
102
-
103
-
104
-
105
-
106
-
107
-
108
-
109
-
110
-
111
-
112
-
113
-
114
-
115
-
116
-
117
-
118
-
119
-
120
-
121
-
122
-
123
-
124
-
125
-
126
-
127
-
128
-
129
-
130
-
131
-
132
-
133
-
134
-
135
-
136
-
137
-
138
-
139
-
140
-
141
-
142
-
143
-
144
-
145
-
146
-
147
-
148
-
149
-
150
-
151
-
152
-
153
-
154
-
155
-
156
-
157
-
158
-
159
-
160
-
161
-
162
-
163
-
164
-
165
-
166
-
167
-
168
-
169
-
170
-
171
-
172
-
173
-
174
-
175
-
176
-
177
-
178
-
179
-
180
-
181
-
182
-
183
-
184
-
185
-
186
-
187
-
188
-
189
-
190
-
191
-
192
-
193
-
194
-
195
-
196
-
197
-
198
-
199
-
200
-
201
-
202
-
203
-
204
-
205
-
206
-
207
-
208
-
209
-
210
-
211
-
212
-
213
-
214
-
215
-
216
-
217
-
218
 |
 |