HP Q7699A HP LaserJet 9040/9050 - User Guide - Page 67
damage the finisher., On the empty staple cartridge
 |
View all HP Q7699A manuals
Add to My Manuals
Save this manual to your list of manuals |
Page 67 highlights
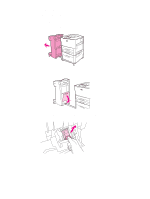
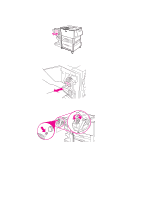
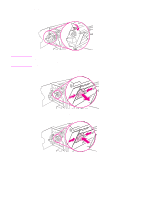
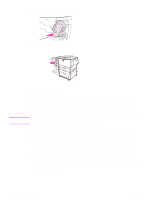
4 Turn the small green knob at the top of the stapler unit clockwise until the staple cartridge moves to the left of the stapler unit. CAUTION The blue dot must appear in the window of the stapler-unit before you remove the staple cartridge. If you try to remove the staple cartridge before the blue dot appears in the window, you could damage the finisher. 5 On the empty staple cartridge, squeeze the tabs together and pull the empty cartridge out. 6 Insert the new staple cartridge so that it locks into place. ENWW Using the optional multifunction finisher 65
-
 1
1 -
2
-
3
-
4
-
5
-
6
-
7
-
8
-
9
-
10
-
11
-
12
-
13
-
14
-
15
-
16
-
17
-
18
-
19
-
20
-
21
-
22
-
23
-
24
-
25
-
26
-
27
-
28
-
29
-
30
-
31
-
32
-
33
-
34
-
35
-
36
-
37
-
38
-
39
-
40
-
41
-
42
-
43
-
44
-
45
-
46
-
47
-
48
-
49
-
50
-
51
-
52
-
53
-
54
-
55
-
56
-
57
-
58
-
59
-
60
-
61
-
 62
62 -
 63
63 -
 64
64 -
 65
65 -
 66
66 -
 67
67 -
 68
68 -
 69
69 -
 70
70 -
 71
71 -
 72
72 -
73
-
74
-
75
-
76
-
77
-
78
-
79
-
80
-
81
-
82
-
83
-
84
-
85
-
86
-
87
-
88
-
89
-
90
-
91
-
92
-
93
-
94
-
95
-
96
-
97
-
98
-
99
-
100
-
101
-
102
-
103
-
104
-
105
-
106
-
107
-
108
-
109
-
110
-
111
-
112
-
113
-
114
-
115
-
116
-
117
-
118
-
119
-
120
-
121
-
122
-
123
-
124
-
125
-
126
-
127
-
128
-
129
-
130
-
131
-
132
-
133
-
134
-
135
-
136
-
137
-
138
-
139
-
140
-
141
-
142
-
143
-
144
-
145
-
146
-
147
-
148
-
149
-
150
-
151
-
152
-
153
-
154
-
155
-
156
-
157
-
158
-
159
-
160
-
161
-
162
-
163
-
164
-
165
-
166
-
167
-
168
-
169
-
170
-
171
-
172
-
173
-
174
-
175
-
176
-
177
-
178
-
179
-
180
-
181
-
182
-
183
-
184
-
185
-
186
-
187
-
188
-
189
-
190
-
191
-
192
-
193
-
194
-
195
-
196
-
197
-
198
-
199
-
200
-
201
-
202
-
203
-
204
-
205
-
206
-
207
-
208
-
209
-
210
-
211
-
212
-
213
-
214
-
215
-
216
-
217
-
218
 |
 |

ENWW
Using the optional multifunction finisher
65
4
Turn the small green knob at the top of the stapler unit clockwise until the staple cartridge
moves to the left of the stapler unit.
CAUTION
The blue dot must appear in the window of the stapler-unit before you remove the staple cartridge.
If you try to remove the staple cartridge before the blue dot appears in the window, you could
damage the finisher.
5
On the empty staple cartridge, squeeze the tabs together and pull the empty cartridge out.
6
Insert the new staple cartridge so that it locks into place.