HP Q7699A HP LaserJet 9040/9050 - User Guide - Page 46
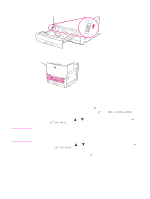
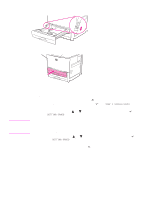
Set the Custom/Standard switch to Custom
 |
View all HP Q7699A manuals
Add to My Manuals
Save this manual to your list of manuals |
Page 46 highlights
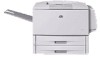
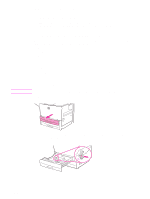
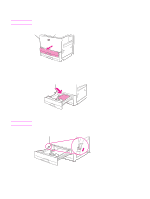
7 Set the Custom/Standard switch to Custom. 8 Close the tray. Note 9 Look at the control panel within a few seconds of closing the tray. (Open and close the tray if the time has already elapsed.) The control panel indicates the tray size and type settings. Complete one of the following actions: • If the size and type settings are correct, press to accept the settings. • If the size and type settings are not correct, press . The TRAY X SIZE=* menu appears. 10 To change the size setting, use or to scroll to the correct size and then press . The message SETTING SAVED appears for a moment, and then the tray type menu appears. Depending on the size that you selected, the printer might prompt you to move the Custom/ Standard switch in the tray to another position. The printer might also prompt you to move the paper guides. Follow the instructions on the control panel, close the tray, and then repeat this procedure starting with step 9. 11 To change the type setting, use or to scroll to the correct type and then press . The message SETTING SAVED appears for a moment, and then the current size and type settings appear. 12 If the size and type settings are correct, press use. to accept the settings. The tray is ready to 44 Chapter 2 Printing tasks ENWW
-
 1
1 -
2
-
3
-
4
-
5
-
6
-
7
-
8
-
9
-
10
-
11
-
12
-
13
-
14
-
15
-
16
-
17
-
18
-
19
-
20
-
21
-
22
-
23
-
24
-
25
-
26
-
27
-
28
-
29
-
30
-
31
-
32
-
33
-
34
-
35
-
36
-
37
-
38
-
39
-
40
-
 41
41 -
 42
42 -
 43
43 -
 44
44 -
 45
45 -
 46
46 -
 47
47 -
 48
48 -
 49
49 -
 50
50 -
 51
51 -
52
-
53
-
54
-
55
-
56
-
57
-
58
-
59
-
60
-
61
-
62
-
63
-
64
-
65
-
66
-
67
-
68
-
69
-
70
-
71
-
72
-
73
-
74
-
75
-
76
-
77
-
78
-
79
-
80
-
81
-
82
-
83
-
84
-
85
-
86
-
87
-
88
-
89
-
90
-
91
-
92
-
93
-
94
-
95
-
96
-
97
-
98
-
99
-
100
-
101
-
102
-
103
-
104
-
105
-
106
-
107
-
108
-
109
-
110
-
111
-
112
-
113
-
114
-
115
-
116
-
117
-
118
-
119
-
120
-
121
-
122
-
123
-
124
-
125
-
126
-
127
-
128
-
129
-
130
-
131
-
132
-
133
-
134
-
135
-
136
-
137
-
138
-
139
-
140
-
141
-
142
-
143
-
144
-
145
-
146
-
147
-
148
-
149
-
150
-
151
-
152
-
153
-
154
-
155
-
156
-
157
-
158
-
159
-
160
-
161
-
162
-
163
-
164
-
165
-
166
-
167
-
168
-
169
-
170
-
171
-
172
-
173
-
174
-
175
-
176
-
177
-
178
-
179
-
180
-
181
-
182
-
183
-
184
-
185
-
186
-
187
-
188
-
189
-
190
-
191
-
192
-
193
-
194
-
195
-
196
-
197
-
198
-
199
-
200
-
201
-
202
-
203
-
204
-
205
-
206
-
207
-
208
-
209
-
210
-
211
-
212
-
213
-
214
-
215
-
216
-
217
-
218
 |
 |