IBM 8840 Hardware Maintenance Manual - Page 40
Working, adapters
 |
UPC - 000435863799
View all IBM 8840 manuals
Add to My Manuals
Save this manual to your list of manuals |
Page 40 highlights
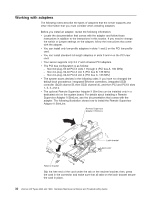
Working with adapters The following notes describe the types of adapters that the server supports and other information that you must consider when installing adapters: Before you install an adapter, review the following information: v Locate the documentation that comes with the adapter and follow those instructions in addition to the instructions in this section. If you need to change the switch or jumper settings on the adapter, follow the instructions that come with the adapter. v You can install only low-profile adapters in slots 1 and 2 on the PCI low-profile card. v You can install standard full-length adapters in slots 3 and 4 on the PCI riser card. v Your server supports only 3.3 V and universal PCI adapters. v The PCI bus configuration is as follows: - Non-hot-plug, 64-bit PCI-X slots 1 through 2 (PCI bus A, 100 MHz) - Non-hot-plug, 64-bit PCI-X slot 3 (PCI bus B, 133 MHz) - Non-hot-plug, 64-bit PCI-X slot 4 (PCI bus C, 133 MHz) v The system scans devices in the following order, if you have not changed the default boot precedence: integrated Ethernet controllers, integrated SCSI controller (SCSI channel B, then SCSI channel A), and then PCI and PCI-X slots 1, 2, 3, and 4. v The optional Remote Supervisor Adapter II SlimLine can be installed only in a dedicated slot on the system board. For details about installing a Remote Supervisor Adapter II SlimLine, see the documentation that comes with the adapter. The following illustration shows how to install the Remote Supervisor Adapter II SlimLine. Remote Supervisor Adapter II SlimLine Latch bracket Connector Retainer bracket Slip the free end of the card under the tab on the retainer bracket; then, press the card in the connector and make sure that all tabs on the latch bracket secure the card in place. 30 xSeries 346 Types 8840 and 1880: Hardware Maintenance Manual and Troubleshooting Guide
-
 1
1 -
2
-
3
-
4
-
5
-
6
-
7
-
8
-
9
-
10
-
11
-
12
-
13
-
14
-
15
-
16
-
17
-
18
-
19
-
20
-
21
-
22
-
23
-
24
-
25
-
26
-
27
-
28
-
29
-
30
-
31
-
32
-
33
-
34
-
 35
35 -
 36
36 -
 37
37 -
 38
38 -
 39
39 -
 40
40 -
 41
41 -
 42
42 -
 43
43 -
 44
44 -
 45
45 -
46
-
47
-
48
-
49
-
50
-
51
-
52
-
53
-
54
-
55
-
56
-
57
-
58
-
59
-
60
-
61
-
62
-
63
-
64
-
65
-
66
-
67
-
68
-
69
-
70
-
71
-
72
-
73
-
74
-
75
-
76
-
77
-
78
-
79
-
80
-
81
-
82
-
83
-
84
-
85
-
86
-
87
-
88
-
89
-
90
-
91
-
92
-
93
-
94
-
95
-
96
-
97
-
98
-
99
-
100
-
101
-
102
-
103
-
104
-
105
-
106
-
107
-
108
-
109
-
110
-
111
-
112
-
113
-
114
-
115
-
116
-
117
-
118
-
119
-
120
-
121
-
122
-
123
-
124
-
125
-
126
-
127
-
128
-
129
-
130
-
131
-
132
-
133
-
134
-
135
-
136
-
137
-
138
-
139
-
140
-
141
-
142
-
143
-
144
-
145
-
146
-
147
-
148
-
149
-
150
-
151
-
152
-
153
-
154
-
155
-
156
-
157
-
158
-
159
-
160
-
161
-
162
-
163
-
164
-
165
-
166
-
167
-
168
-
169
-
170
-
171
-
172
-
173
-
174
-
175
-
176
 |
 |
