IBM 8840 Hardware Maintenance Manual - Page 52
Installing, microprocessor
 |
UPC - 000435863799
View all IBM 8840 manuals
Add to My Manuals
Save this manual to your list of manuals |
Page 52 highlights
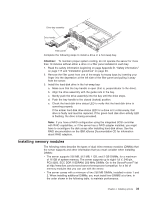
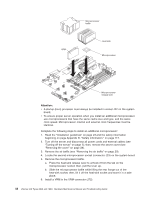
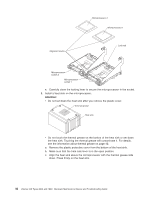
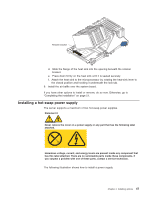
Attention: To avoid breaking the retaining clips or damaging the DIMM connectors, handle the clips gently. b. If the retaining clips are closed, open them; then, insert the DIMM by pressing the DIMM straight into the connector. Make sure that the retaining clips snap into the closed position. Note: If there is a gap between the DIMM and the retaining clips, the DIMM has not been properly installed. In this case, open the retaining clips and remove the DIMM; then, reinsert the DIMM. 7. Install the air baffle over the system board. If you have other options to install or remove, do so now. Otherwise, go to "Completing the installation" on page 51. Installing a microprocessor The following notes describe the type of microprocessor that the server supports and other information that you must consider when installing a microprocessor: v The server supports up to two microprocessors. With two microprocessors, the server can operate as a symmetric multiprocessing (SMP) server. With SMP, certain operating systems and application programs can distribute the processing load between the microprocessors. If the server comes with one microprocessor, you can install a second microprocessor. v You might have to update the BIOS code. Be sure to read the documentation that comes with the microprocessor, so that you can determine whether you have to update the BIOS code. You can download the latest level of BIOS code and many other code updates for your server at http://www.ibm.com/support/. v (Optional) Obtain an SMP-capable operating system. For a list of supported operating systems and other options, go to http://www.ibm.com/servers/eserver/ serverproven/compat/us/. v To order additional microprocessor options, contact your IBM marketing representative or authorized reseller. v When you install an additional microprocessor in socket J23, you must also install the voltage regulator module (VRM) that comes with the microprocessor in VRM connector J72. v The microprocessor speeds are automatically set for this server; therefore, you do not have to set any microprocessor frequency-selection jumpers or switches. v If you have to replace a microprocessor, call for service. v If the thermal-grease protective cover (for example, a plastic cap or tape liner) is removed from the heat sink or fan sink, do not touch the thermal grease on the bottom of the heat sink or fan sink or set down the heat sink or fan sink. Note: Removing the heat sink or fan sink from the microprocessor destroys the even distribution of the thermal grease and requires replacing the thermal grease. Setting down the heat sink or fan sink onto any surface when the thermal-grease protective cover is removed will contaminate the thermal grease. If the thermal grease becomes contaminated with particles, it must be replaced. For information about replacing contaminated thermal grease on the heat sink or fan sink, contact IBM Services. For support phone numbers, go to http://www.ibm.com/planetwide/, or in the U.S. and Canada, call 1-800-IBM-SERV (1-800-426-7378). Have the following information ready when you call: - Machine type and model 42 xSeries 346 Types 8840 and 1880: Hardware Maintenance Manual and Troubleshooting Guide
-
 1
1 -
2
-
3
-
4
-
5
-
6
-
7
-
8
-
9
-
10
-
11
-
12
-
13
-
14
-
15
-
16
-
17
-
18
-
19
-
20
-
21
-
22
-
23
-
24
-
25
-
26
-
27
-
28
-
29
-
30
-
31
-
32
-
33
-
34
-
35
-
36
-
37
-
38
-
39
-
40
-
41
-
42
-
43
-
44
-
45
-
46
-
 47
47 -
 48
48 -
 49
49 -
 50
50 -
 51
51 -
 52
52 -
 53
53 -
 54
54 -
 55
55 -
 56
56 -
 57
57 -
58
-
59
-
60
-
61
-
62
-
63
-
64
-
65
-
66
-
67
-
68
-
69
-
70
-
71
-
72
-
73
-
74
-
75
-
76
-
77
-
78
-
79
-
80
-
81
-
82
-
83
-
84
-
85
-
86
-
87
-
88
-
89
-
90
-
91
-
92
-
93
-
94
-
95
-
96
-
97
-
98
-
99
-
100
-
101
-
102
-
103
-
104
-
105
-
106
-
107
-
108
-
109
-
110
-
111
-
112
-
113
-
114
-
115
-
116
-
117
-
118
-
119
-
120
-
121
-
122
-
123
-
124
-
125
-
126
-
127
-
128
-
129
-
130
-
131
-
132
-
133
-
134
-
135
-
136
-
137
-
138
-
139
-
140
-
141
-
142
-
143
-
144
-
145
-
146
-
147
-
148
-
149
-
150
-
151
-
152
-
153
-
154
-
155
-
156
-
157
-
158
-
159
-
160
-
161
-
162
-
163
-
164
-
165
-
166
-
167
-
168
-
169
-
170
-
171
-
172
-
173
-
174
-
175
-
176
 |
 |