IBM 8840 Hardware Maintenance Manual - Page 59
Replacing, hot-swap
 |
UPC - 000435863799
View all IBM 8840 manuals
Add to My Manuals
Save this manual to your list of manuals |
Page 59 highlights
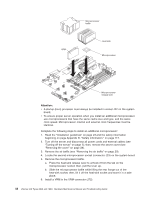
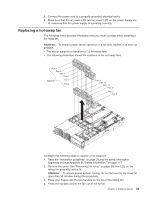
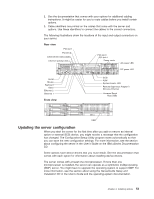
5. Connect the power cord to a properly grounded electrical outlet. 6. Make sure that the dc power LED and ac power LED on the power supply are lit, indicating that the power supply is operating correctly. Replacing a hot-swap fan The following notes describe information that you must consider when installing a hot-swap fan. Attention: To ensure proper server operation, if a fan fails, replace it as soon as possible. v The server supports a maximum of 12 hot-swap fans. v The following illustration shows the locations of the hot-swap fans. Fan 3 Fan 4 Fan 5 Fan 6 Optional Fan 1 Fan 2 Fan 9 Fan 10 Fan 11 Fan 12 Fan 7 Fan 8 Complete the following steps to replace a hot-swap-fan: 1. Read the "Installation guidelines" on page 23.and the safety information beginning on page Appendix B, "Safety information," on page 117. 2. Remove the cover. See "Removing the cover" on page 28. The LED on the failing fan assembly will be lit. Attention: To ensure proper system cooling, do not remove the top cover for more than 30 minutes during this procedure. 3. Place your fingers into the two handles on the top of the failing fan. 4. Press the handles and lift the fan out of the server. Chapter 4. Installing options 49
-
 1
1 -
2
-
3
-
4
-
5
-
6
-
7
-
8
-
9
-
10
-
11
-
12
-
13
-
14
-
15
-
16
-
17
-
18
-
19
-
20
-
21
-
22
-
23
-
24
-
25
-
26
-
27
-
28
-
29
-
30
-
31
-
32
-
33
-
34
-
35
-
36
-
37
-
38
-
39
-
40
-
41
-
42
-
43
-
44
-
45
-
46
-
47
-
48
-
49
-
50
-
51
-
52
-
53
-
 54
54 -
 55
55 -
 56
56 -
 57
57 -
 58
58 -
 59
59 -
 60
60 -
 61
61 -
 62
62 -
 63
63 -
 64
64 -
65
-
66
-
67
-
68
-
69
-
70
-
71
-
72
-
73
-
74
-
75
-
76
-
77
-
78
-
79
-
80
-
81
-
82
-
83
-
84
-
85
-
86
-
87
-
88
-
89
-
90
-
91
-
92
-
93
-
94
-
95
-
96
-
97
-
98
-
99
-
100
-
101
-
102
-
103
-
104
-
105
-
106
-
107
-
108
-
109
-
110
-
111
-
112
-
113
-
114
-
115
-
116
-
117
-
118
-
119
-
120
-
121
-
122
-
123
-
124
-
125
-
126
-
127
-
128
-
129
-
130
-
131
-
132
-
133
-
134
-
135
-
136
-
137
-
138
-
139
-
140
-
141
-
142
-
143
-
144
-
145
-
146
-
147
-
148
-
149
-
150
-
151
-
152
-
153
-
154
-
155
-
156
-
157
-
158
-
159
-
160
-
161
-
162
-
163
-
164
-
165
-
166
-
167
-
168
-
169
-
170
-
171
-
172
-
173
-
174
-
175
-
176
 |
 |
