IBM 8840 Hardware Maintenance Manual - Page 51
Active, connectors, Online-spare, memory
 |
UPC - 000435863799
View all IBM 8840 manuals
Add to My Manuals
Save this manual to your list of manuals |
Page 51 highlights
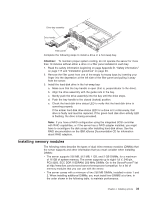
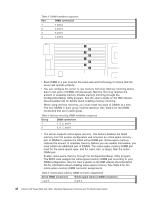
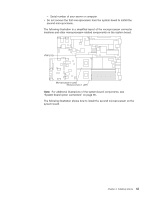
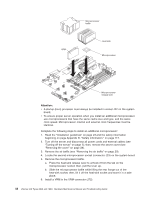
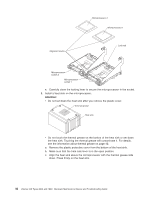
Table 5. Online-spare memory DIMM connector assignments (continued) Active DIMM connectors Online-spare memory DIMM connectors 1 and 2 3 and 4 5 and 6 1 and 2 3 and 4 5 and 6 7 and 8 v You can enable either online-spare memory or memory mirroring, but not both at the same time. v When you install or remove DIMMs, the server configuration information changes. When you restart the server, the system displays a message indicating that the memory configuration has changed. The following illustration shows how to install DIMMs on the system board. Complete the following steps to install a DIMM: 1. Read the "Installation guidelines" on page 23.and the safety information beginning on page Appendix B, "Safety information," on page 117. 2. Turn off the server and disconnect all power cords and external cables (see "Turning off the server" on page 7); then, remove the server cover (see "Removing the cover" on page 28). 3. Remove the air baffle (see "Removing the air baffle" on page 29). 4. Locate the DIMM connectors on the system board and determine the connectors into which you will install the DIMMs. 5. Touch the static-protective package that contains the DIMM to any unpainted metal surface on the server. Then, remove the DIMM from the package. 6. Complete the following steps to install the DIMM. Repeat these steps for each DIMM that you install. a. Turn the DIMM so that the DIMM keys align correctly with the connector on the system board. Chapter 4. Installing options 41
-
 1
1 -
2
-
3
-
4
-
5
-
6
-
7
-
8
-
9
-
10
-
11
-
12
-
13
-
14
-
15
-
16
-
17
-
18
-
19
-
20
-
21
-
22
-
23
-
24
-
25
-
26
-
27
-
28
-
29
-
30
-
31
-
32
-
33
-
34
-
35
-
36
-
37
-
38
-
39
-
40
-
41
-
42
-
43
-
44
-
45
-
 46
46 -
 47
47 -
 48
48 -
 49
49 -
 50
50 -
 51
51 -
 52
52 -
 53
53 -
 54
54 -
 55
55 -
 56
56 -
57
-
58
-
59
-
60
-
61
-
62
-
63
-
64
-
65
-
66
-
67
-
68
-
69
-
70
-
71
-
72
-
73
-
74
-
75
-
76
-
77
-
78
-
79
-
80
-
81
-
82
-
83
-
84
-
85
-
86
-
87
-
88
-
89
-
90
-
91
-
92
-
93
-
94
-
95
-
96
-
97
-
98
-
99
-
100
-
101
-
102
-
103
-
104
-
105
-
106
-
107
-
108
-
109
-
110
-
111
-
112
-
113
-
114
-
115
-
116
-
117
-
118
-
119
-
120
-
121
-
122
-
123
-
124
-
125
-
126
-
127
-
128
-
129
-
130
-
131
-
132
-
133
-
134
-
135
-
136
-
137
-
138
-
139
-
140
-
141
-
142
-
143
-
144
-
145
-
146
-
147
-
148
-
149
-
150
-
151
-
152
-
153
-
154
-
155
-
156
-
157
-
158
-
159
-
160
-
161
-
162
-
163
-
164
-
165
-
166
-
167
-
168
-
169
-
170
-
171
-
172
-
173
-
174
-
175
-
176
 |
 |
