IBM 8840 Hardware Maintenance Manual - Page 73
Media
 |
UPC - 000435863799
View all IBM 8840 manuals
Add to My Manuals
Save this manual to your list of manuals |
Page 73 highlights
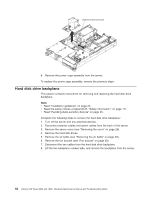
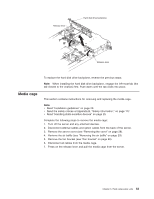
Release lever Hard disk drive backplane Release lever Media cage To replace the hard disk drive backplane, reverse the previous steps. Note: When installing the hard disk drive backplane, engage the left-most tab (the tab closest to the chassis) first. Push down until the tab clicks into place. This section contains instructions for removing and replacing the media cage. Note: v Read "Installation guidelines" on page 23. v Read the safety notices at Appendix B, "Safety information," on page 117. v Read "Handling static-sensitive devices" on page 25. Complete the following steps to remove the media cage: 1. Turn off the server and any attached devices. 2. Disconnect external cables and option cables from the back of the server. 3. Remove the server cover (see "Removing the cover" on page 28). 4. Remove the air baffle (see "Removing the air baffle" on page 29). 5. Remove the fan bracket (see "Fan bracket" on page 60). 6. Disconnect all cables from the media cage. 7. Press on the release lever and pull the media cage from the server. Chapter 5. Field replaceable units 63
-
 1
1 -
2
-
3
-
4
-
5
-
6
-
7
-
8
-
9
-
10
-
11
-
12
-
13
-
14
-
15
-
16
-
17
-
18
-
19
-
20
-
21
-
22
-
23
-
24
-
25
-
26
-
27
-
28
-
29
-
30
-
31
-
32
-
33
-
34
-
35
-
36
-
37
-
38
-
39
-
40
-
41
-
42
-
43
-
44
-
45
-
46
-
47
-
48
-
49
-
50
-
51
-
52
-
53
-
54
-
55
-
56
-
57
-
58
-
59
-
60
-
61
-
62
-
63
-
64
-
65
-
66
-
67
-
 68
68 -
 69
69 -
 70
70 -
 71
71 -
 72
72 -
 73
73 -
 74
74 -
 75
75 -
 76
76 -
 77
77 -
 78
78 -
79
-
80
-
81
-
82
-
83
-
84
-
85
-
86
-
87
-
88
-
89
-
90
-
91
-
92
-
93
-
94
-
95
-
96
-
97
-
98
-
99
-
100
-
101
-
102
-
103
-
104
-
105
-
106
-
107
-
108
-
109
-
110
-
111
-
112
-
113
-
114
-
115
-
116
-
117
-
118
-
119
-
120
-
121
-
122
-
123
-
124
-
125
-
126
-
127
-
128
-
129
-
130
-
131
-
132
-
133
-
134
-
135
-
136
-
137
-
138
-
139
-
140
-
141
-
142
-
143
-
144
-
145
-
146
-
147
-
148
-
149
-
150
-
151
-
152
-
153
-
154
-
155
-
156
-
157
-
158
-
159
-
160
-
161
-
162
-
163
-
164
-
165
-
166
-
167
-
168
-
169
-
170
-
171
-
172
-
173
-
174
-
175
-
176
 |
 |
