Icom ID-1 Instruction Manual - Page 13
Vfo/memory Mode Button [v/m] - dd mode
 |
View all Icom ID-1 manuals
Add to My Manuals
Save this manual to your list of manuals |
Page 13 highlights
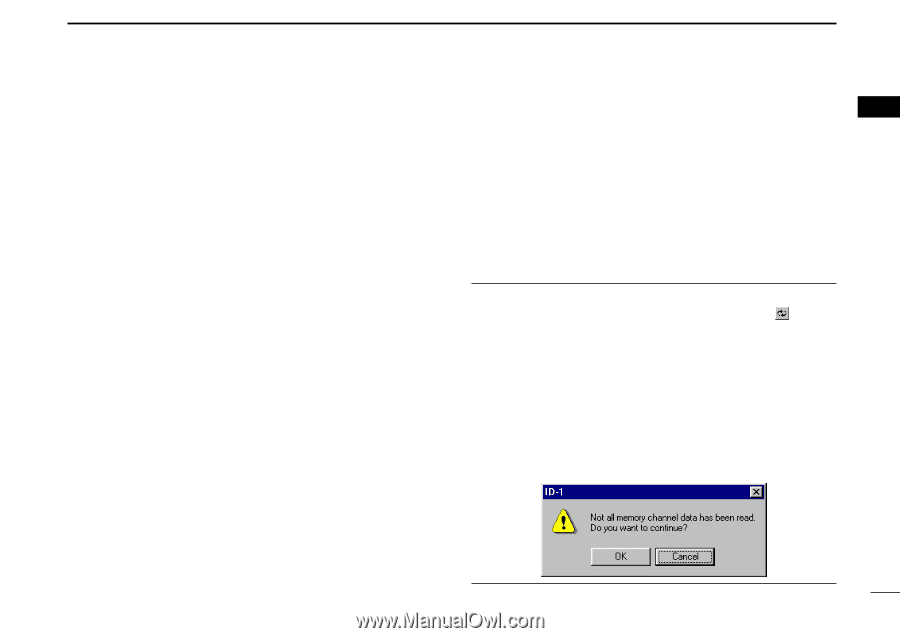
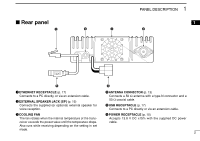
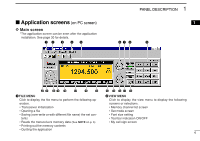
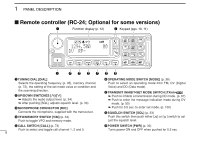
PANEL DESCRIPTION 1 !0 EMR MODE BUTTON [EMR] Click to enter and exit EMR mode. !1 MESSAGE BUTTON [MSG] Click to turn the message screen indication ON and OFF. !2 SQUELCH CONTROL [SQL] Left click to decrease; right click to increase the squelch level. !3 SKIP BUTTON [SKIP] During memory mode, click to turn the skip setting for the selected memory channel ON and OFF. !4 MONITOR BUTTON [MONI] Click to turn the monitor function ON and OFF. While the function ON, any squelches, such as tone squelch, are released and emits audio. !5 SET MODE BUTTON [SET] Click to display and hide the Set mode screen. !6 OPERATING MODE BUTTON [MODE] Click to select the operating mode from FM, digital voice (DV) and data (DD). !7 CALL CHANNEL BUTTON [CALL] Click to select a call channel (1-3). !8 VFO/MEMORY MODE BUTTON [V/M] Click to switch between VFO and memory mode. !9 TUNING DIAL [DIAL] Left click to decrease; right click to increase the operating frequency or memory channel. @0 TUNING STEP BUTTON [TS] 1 Click to display the tuning step list. After the tuning step selection, the list disappears. @1 1 MHz TUNING BUTTON [MHz] Click to turn the 1 MHz tuning ON and OFF. While the 1 MHz tuning is selected, "Z" icon appears. @2 POWER BUTTON [POWER] Click to turn the transceiver power ON and OFF. Even the transceiver power is turned OFF, the control application is still running. NOTE: While reading the transceiver's memory data While reading the transceiver's memory data the " " button in the tool bar will change from Black to Red arrows. It is not recommended to save data or initialize the transceiver while the program is downloading the memory channel data. If transceiver initialization or save data buttons are accidentally pushed, the dialog box shown below will appear. It is recommended to click the cancel button to allow the task of reading the transceiver to be completed. Then try the initialization or saving data. Completion of the download is indicated when the arrows change from Red to Black. 6
-
 1
1 -
2
-
3
-
4
-
5
-
6
-
7
-
 8
8 -
 9
9 -
 10
10 -
 11
11 -
 12
12 -
 13
13 -
 14
14 -
 15
15 -
 16
16 -
 17
17 -
 18
18 -
19
-
20
-
21
-
22
-
23
-
24
-
25
-
26
-
27
-
28
-
29
-
30
-
31
-
32
-
33
-
34
-
35
-
36
-
37
-
38
-
39
-
40
-
41
-
42
-
43
-
44
-
45
-
46
-
47
-
48
-
49
-
50
-
51
-
52
-
53
-
54
-
55
-
56
-
57
-
58
-
59
-
60
-
61
-
62
-
63
-
64
-
65
-
66
-
67
-
68
-
69
-
70
-
71
-
72
-
73
-
74
-
75
-
76
-
77
-
78
-
79
-
80
-
81
-
82
-
83
-
84
-
85
-
86
-
87
-
88
-
89
-
90
-
91
-
92
-
93
-
94
-
95
-
96
-
97
-
98
-
99
-
100
-
101
-
102
-
103
-
104
-
105
-
106
-
107
-
108
-
109
-
110
-
111
-
112
-
113
-
114
-
115
-
116
-
117
-
118
-
119
-
120
-
121
-
122
-
123
-
124
 |
 |