Icom ID-1 Instruction Manual - Page 42
Setting a frequency
 |
View all Icom ID-1 manuals
Add to My Manuals
Save this manual to your list of manuals |
Page 42 highlights
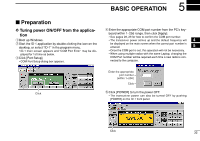
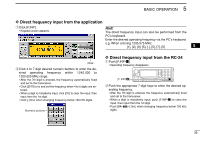
5 BASIC OPERATION Setting a frequency D Using the application tuning dial qSet the pointer on the tuning dial control then; right click to increase, left click to decrease the operating frequency. • While clicking and holding either right or left button of the mouse, the operating frequency increases or decreases continuously. • Operating frequency changes in the selected tuning steps. See page 37 for the tuning step selection. Right click to increase; Left click to decrease wTo change the frequency in 1 MHz steps, click [MHz], then click (left or right) the tuning dial. • "Z" appears above the 1 MHz digit when the 1 MHz tuning step is selected. Hint! [⇐] and [⇒] keys on the PC's keyboard also functions as the tuning dial. Press [⇐] to decrease; press [⇒] to increase the operating frequency. D Using the RC-24 tuning dial q Rotate [DIAL] to set the operating frequency. • Operating frequency will be changed with the selected tuning steps. See page 37 for the tuning step selection. [DIAL] wTo change the frequency in 1 MHz steps, push [MHz• •2], then rotate the [DIAL]. • Below 1 MHz digits disappear when the 1 MHz tuning step is selected. [MHz• •2] D Using microphone [UP]/[DN] ➥ Push the microphone's [UP]/[DN] to set the operating frequency. • While pushing and holding either [UP] or [DN], the operating frequency increases or decreases continuously. • Operating frequency will be changed with the selected tuning steps. See page 37 for the tuning step selection. 35
-
 1
1 -
2
-
3
-
4
-
5
-
6
-
7
-
8
-
9
-
10
-
11
-
12
-
13
-
14
-
15
-
16
-
17
-
18
-
19
-
20
-
21
-
22
-
23
-
24
-
25
-
26
-
27
-
28
-
29
-
30
-
31
-
32
-
33
-
34
-
35
-
36
-
 37
37 -
 38
38 -
 39
39 -
 40
40 -
 41
41 -
 42
42 -
 43
43 -
 44
44 -
 45
45 -
 46
46 -
 47
47 -
48
-
49
-
50
-
51
-
52
-
53
-
54
-
55
-
56
-
57
-
58
-
59
-
60
-
61
-
62
-
63
-
64
-
65
-
66
-
67
-
68
-
69
-
70
-
71
-
72
-
73
-
74
-
75
-
76
-
77
-
78
-
79
-
80
-
81
-
82
-
83
-
84
-
85
-
86
-
87
-
88
-
89
-
90
-
91
-
92
-
93
-
94
-
95
-
96
-
97
-
98
-
99
-
100
-
101
-
102
-
103
-
104
-
105
-
106
-
107
-
108
-
109
-
110
-
111
-
112
-
113
-
114
-
115
-
116
-
117
-
118
-
119
-
120
-
121
-
122
-
123
-
124
 |
 |
