Kenmore 18221 Owners Manual - Page 40
up bobbin, Adjust, Needle, Tension, for a Straight, Stitch, Correct tension
 |
View all Kenmore 18221 manuals
Add to My Manuals
Save this manual to your list of manuals |
Page 40 highlights
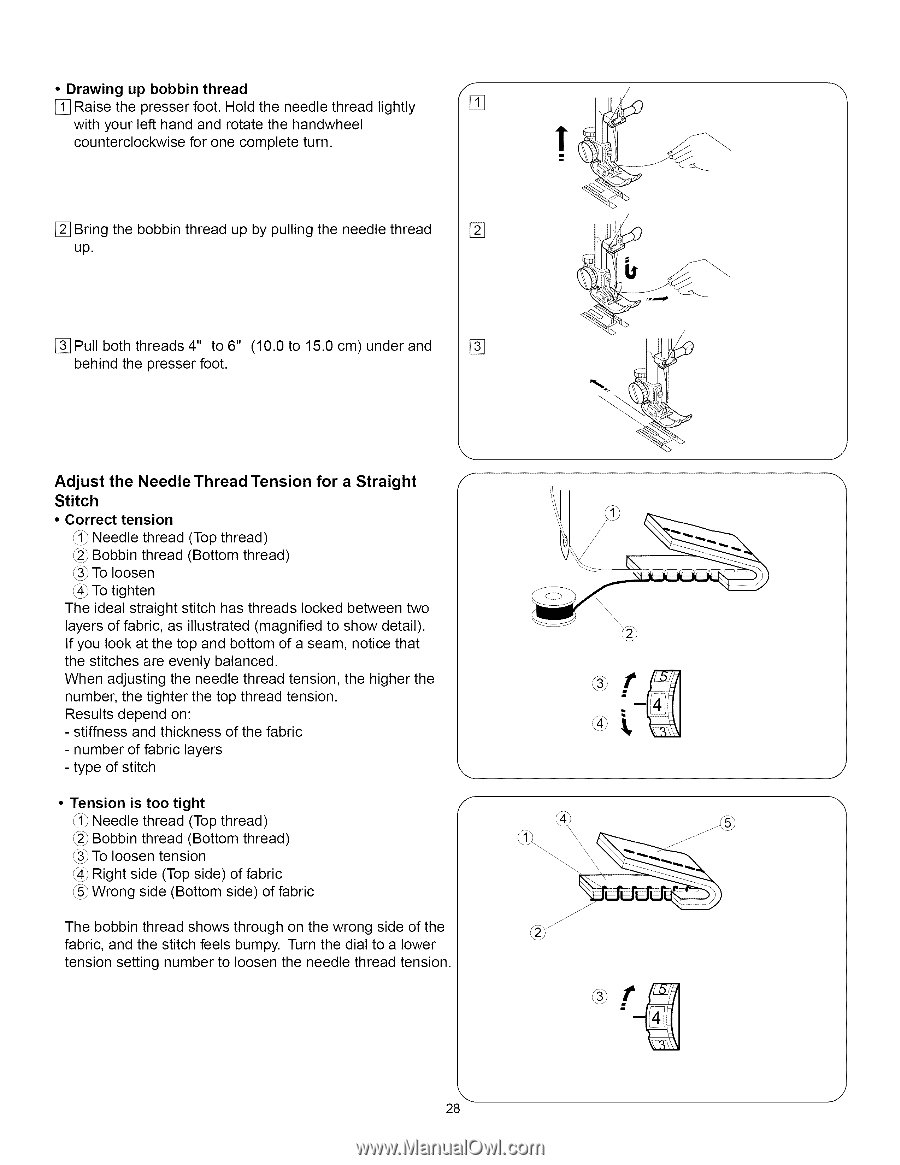
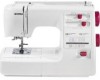
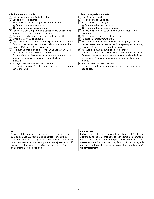
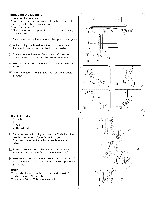
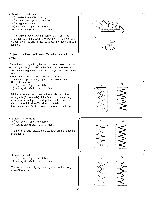
• Drawing up bobbin thread [] Raise the presser foot. Hold the needle thread lightly with your left hand and rotate the handwheel counterclockwise for one complete turn. [] Bring the bobbin thread up by pulling the needle thread [] up. [_Pull both threads 4" to 6" (10.0 to 15.0 cm) under and behind the presser foot. Adjust the Needle Thread Tension for a Straight Stitch • Correct tension _1_Needle thread (Top thread) _2_Bobbin thread (Bottom thread) _3_To loosen _4_To tighten The ideal straight stitch has threads locked between two layers of fabric, as illustrated (magnified to show detail). If you look at the top and bottom of a seam, notice that the stitches are evenly balanced. When adjusting the needle thread tension, the higher the number, the tighter the top thread tension. Results depend on: - stiffness and thickness of the fabric - number of fabric layers - type of stitch • Tension is too tight _ Needle thread (Top thread) _2_Bobbin thread (Bottom thread) _3_To loosen tension @ Right side (Top side) of fabric @ Wrong side (Bottom side) of fabric The bobbin thread shows through on the wrong side of the fabric, and the stitch feels bumpy. Turn the dial to a lower tension setting number to loosen the needle thread tension. ,. j 28
-
 1
1 -
2
-
3
-
4
-
5
-
6
-
7
-
8
-
9
-
10
-
11
-
12
-
13
-
14
-
15
-
16
-
17
-
18
-
19
-
20
-
21
-
22
-
23
-
24
-
25
-
26
-
27
-
28
-
29
-
30
-
31
-
32
-
33
-
34
-
 35
35 -
 36
36 -
 37
37 -
 38
38 -
 39
39 -
 40
40 -
 41
41 -
 42
42 -
 43
43 -
 44
44 -
 45
45 -
46
-
47
-
48
-
49
-
50
-
51
-
52
-
53
-
54
-
55
-
56
-
57
-
58
-
59
-
60
-
61
-
62
-
63
-
64
-
65
-
66
-
67
-
68
-
69
-
70
-
71
-
72
-
73
-
74
-
75
-
76
-
77
-
78
-
79
-
80
-
81
-
82
-
83
-
84
-
85
-
86
-
87
-
88
-
89
-
90
-
91
-
92
-
93
-
94
-
95
-
96
-
97
-
98
-
99
-
100
-
101
-
102
-
103
-
104
-
105
-
106
-
107
-
108
-
109
-
110
-
111
 |
 |