Kenmore 18221 Owners Manual - Page 54
Zipper, Sewing
 |
View all Kenmore 18221 manuals
Add to My Manuals
Save this manual to your list of manuals |
Page 54 highlights
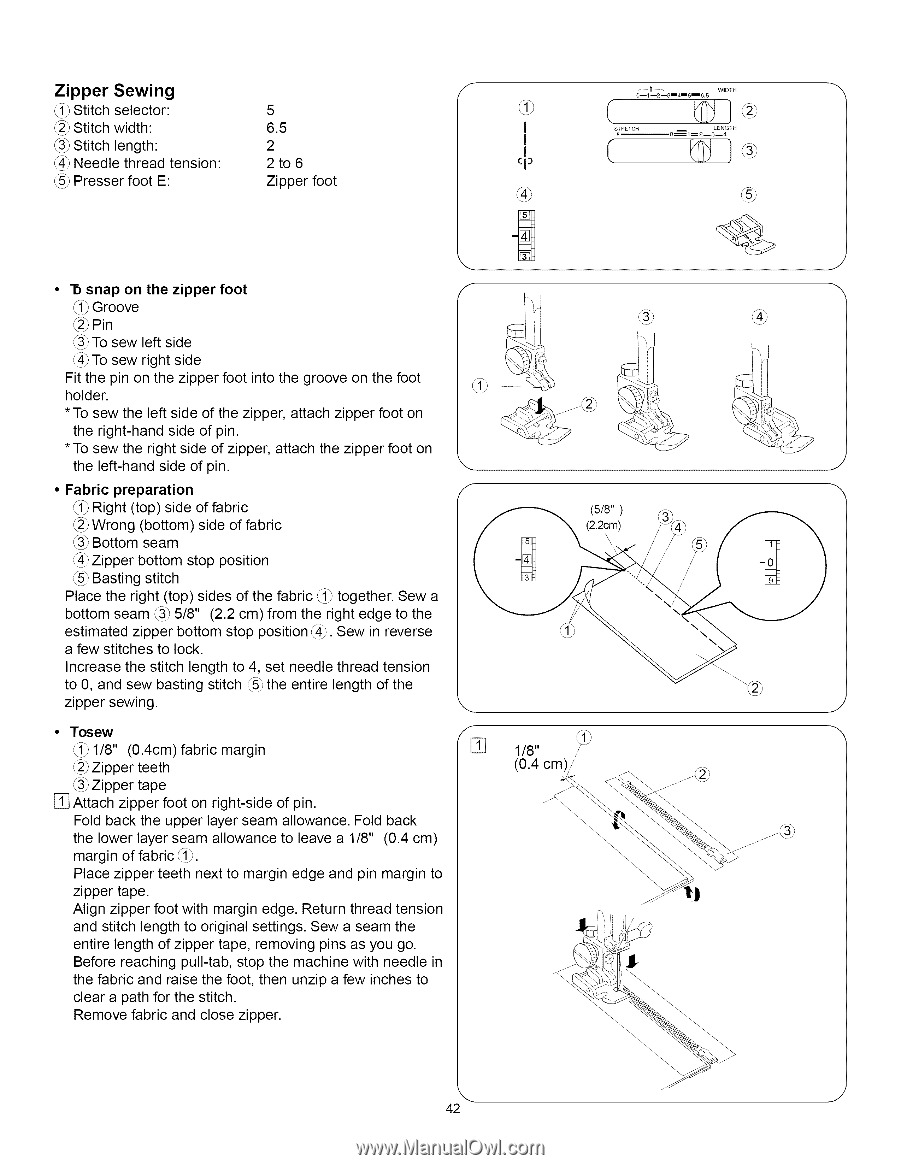
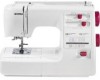
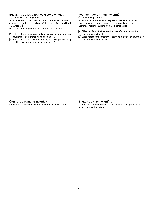
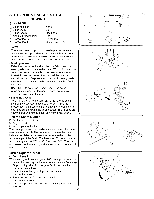
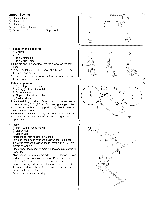
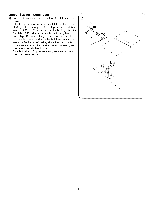
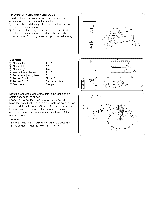
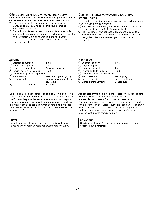
Zipper Sewing _1_Stitch selector: ,_2_S,titch width: _3_Stitch length: (4) Needle thread tension: _5_Presser foot E: 5 6.5 2 2 to 6 Zipper foot f I I L4i, ¢_ 0--1 --2--3_4_5_6,5 WIDTH STRETCH v --0,,_= LENGTH 1_2__3__4 • "b snap on the zipper foot f _1_Groove _2)Pin (3) To sew left side (4) To sew right side Fit the pin on the zipper foot into the groove on the foot holder. * To sew the left side of the zipper, attach zipper foot on the right-hand side of pin. *To sew the right side of zipper, attach the zipper foot on the left-hand side of pin. • Fabric preparation f _ Right (top) side of fabric _ Wrong (bottom) side of fabric _3) Bottom seam _4_Zipper bottom stop position _5_Basting stitch Place the right (top) sides of the fabric _i_ together. Sew a bottom seam ,_3_5/8" (2.2 cm) from the right edge to the estimated zipper bottom stop position _4_.Sew in reverse a few stitches to lock. Increase the stitch length to 4, set needle thread tension to 0, and sew basting stitch _5_t.he entire length of the zipper sewing. • Tosew / _1_1/8" (0.4cm) fabric margin [] _2_Zipper teeth _3_Zipper tape [] Attach zipper foot on right-side of pin. Fold back the upper layer seam allowance. Fold back the lower layer seam allowance to leave a 1/8" (0.4 cm) margin of fabric _1_,. Place zipper teeth next to margin edge and pin margin to zipper tape. Align zipper foot with margin edge. Return thread tension and stitch length to original settings. Sew a seam the entire length of zipper tape, removing pins as you go. Before reaching pull-tab, stop the machine with needle in the fabric and raise the foot, then unzip a few inches to clear a path for the stitch. Remove fabric and close zipper. (5/8") (2.2cm) 1/8" (0.4 cm)i J -x 'i J J J 42
-
 1
1 -
2
-
3
-
4
-
5
-
6
-
7
-
8
-
9
-
10
-
11
-
12
-
13
-
14
-
15
-
16
-
17
-
18
-
19
-
20
-
21
-
22
-
23
-
24
-
25
-
26
-
27
-
28
-
29
-
30
-
31
-
32
-
33
-
34
-
35
-
36
-
37
-
38
-
39
-
40
-
41
-
42
-
43
-
44
-
45
-
46
-
47
-
48
-
 49
49 -
 50
50 -
 51
51 -
 52
52 -
 53
53 -
 54
54 -
 55
55 -
 56
56 -
 57
57 -
 58
58 -
 59
59 -
60
-
61
-
62
-
63
-
64
-
65
-
66
-
67
-
68
-
69
-
70
-
71
-
72
-
73
-
74
-
75
-
76
-
77
-
78
-
79
-
80
-
81
-
82
-
83
-
84
-
85
-
86
-
87
-
88
-
89
-
90
-
91
-
92
-
93
-
94
-
95
-
96
-
97
-
98
-
99
-
100
-
101
-
102
-
103
-
104
-
105
-
106
-
107
-
108
-
109
-
110
-
111
 |
 |