Xerox 6400XF WorkCentre 6400 System Administrator Guide - Page 63
Managing Trusted Certificate Authorities, Creating a Request, Downloading the Generic Xerox CA
 |
UPC - 095205759334
View all Xerox 6400XF manuals
Add to My Manuals
Save this manual to your list of manuals |
Page 63 highlights
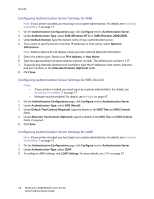
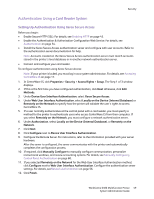
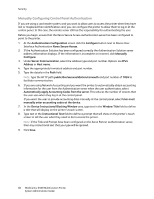
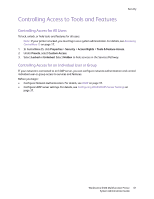
Security Creating a Request Note: If your printer is locked, you must log in as a system administrator. For details, see Accessing CentreWare IS on page 17. 1. In CentreWare IS, click Properties > Security > Machine Digital Certificate Management. 2. Click Create New Certificate. 3. Select Certificate Signing Request. 4. Fill out the form with your 2-Letter Country Code, State/Province Name, Locality Name, Organization Name, Organization Unit, and Email Address. 5. Click Apply. 6. Values from the form are used to generate a Certificate Signing Request. 7. When the process is complete, you are prompted to save the Certificate Signing Request. Rightclick the link and save the csr.pem file to your computer. 8. Email the file to a trusted certificate authority to be signed. 9. When the signed certificate is received back from the trusted certificate authority, upload the certificate to the printer. From the Machine Digital Certificate Management page, click Upload Signed Certificate. 10. Click Browse or Choose File, navigate to the signed certificate in .crt format, and click Open or Choose. 11. Click Upload Certificate. Note: The signed certificate must match the CSR created by the printer. Managing Trusted Certificate Authorities You can add, delete, or reset trusted certificate authorities (trusted root certificates). Note: If your printer is locked, you must log in as a system administrator. For details, see Accessing CentreWare IS on page 17. To install a root certificate: 1. In CentreWare IS, click Properties > Security > Trusted Certificate Authorities. 2. Click Add. 3. Click Browse or Choose File, navigate to the signed certificate file, then click Open or Choose. 4. Click Upload Certificate Authority. The digital certificate displays in the list of Installed Certificates. To delete a certificate: 1. Select a certificate from the list. 2. Click Delete. 3. Click OK to acknowledge the warning message. 4. To delete all certificates, click Reset. Downloading the Generic Xerox CA If the printer does not have a trusted root certificate, or if a self-signed certificate is installed, users may see an error message related to the certificate when attempting to connect to the printer using WorkCentre 6400 Multifunction Printer 63 System Administrator Guide
-
 1
1 -
2
-
3
-
4
-
5
-
6
-
7
-
8
-
9
-
10
-
11
-
12
-
13
-
14
-
15
-
16
-
17
-
18
-
19
-
20
-
21
-
22
-
23
-
24
-
25
-
26
-
27
-
28
-
29
-
30
-
31
-
32
-
33
-
34
-
35
-
36
-
37
-
38
-
39
-
40
-
41
-
42
-
43
-
44
-
45
-
46
-
47
-
48
-
49
-
50
-
51
-
52
-
53
-
54
-
55
-
56
-
57
-
 58
58 -
 59
59 -
 60
60 -
 61
61 -
 62
62 -
 63
63 -
 64
64 -
 65
65 -
 66
66 -
 67
67 -
 68
68 -
69
-
70
-
71
-
72
-
73
-
74
-
75
-
76
-
77
-
78
-
79
-
80
-
81
-
82
-
83
-
84
-
85
-
86
-
87
-
88
-
89
-
90
-
91
-
92
-
93
-
94
-
95
-
96
-
97
-
98
-
99
-
100
-
101
-
102
-
103
-
104
-
105
-
106
-
107
-
108
-
109
-
110
-
111
-
112
-
113
-
114
-
115
-
116
-
117
-
118
-
119
-
120
-
121
-
122
-
123
-
124
-
125
-
126
-
127
-
128
-
129
-
130
-
131
-
132
-
133
-
134
-
135
-
136
-
137
-
138
-
139
-
140
-
141
-
142
-
143
-
144
-
145
-
146
-
147
-
148
-
149
-
150
-
151
-
152
-
153
-
154
-
155
-
156
-
157
-
158
-
159
-
160
-
161
-
162
-
163
-
164
-
165
-
166
-
167
-
168
-
169
-
170
-
171
-
172
-
173
-
174
-
175
-
176
-
177
-
178
-
179
-
180
-
181
-
182
-
183
-
184
 |
 |
