Canon PIXMA MP500 MP500 User's Guide - Page 111
Ink Does Not Come Out/Printing is Blurred/Colors are, Wrong/White Streaks/Straight Lines are - printer troubleshooting
 |
View all Canon PIXMA MP500 manuals
Add to My Manuals
Save this manual to your list of manuals |
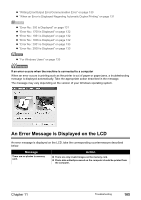
Page 111 highlights
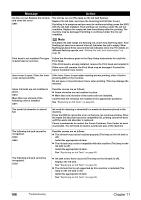
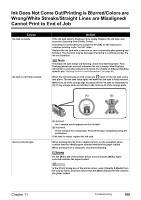
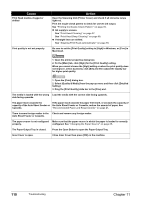
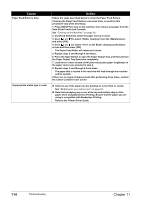
Ink Does Not Come Out/Printing is Blurred/Colors are Wrong/White Streaks/Straight Lines are Misaligned/ Cannot Print to End of Job Cause Ink tank is empty. Ink tank is not fully inserted. Action If the ink tank lamp is flashing, ink is empty. Replace the ink tank, and close the Scanning Unit (Printer Cover). If printing is not finished yet, just press the [OK] on the machine to continue printing in the "no ink" state. Replace the ink tank with a new one as soon as possible after printing has finished. The machine may be damaged if printing is continued under the ink out condition. Note If multiple ink tank lamps are flashing, check how fast they flash. Fast flashing (about one second) indicates the ink is empty. Slow flashing (about three seconds) indicates ink is low. For details on different flashing speeds, see "Getting the Ink Level Information" on page 88. When the ink tank lamp is unlit, press the mark on the ink tank clicks into place. The ink tank lamp lights red when the ink tank is fully inserted. Make sure all of the orange tape is peeled off the ink tank as illustrated in (A). If any orange parts are left like in (B), remove all of the orange parts. (A) (B) Incorrect media type (A) Correct An L shaped notch appears on the ink tank. (B) Incorrect There remains the orange tape. Peel off the tape completely along the perforation. If ink tank is empty, replace the ink tank. When printing directly from a digital camera, on the operation panel, confirm that the selected matches the paper loaded. When printing from a computer, check the following. On the [Main] tab of the printer driver, ensure that the [Media Type] selected matches the paper loaded. In the [Print] dialog box of the printer driver, select [Quality & Media] from the pop-up menu, and then ensure that the [Media Type] selected matches the paper loaded. Chapter 11 Troubleshooting 109
-
 1
1 -
2
-
3
-
4
-
5
-
6
-
7
-
8
-
9
-
10
-
11
-
12
-
13
-
14
-
15
-
16
-
17
-
18
-
19
-
20
-
21
-
22
-
23
-
24
-
25
-
26
-
27
-
28
-
29
-
30
-
31
-
32
-
33
-
34
-
35
-
36
-
37
-
38
-
39
-
40
-
41
-
42
-
43
-
44
-
45
-
46
-
47
-
48
-
49
-
50
-
51
-
52
-
53
-
54
-
55
-
56
-
57
-
58
-
59
-
60
-
61
-
62
-
63
-
64
-
65
-
66
-
67
-
68
-
69
-
70
-
71
-
72
-
73
-
74
-
75
-
76
-
77
-
78
-
79
-
80
-
81
-
82
-
83
-
84
-
85
-
86
-
87
-
88
-
89
-
90
-
91
-
92
-
93
-
94
-
95
-
96
-
97
-
98
-
99
-
100
-
101
-
102
-
103
-
104
-
105
-
 106
106 -
 107
107 -
 108
108 -
 109
109 -
 110
110 -
 111
111 -
 112
112 -
 113
113 -
 114
114 -
 115
115 -
 116
116 -
117
-
118
-
119
-
120
-
121
-
122
-
123
-
124
-
125
-
126
-
127
-
128
-
129
-
130
-
131
-
132
-
133
-
134
-
135
-
136
-
137
-
138
-
139
-
140
-
141
-
142
-
143
-
144
-
145
-
146
-
147
-
148
-
149
-
150
-
151
-
152
-
153
-
154
-
155
-
156
 |
 |
