Canon PIXMA MP500 MP500 User's Guide - Page 123
Cannot Print Properly from the Digital Camera - printer manual
 |
View all Canon PIXMA MP500 manuals
Add to My Manuals
Save this manual to your list of manuals |
Page 123 highlights
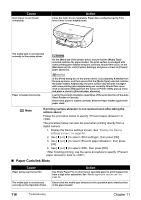
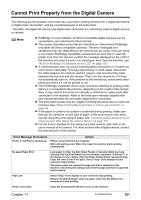
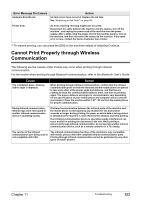
Cannot Print Properly from the Digital Camera The following are the possible errors that may occur when printing directly from a digital still camera or digital video camcorder*, and the countermeasures to eliminate them. * Hereafter, the digital still camera and digital video camcorder are collectively called a digital camera or camera. Note z PictBridge or Canon Bubble Jet Direct compatible digital cameras can be connected to your machine for direct printing. z This section describes errors that are indicated on Canon-brand PictBridgeor Bubble Jet Direct compatible cameras. The error messages and operations may vary depending on the camera you are using. If you are using a non-Canon PictBridge compatible camera and not sure how to clear the printer error from the camera, confirm the message displayed on the LCD of the machine and clear the error. For clearing an error from the machine, see "An Error Message is Displayed on the LCD" on page 105. z A communication time out occurs if printing takes a long time or if it takes too much time to send data. This may stop printing. In such cases, disconnect the cable between the machine and the camera, and reconnect the cable between the machine and the camera. Then, turn the camera on, if it does not automatically turn on. If the problem is still unresolved, select some other photo and check if it can be printed or not. z Your PictBridge compatible device may need to be switched to printing mode before it is connected to the machine, depending on the model of the camera. Also, it may need to be turned on manually or switched to replay mode after connected to the machine. Refer to the instruction manuals supplied with your camera and take the necessary steps before connection. z The print head nozzles may be clogged if printing becomes faint or colors are incorrect. See "When Printing Becomes Faint or Colors are Incorrect" on page 94. z If the paper is curled or its surface is scratched during printing, make sure that you are using the correct type of paper. If this error occurs even when you are using the correct type of paper, see "If printing surface abrasion is not resolved even after taking the actions above:" on page 116. z For the errors indicated on the camera and their solution, also refer to the user's manual of the camera. For other troubles with a digital camera, contact the manufacturer of the camera. Error Message On Camera Printer in use/Printer warming up Action Photos are printed from the computer. Wait until printing ends. When it is ready, the machine starts printing automatically. No paper/Paper Error Load paper in either the Auto Sheet Feeder or Cassette which you have selected with the [Feed Switch] on the machine, and select "Continue"*1 in the display on your camera. Open the Paper Output Tray to resume printing. Close the Inner Cover if it is open. Select "Stop" in the display on your camera to stop printing. The camera does not support the page size that is selected on this machine. Check the print settings and select the page size that is supported by the camera. Paper jam Select "Stop" in the display on your camera to stop printing. Remove the jammed paper, load new paper, and press the [OK] on the machine and retry printing. Printer cover open Close the Scanning Unit (Printer Cover) on the machine. Chapter 11 Troubleshooting 121
-
 1
1 -
2
-
3
-
4
-
5
-
6
-
7
-
8
-
9
-
10
-
11
-
12
-
13
-
14
-
15
-
16
-
17
-
18
-
19
-
20
-
21
-
22
-
23
-
24
-
25
-
26
-
27
-
28
-
29
-
30
-
31
-
32
-
33
-
34
-
35
-
36
-
37
-
38
-
39
-
40
-
41
-
42
-
43
-
44
-
45
-
46
-
47
-
48
-
49
-
50
-
51
-
52
-
53
-
54
-
55
-
56
-
57
-
58
-
59
-
60
-
61
-
62
-
63
-
64
-
65
-
66
-
67
-
68
-
69
-
70
-
71
-
72
-
73
-
74
-
75
-
76
-
77
-
78
-
79
-
80
-
81
-
82
-
83
-
84
-
85
-
86
-
87
-
88
-
89
-
90
-
91
-
92
-
93
-
94
-
95
-
96
-
97
-
98
-
99
-
100
-
101
-
102
-
103
-
104
-
105
-
106
-
107
-
108
-
109
-
110
-
111
-
112
-
113
-
114
-
115
-
116
-
117
-
 118
118 -
 119
119 -
 120
120 -
 121
121 -
 122
122 -
 123
123 -
 124
124 -
 125
125 -
 126
126 -
 127
127 -
 128
128 -
129
-
130
-
131
-
132
-
133
-
134
-
135
-
136
-
137
-
138
-
139
-
140
-
141
-
142
-
143
-
144
-
145
-
146
-
147
-
148
-
149
-
150
-
151
-
152
-
153
-
154
-
155
-
156
 |
 |
