Canon PIXMA MP500 MP500 User's Guide - Page 117
Open the [Canon IJ Printer Utility] dialog box.
 |
View all Canon PIXMA MP500 manuals
Add to My Manuals
Save this manual to your list of manuals |
Page 117 highlights
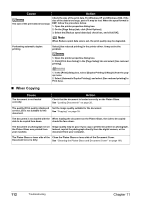
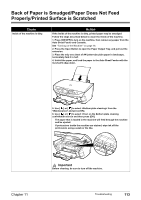
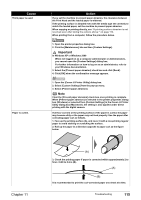
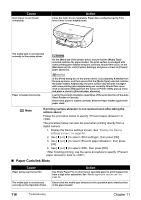
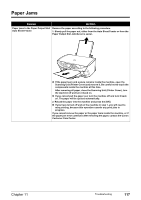
Cause Thick paper is used. Paper is curled. Action If you set the machine to prevent paper abrasion, the clearance between the Print Head and the loaded paper is widened. If the printing surface is abraded even with the media type set correctly to match the loaded paper, set the machine to prevent paper abrasion. When copying or printing directly, see "If printing surface abrasion is not resolved even after taking the actions above:" on page 116. When printing from a computer, follow the procedure below. 1. Open the printer properties dialog box. 2. Click the [Maintenance] tab and then [Custom Settings]. Important In Windows XP or Windows 2000 When not logged on as a computer administrator or Administrators, you cannot open the [Custom Settings] dialog box. For further information on how to log on as an administrator, refer to your Windows documentation. 3. Select the [Prevent paper abrasion] check box and click [Send]. 4. Click [OK] when the confirmation message appears. 1. Open the [Canon IJ Printer Utility] dialog box. 2. Select [Custom Settings] from the pop-up menu. 3. Select [Prevent paper abrasion]. Note Clear the [Prevent paper abrasion] check box once printing is complete. When [Prevent paper abrasion] is selected in the printer properties dialog box (Windows) or selected from [Custom Settings] in the Canon IJ Printer Utility dialog box (Macintosh), the setting is also applied under direct printing with the digital camera. If all four corners or the printing surface of the paper is curled, the paper may become dirty or the paper may not feed properly. Use the paper after correcting paper curl as follows. 1. Face up the printing surface (A), and cover it with a non-printing regular paper to avoid staining or scratching the surface. 2. Roll up the paper in a direction opposite to paper curl as the figure below. Chapter 11 (A) 3. Check the printing paper if paper is corrected within approximately 2 to 5mm / 0.08 to 0.2 in (B). (A) (B) It is recommended to print the curl-corrected paper one sheet at a time. Troubleshooting 115
-
 1
1 -
2
-
3
-
4
-
5
-
6
-
7
-
8
-
9
-
10
-
11
-
12
-
13
-
14
-
15
-
16
-
17
-
18
-
19
-
20
-
21
-
22
-
23
-
24
-
25
-
26
-
27
-
28
-
29
-
30
-
31
-
32
-
33
-
34
-
35
-
36
-
37
-
38
-
39
-
40
-
41
-
42
-
43
-
44
-
45
-
46
-
47
-
48
-
49
-
50
-
51
-
52
-
53
-
54
-
55
-
56
-
57
-
58
-
59
-
60
-
61
-
62
-
63
-
64
-
65
-
66
-
67
-
68
-
69
-
70
-
71
-
72
-
73
-
74
-
75
-
76
-
77
-
78
-
79
-
80
-
81
-
82
-
83
-
84
-
85
-
86
-
87
-
88
-
89
-
90
-
91
-
92
-
93
-
94
-
95
-
96
-
97
-
98
-
99
-
100
-
101
-
102
-
103
-
104
-
105
-
106
-
107
-
108
-
109
-
110
-
111
-
 112
112 -
 113
113 -
 114
114 -
 115
115 -
 116
116 -
 117
117 -
 118
118 -
 119
119 -
 120
120 -
 121
121 -
 122
122 -
123
-
124
-
125
-
126
-
127
-
128
-
129
-
130
-
131
-
132
-
133
-
134
-
135
-
136
-
137
-
138
-
139
-
140
-
141
-
142
-
143
-
144
-
145
-
146
-
147
-
148
-
149
-
150
-
151
-
152
-
153
-
154
-
155
-
156
 |
 |