Canon PIXMA MP500 MP500 User's Guide - Page 63
Start printing the Photo Index Sheet.
 |
View all Canon PIXMA MP500 manuals
Add to My Manuals
Save this manual to your list of manuals |
Page 63 highlights
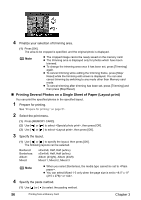
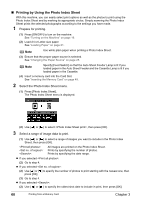
(3) Use [ ] or [ (4) Go to step 4. Note ] to specify the newest shot date to include in print, then press [OK]. It may take time to display the Search screen depending on the number of photos saved on the memory card. 4 Start printing the Photo Index Sheet. (1) Press [Color]. Printing of the Photo Index Sheet starts. Note When there are more than 37 images, two or more Photo Index Sheets are printed. (A) (B) (C) (D) (E) (F) (G) (A) Select the page size and media type. (B) Select date printing and/or photo optimizer as necessary. See "Print Setting Items" on page 36. (C) Mark this to print all photographs, one copy each. *When you mark this, even if you mark the number of copies you want to print for each photograph, those marks will be disregarded, and one copy each of all photographs will be printed. (D) Select the number of copies (fill in a circle under each photograph you want to print). (E) Follow the procedure as described. (F) Select the paper source. (G) Mark this to print the same Photo Index Sheet again. *If you mark this, all other marked settings will be disregarded. Chapter 3 Printing from a Memory Card 61
-
 1
1 -
2
-
3
-
4
-
5
-
6
-
7
-
8
-
9
-
10
-
11
-
12
-
13
-
14
-
15
-
16
-
17
-
18
-
19
-
20
-
21
-
22
-
23
-
24
-
25
-
26
-
27
-
28
-
29
-
30
-
31
-
32
-
33
-
34
-
35
-
36
-
37
-
38
-
39
-
40
-
41
-
42
-
43
-
44
-
45
-
46
-
47
-
48
-
49
-
50
-
51
-
52
-
53
-
54
-
55
-
56
-
57
-
 58
58 -
 59
59 -
 60
60 -
 61
61 -
 62
62 -
 63
63 -
 64
64 -
 65
65 -
 66
66 -
 67
67 -
 68
68 -
69
-
70
-
71
-
72
-
73
-
74
-
75
-
76
-
77
-
78
-
79
-
80
-
81
-
82
-
83
-
84
-
85
-
86
-
87
-
88
-
89
-
90
-
91
-
92
-
93
-
94
-
95
-
96
-
97
-
98
-
99
-
100
-
101
-
102
-
103
-
104
-
105
-
106
-
107
-
108
-
109
-
110
-
111
-
112
-
113
-
114
-
115
-
116
-
117
-
118
-
119
-
120
-
121
-
122
-
123
-
124
-
125
-
126
-
127
-
128
-
129
-
130
-
131
-
132
-
133
-
134
-
135
-
136
-
137
-
138
-
139
-
140
-
141
-
142
-
143
-
144
-
145
-
146
-
147
-
148
-
149
-
150
-
151
-
152
-
153
-
154
-
155
-
156
 |
 |
