Canon PIXMA MP500 MP500 User's Guide - Page 29
Loading Envelopes - printer ink
 |
View all Canon PIXMA MP500 manuals
Add to My Manuals
Save this manual to your list of manuals |
Page 29 highlights
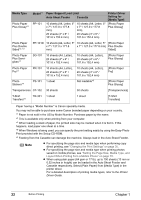
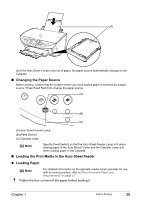
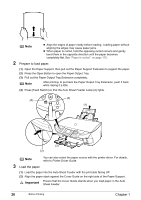
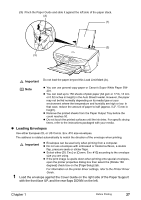
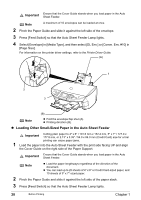
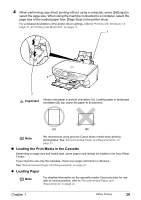
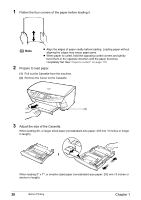
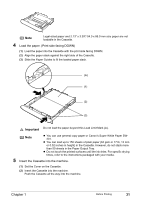
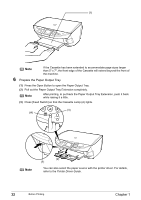
(3) Pinch the Paper Guide and slide it against the left side of the paper stack. (A) (1) (2) (3) Important Do not load the paper beyond this Load Limit Mark (A). Note z You can use general copy paper or Canon's Super White Paper SW201. z You can load up to 150 sheets of plain paper (64 gsm or 17 lb, 13 mm or 0.52 inches in height) in the Auto Sheet Feeder. However, the paper may not be fed normally depending on its media type or your environment where the temperature and humidity are high or low. In that case, reduce the amount of paper to half (approx. 0.2" / 5 mm in height). z Remove the printed sheets from the Paper Output Tray before the count reaches 50. z Do not touch the printed surfaces until the ink dries. For specific drying times, refer to the instructions packaged with your media. z Loading Envelopes Use either European DL or US Comm. Env. #10 size envelopes. The address is rotated automatically to match the direction of the envelope when printing. Important z Envelopes can be used only when printing from a computer. z Do not use envelopes with embossed or treated surfaces, a double flap, pressure seals or sticker flaps. z Select either [DL Env.] or [Comm. Env. #10] according to the envelope size you are using. z If the print image is upside down when printing onto special envelopes, open the printer properties dialog box then select the [Rotate 180 degrees] check box on the [Page Setup] tab. For information on the printer driver settings, refer to the Printer Driver Guide. 1 Load the envelope against the Cover Guide on the right side of the Paper Support with the front face UP, and the rear flaps DOWN on the left. Chapter 1 Before Printing 27
-
 1
1 -
2
-
3
-
4
-
5
-
6
-
7
-
8
-
9
-
10
-
11
-
12
-
13
-
14
-
15
-
16
-
17
-
18
-
19
-
20
-
21
-
22
-
23
-
 24
24 -
 25
25 -
 26
26 -
 27
27 -
 28
28 -
 29
29 -
 30
30 -
 31
31 -
 32
32 -
 33
33 -
 34
34 -
35
-
36
-
37
-
38
-
39
-
40
-
41
-
42
-
43
-
44
-
45
-
46
-
47
-
48
-
49
-
50
-
51
-
52
-
53
-
54
-
55
-
56
-
57
-
58
-
59
-
60
-
61
-
62
-
63
-
64
-
65
-
66
-
67
-
68
-
69
-
70
-
71
-
72
-
73
-
74
-
75
-
76
-
77
-
78
-
79
-
80
-
81
-
82
-
83
-
84
-
85
-
86
-
87
-
88
-
89
-
90
-
91
-
92
-
93
-
94
-
95
-
96
-
97
-
98
-
99
-
100
-
101
-
102
-
103
-
104
-
105
-
106
-
107
-
108
-
109
-
110
-
111
-
112
-
113
-
114
-
115
-
116
-
117
-
118
-
119
-
120
-
121
-
122
-
123
-
124
-
125
-
126
-
127
-
128
-
129
-
130
-
131
-
132
-
133
-
134
-
135
-
136
-
137
-
138
-
139
-
140
-
141
-
142
-
143
-
144
-
145
-
146
-
147
-
148
-
149
-
150
-
151
-
152
-
153
-
154
-
155
-
156
 |
 |
