Canon PIXMA MP500 MP500 User's Guide - Page 41
Copying - reset
 |
View all Canon PIXMA MP500 manuals
Add to My Manuals
Save this manual to your list of manuals |
Page 41 highlights
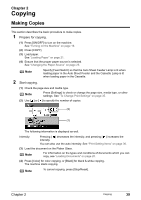
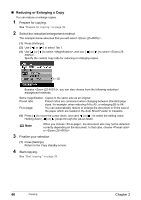
Chapter 2 Copying Making Copies This section describes the basic procedure to make copies. 1 Prepare for copying. (1) Press [ON/OFF] to turn on the machine. See "Turning on the Machine" on page 19. (2) Press [COPY]. (3) Load paper. See "Loading Paper" on page 21. (4) Ensure that the proper paper source is selected. See "Changing the Paper Source" on page 25. Note Specify [Feed Switch] so that the Auto Sheet Feeder Lamp is lit when loading paper in the Auto Sheet Feeder and the Cassette Lamp is lit when loading paper in the Cassette. 2 Start copying. (1) Check the page size and media type. Note Press [Settings] to check or change the page size, media type, or other settings. See "To Change Print Settings" on page 35. (2) Use [ ] or [ ] to specify the number of copies. (2) (1) The following information is displayed as well. Intensity: Pressing [ ] decreases the intensity, and pressing [ ] increases the intensity. You can also use the auto intensity. See "Print Setting Items" on page 36. (3) Load the document on the Platen Glass. Note For information on the types and conditions of documents which you can copy, see "Loading Documents" on page 20. (4) Press [Color] for color copying, or [Black] for black & white copying. The machine starts copying. Note To cancel copying, press [Stop/Reset]. Chapter 2 Copying 39
-
 1
1 -
2
-
3
-
4
-
5
-
6
-
7
-
8
-
9
-
10
-
11
-
12
-
13
-
14
-
15
-
16
-
17
-
18
-
19
-
20
-
21
-
22
-
23
-
24
-
25
-
26
-
27
-
28
-
29
-
30
-
31
-
32
-
33
-
34
-
35
-
 36
36 -
 37
37 -
 38
38 -
 39
39 -
 40
40 -
 41
41 -
 42
42 -
 43
43 -
 44
44 -
 45
45 -
 46
46 -
47
-
48
-
49
-
50
-
51
-
52
-
53
-
54
-
55
-
56
-
57
-
58
-
59
-
60
-
61
-
62
-
63
-
64
-
65
-
66
-
67
-
68
-
69
-
70
-
71
-
72
-
73
-
74
-
75
-
76
-
77
-
78
-
79
-
80
-
81
-
82
-
83
-
84
-
85
-
86
-
87
-
88
-
89
-
90
-
91
-
92
-
93
-
94
-
95
-
96
-
97
-
98
-
99
-
100
-
101
-
102
-
103
-
104
-
105
-
106
-
107
-
108
-
109
-
110
-
111
-
112
-
113
-
114
-
115
-
116
-
117
-
118
-
119
-
120
-
121
-
122
-
123
-
124
-
125
-
126
-
127
-
128
-
129
-
130
-
131
-
132
-
133
-
134
-
135
-
136
-
137
-
138
-
139
-
140
-
141
-
142
-
143
-
144
-
145
-
146
-
147
-
148
-
149
-
150
-
151
-
152
-
153
-
154
-
155
-
156
 |
 |
