Canon PIXMA MP500 MP500 User's Guide - Page 30
Loading Other Small-Sized Paper in the Auto Sheet Feeder
 |
View all Canon PIXMA MP500 manuals
Add to My Manuals
Save this manual to your list of manuals |
Page 30 highlights
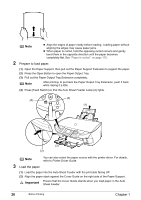
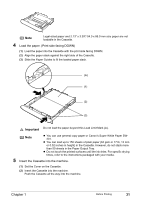
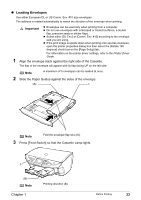
Important Ensure that the Cover Guide stands when you load paper in the Auto Sheet Feeder. Note A maximum of 10 envelopes can be loaded at once. 2 Pinch the Paper Guide and slide it against the left side of the envelope. 3 Press [Feed Switch] so that the Auto Sheet Feeder Lamp lights. 4 Select [Envelope] in [Media Type], and then select [DL Env.] or [Comm. Env. #10] in [Page Size]. For information on the printer driver settings, refer to the Printer Driver Guide. (A) 1 2 3 (B) Note z Fold the envelope flap shut (A). z Printing direction (B). z Loading Other Small-Sized Paper in the Auto Sheet Feeder Important Cutting plain paper to 4" x 6" / 101.6 mm x 152.4 mm, 5" x 7" / 127.0 x 177.8 mm, or 2.13" x 3.39" / 54.0 x 86.0 mm (Credit Card) size for a trial printing can cause paper jams. 1 Load the paper into the Auto Sheet Feeder with the print side facing UP and align the Cover Guide on the right side of the Paper Support. Important Ensure that the Cover Guide stands when you load paper in the Auto Sheet Feeder. Note z Load the paper lengthways regardless of the direction of the document. z You can load up to 20 sheets of 4" x 6" or Credit Card-sized paper, and 10 sheets of 5" x 7"-sized paper. 2 Pinch the Paper Guide and slide it against the left side of the paper stack. 3 Press [Feed Switch] so that the Auto Sheet Feeder Lamp lights. 28 Before Printing Chapter 1
-
 1
1 -
2
-
3
-
4
-
5
-
6
-
7
-
8
-
9
-
10
-
11
-
12
-
13
-
14
-
15
-
16
-
17
-
18
-
19
-
20
-
21
-
22
-
23
-
24
-
 25
25 -
 26
26 -
 27
27 -
 28
28 -
 29
29 -
 30
30 -
 31
31 -
 32
32 -
 33
33 -
 34
34 -
 35
35 -
36
-
37
-
38
-
39
-
40
-
41
-
42
-
43
-
44
-
45
-
46
-
47
-
48
-
49
-
50
-
51
-
52
-
53
-
54
-
55
-
56
-
57
-
58
-
59
-
60
-
61
-
62
-
63
-
64
-
65
-
66
-
67
-
68
-
69
-
70
-
71
-
72
-
73
-
74
-
75
-
76
-
77
-
78
-
79
-
80
-
81
-
82
-
83
-
84
-
85
-
86
-
87
-
88
-
89
-
90
-
91
-
92
-
93
-
94
-
95
-
96
-
97
-
98
-
99
-
100
-
101
-
102
-
103
-
104
-
105
-
106
-
107
-
108
-
109
-
110
-
111
-
112
-
113
-
114
-
115
-
116
-
117
-
118
-
119
-
120
-
121
-
122
-
123
-
124
-
125
-
126
-
127
-
128
-
129
-
130
-
131
-
132
-
133
-
134
-
135
-
136
-
137
-
138
-
139
-
140
-
141
-
142
-
143
-
144
-
145
-
146
-
147
-
148
-
149
-
150
-
151
-
152
-
153
-
154
-
155
-
156
 |
 |
