Dell PowerConnect J-SRX100 Hardware Guide
Dell PowerConnect J-SRX100 Manual
 |
View all Dell PowerConnect J-SRX100 manuals
Add to My Manuals
Save this manual to your list of manuals |
Dell PowerConnect J-SRX100 manual content summary:
- Dell PowerConnect J-SRX100 | Hardware Guide - Page 1
Dell PowerConnect J-Series J-SRX100 Services Gateway Hardware Guide Published: 2010-10-28 - Dell PowerConnect J-SRX100 | Hardware Guide - Page 2
to Juniper Networks: U.S. Patent Nos. 5,473,599, 5,905,725, 5,909,440, 6,192,051, 6,333,650, 6,359,479, 6,406,312, 6,429,706, 6,459,579, 6,493,347, 6,538,518, 6,538,899, 6,552,918, 6,567,902, 6,578,186, and 6,590,785. PowerConnect J-Series J-SRX100 Services Gateway Hardware Guide © Copyright Dell - Dell PowerConnect J-SRX100 | Hardware Guide - Page 3
the limitations and restrictions set forth herein, Juniper grants to Customer a non-exclusive and non services, applications, operations, or capabilities, or provide throughput, performance, configuration Belted Radius software to support any commercial network access services. The foregoing license - Dell PowerConnect J-SRX100 | Hardware Guide - Page 4
this Agreement shall give rise to any obligation to support the Software. Support services may be purchased separately. Any such support shall be governed by a separate, written support services agreement. TO THE MAXIMUM EXTENT PERMITTED BY LAW, JUNIPER SHALL NOT BE LIABLE FOR ANY LOST PROFITS, LOSS - Dell PowerConnect J-SRX100 | Hardware Guide - Page 5
makes such information available. 14. Third Party Software. Any licensor of Juniper whose software is embedded in the Software and any supplier of Juniper whose products or technology are embedded in (or services are accessed by) the Software shall be a third party beneficiary with respect to - Dell PowerConnect J-SRX100 | Hardware Guide - Page 6
vi - Dell PowerConnect J-SRX100 | Hardware Guide - Page 7
This Guide xi Objectives xi Audience xi Documentation Conventions xii Repair and Warranty xiii Requesting Technical Support xiii J-SRX100 Services Gateway Overview Introduction to the J-SRX100 Services Gateway 3 J-SRX100 Services Gateway Description 3 About the J-SRX100 Services Gateway - Dell PowerConnect J-SRX100 | Hardware Guide - Page 8
PowerConnect J-SRX100 Services Gateway Hardware Guide Chapter 5 Chapter 6 Chapter 7 Chapter 8 Chapter 9 Chapter 10 Chapter 11 Chapter 12 Required Tools and Parts for Installing and Maintaining the J-SRX100 Services Gateway 31 Required Tools and Parts for Installing and Maintaining the J-SRX100 - Dell PowerConnect J-SRX100 | Hardware Guide - Page 9
J-SRX100 Services Gateway Power System 92 Resetting the Configuration File When the J-SRX100 Services Gateway Is Inaccessible 93 Using the Reset Config Button on the J-SRX100 Services Gateway 93 Changing the Reset Config Button Behavior on the J-SRX100 Services Gateway 94 Dell Support 95 Dell - Dell PowerConnect J-SRX100 | Hardware Guide - Page 10
-45 Connector Pinouts for the J-SRX100 Services Gateway Console Port . . . . 128 Getting Help 131 Obtaining Assistance 131 Online Services 132 Automated Order-Status Service 133 Support Service 133 Dell Enterprise Training and Certification 133 Problems With Your Order 133 Product Information - Dell PowerConnect J-SRX100 | Hardware Guide - Page 11
• Repair and Warranty on page xiii • Requesting Technical Support on page xiii This guide describes hardware components and installation, basic configuration, and basic troubleshooting procedures for the PowerConnect J-Series J-SRX100 Services Gateway. It explains how to prepare your site for the - Dell PowerConnect J-SRX100 | Hardware Guide - Page 12
PowerConnect J-SRX100 Services Gateway Hardware Guide Documentation Conventions Table 1: Notice Icons Icon Meaning Informational note Caution Warning Laser warning Description Indicates important features or instructions configuration mode, type the configure command: user@host> configure - Dell PowerConnect J-SRX100 | Hardware Guide - Page 13
only perform troubleshooting and simple repairs as authorized in your product documentation, or as directed by the online or telephone service and support team. Damage due to servicing that is not authorized by Dell is not covered by your warranty. Read and follow the safety instructions that came - Dell PowerConnect J-SRX100 | Hardware Guide - Page 14
PowerConnect J-SRX100 Services Gateway Hardware Guide xiv - Dell PowerConnect J-SRX100 | Hardware Guide - Page 15
PART 1 J-SRX100 Services Gateway Overview • Introduction to the J-SRX100 Services Gateway on page 3 • J-SRX100 Services Gateway Hardware Components and Specifications on page 7 1 - Dell PowerConnect J-SRX100 | Hardware Guide - Page 16
PowerConnect J-SRX100 Services Gateway Hardware Guide 2 - Dell PowerConnect J-SRX100 | Hardware Guide - Page 17
routing in addition to switching support and LAN connectivity. The device provides IP Security (IPsec), virtual private network (VPN), and firewall services for small-sized and medium-sized companies and enterprise branch and remote offices. The J-SRX100 Services Gateway can be connected directly to - Dell PowerConnect J-SRX100 | Hardware Guide - Page 18
SRX100 Services Gateway Low Memory J-SRX100B J-SRX100 Services Gateway High Memory J-SRX100H J-SRX100 Services Gateway High Memory J-SRX100S NOTE: The J-SRX100S model supports up to 20 users, 4,000 firewall sessions, and 20 IPsec tunnels. J-SRX100 Services Gateway High Memory J-SRX100SU - Dell PowerConnect J-SRX100 | Hardware Guide - Page 19
on Junos OS features and licenses for the J-SRX100 Services Gateway, see the Junos OS Administration Guide. For more information on upgrading a J-SRX100 Services Gateway Low Memory to High Memory, see "Upgrading the J-SRX100 Services Gateway Low Memory Version to a High Memory Version" on page - Dell PowerConnect J-SRX100 | Hardware Guide - Page 20
PowerConnect J-SRX100 Services Gateway Hardware Guide 6 - Dell PowerConnect J-SRX100 | Hardware Guide - Page 21
Chassis depth Chassis weight 1.38 in. (35 mm) 8.5 in. (216 mm) 5.79 in. (147 mm) 1.86 lb (844 g) Average power consumption Altitude • J-SRX100 Services Gateway Low Memory model: 10 watts • J-SRX100 Services Gateway High Memory model: 10 watts No performance degradation to 10,000 ft (3048 m) 7 - Dell PowerConnect J-SRX100 | Hardware Guide - Page 22
PowerConnect J-SRX100 Services Gateway Hardware Guide Table 5: J-SRX100 Services Gateway Specifications (continued) Specification Value Maximum thermal output The maximum thermal values for the two models of services gateways are as follows: • Low Memory - AC power: 80 BTU/hour (21.5 W) • High - Dell PowerConnect J-SRX100 | Hardware Guide - Page 23
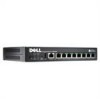
SRX100 Services Gateway. Figure 2: J-SRX100 Services Gateway Front Panel J- Table 6 on page 9 lists the front panel components of the services gateway. Table 6: J-SRX100 Services Gateway Front Panel Components Number Component 1 Power button 2 LEDs: Alarm, Status, Power, HA 3 Reset Config - Dell PowerConnect J-SRX100 | Hardware Guide - Page 24
PowerConnect J-SRX100 Services Gateway Hardware Guide J-SRX100 Services Gateway Back Panel Figure 3 on page 10 illustrates the back panel of the J-SRX100 Services Gateway. Figure 3: J-SRX100 Services Gateway Back Panel Table 7 on page 10 lists the components available on the back panel of the J- - Dell PowerConnect J-SRX100 | Hardware Guide - Page 25
an RJ-45 serial cable connector • Supports the RS-232 (EIA-232) standard The console port can be used: • To provide the console interface. • To function as a management port to log into a device directly. • To configure the device using the CLI. NOTE: The Reset Config button is used to remove the - Dell PowerConnect J-SRX100 | Hardware Guide - Page 26
PowerConnect J-SRX100 Services Gateway Hardware Guide CAUTION: Pressing and holding the Reset Config button for 15 seconds or more deletes all configurations on the device and loads and commits the factory configuration. Related • J-SRX100 Services Gateway Specifications on page 7 Documentation • J- - Dell PowerConnect J-SRX100 | Hardware Guide - Page 27
Chapter 2: J-SRX100 Services Gateway Hardware Components and Specifications Table 9: J-SRX100 Services Gateway Front Panel LEDs Number Component Description Usage 1 Alarm LED The Alarm LED has The Alarm LED can be the following indicator used to gather colors: - Dell PowerConnect J-SRX100 | Hardware Guide - Page 28
PowerConnect J-SRX100 Services Gateway Hardware Guide Table 9: J-SRX100 Services Gateway Front Panel LEDs (continued) Number Component Description Usage 3 HA LED The HA LED has the The HA LED can be following indicator used to determine - Dell PowerConnect J-SRX100 | Hardware Guide - Page 29
J-SRX100 Services Gateway Front Panel and Back Panel Views on page 9 • J-SRX100 Services Gateway Built-In Interfaces on page 10 • J-SRX100 Services Gateway Boot Devices on page 15 • J-SRX100 Services Gateway Power Supply on page 16 J-SRX100 Services Gateway Boot Devices The J-SRX100 Services Gateway - Dell PowerConnect J-SRX100 | Hardware Guide - Page 30
PowerConnect J-SRX100 Services Gateway Hardware Guide J-SRX100 Services Gateway Power Supply The power supply for the J-SRX100 Services Gateway is external. You must use the power supply adapter provided by the manufacturer to provide power to the services gateway. NOTE: The power supply adapter (30 - Dell PowerConnect J-SRX100 | Hardware Guide - Page 31
J-SRX100 Services Gateway on page 51 • J-SRX100 Services Gateway Memory Upgrade on page 59 • J-SRX100 Services Gateway Autoinstallation on page 61 • Connecting the J-SRX100 Services Gateway to Management Devices on page 63 • Performing Initial Software Configuration on the J-SRX100 Services Gateway - Dell PowerConnect J-SRX100 | Hardware Guide - Page 32
PowerConnect J-SRX100 Services Gateway Hardware Guide 18 - Dell PowerConnect J-SRX100 | Hardware Guide - Page 33
J-SRX100 Services Gateway on page 22 • J-SRX100 Services Gateway Cabinet Requirements on page 22 • J-SRX100 Services Gateway Rack Requirements on page 23 • Clearance Requirements for Airflow and Hardware Maintenance of the J-SRX100 Services Gateway on page 24 • J-SRX100 Services Gateway Electrical - Dell PowerConnect J-SRX100 | Hardware Guide - Page 34
PowerConnect J-SRX100 Services Gateway Hardware Guide Table 11: Site Preparation Checklist for Services Gateway Installation (continued) Item or Task Additional Information Performed By Date • Measure the distance between the external power sources and the device installation site. • Locate - Dell PowerConnect J-SRX100 | Hardware Guide - Page 35
the installation location, including required space clearances and airflow requirements. "Preparing the J-SRX100 Services Gateway for Desk-Mount Installation" on page 38 Cables • Acquire cables and connectors. • Review the maximum distance allowed for each cable. Choose the length of cable based - Dell PowerConnect J-SRX100 | Hardware Guide - Page 36
PowerConnect J-SRX100 Services Gateway Hardware Guide General Site Guidelines for Installing the J-SRX100 Services Gateway Keep the following precautions in mind to help you plan an acceptable operating environment for your J-SRX100 Services Gateway and avoid environmentally caused equipment - Dell PowerConnect J-SRX100 | Hardware Guide - Page 37
on page 23 • Site Preparation Checklist for the J-SRX100 Services Gateway on page 19 • Clearance Requirements for Airflow and Hardware Maintenance of the J-SRX100 Services Gateway on page 24 J-SRX100 Services Gateway Rack Requirements The services gateway can be installed in a rack. Many types of - Dell PowerConnect J-SRX100 | Hardware Guide - Page 38
PowerConnect J-SRX100 Services Gateway Hardware Guide Table 13: Rack Requirements for the Services Gateway Rack Requirements Specifications Rack Size A 19 in. (48.3 cm) rack as defined in Cabinets, Racks, Panels, and Associated Equipment (document number EIA-310-D) published by - Dell PowerConnect J-SRX100 | Hardware Guide - Page 39
for the J-SRX100 Services Gateway. Related • J-SRX100 Services Gateway Description on page 3 Documentation • General Site Guidelines for Installing the J-SRX100 Services Gateway on page 22 • Site Preparation Checklist for the J-SRX100 Services Gateway on page 19 • J-SRX100 Services Gateway Cabinet - Dell PowerConnect J-SRX100 | Hardware Guide - Page 40
PowerConnect J-SRX100 Services Gateway Hardware Guide J-SRX100 Services Gateway Electrical and Power Requirements This topic provides information on the factors you must consider while planning the electrical wiring and power availability at your site. - Dell PowerConnect J-SRX100 | Hardware Guide - Page 41
CHAPTER 4 Installation Overview for the J-SRX100 Services Gateway This chapter includes the following section: • Installation Overview for the J-SRX100 Services Gateway on page 28 27 - Dell PowerConnect J-SRX100 | Hardware Guide - Page 42
PowerConnect J-SRX100 Services Gateway Hardware Guide Installation Overview for the J-SRX100 Services Gateway After you have prepared your installation site, you are ready to unpack and install the services gateway. It is important to proceed through the installation process in the order shown in - Dell PowerConnect J-SRX100 | Hardware Guide - Page 43
on page 37 • Preparing the J-SRX100 Services Gateway for Desk-Mount Installation on page 38 • Preparing the J-SRX100 Services Gateway for Wall-Mount Installation on page 38 • Installing the J-SRX100 Services Gateway in a Rack on page 42 • Installing the J-SRX100 Services Gateway on a Desk on page 46 - Dell PowerConnect J-SRX100 | Hardware Guide - Page 44
PowerConnect J-SRX100 Services Gateway Hardware Guide 30 - Dell PowerConnect J-SRX100 | Hardware Guide - Page 45
1 and 3 • Tie wrap "Installing the J-SRX100 Services Gateway in a Rack" on page 42 "Installing the J-SRX100 Services Gateway on a Desk" on page 46 "Installing the J-SRX100 Services Gateway on a Wall" on page 47 Connecting the J-SRX100 Services Gateway Electrostatic discharge (ESD) grounding wrist - Dell PowerConnect J-SRX100 | Hardware Guide - Page 46
PowerConnect J-SRX100 Services Gateway Hardware Guide Table 16: Required Tools and Parts for Installing and Maintaining the J-SRX100 Services Gateway (continued) Task Tools and Parts Related Topic Packing the J-SRX100 Services Gateway • Electrostatic bag or antistatic mat, for each component • - Dell PowerConnect J-SRX100 | Hardware Guide - Page 47
Verifying Parts Received with the J-SRX100 Services Gateway on page 34 Unpacking the J-SRX100 Services Gateway The J-SRX100 Services Gateway is shipped in a cardboard carton. The carton also contains an accessory box and the J-SRX100 Services Gateway Quick Start Guide. NOTE: The device is maximally - Dell PowerConnect J-SRX100 | Hardware Guide - Page 48
Dell Support. A fully configured J-SRX100 Services Gateway SRX100S and J-SRX100SU models. Contact Dell Support for more information. Table 18: Accessory Parts List for the J-SRX100 Services Gateway Part Quantity Product Warranty 1 End User License Agreement 1 Quick Start Guide 1 Dell SERI - Dell PowerConnect J-SRX100 | Hardware Guide - Page 49
and wall installation of the J-SRX100 Services Gateway must be ordered separately. Contact Dell Support for more information. Related • Required Tools and Parts for Installing and Maintaining the J-SRX100 Services Gateway Documentation on page 31 • Unpacking the J-SRX100 Services Gateway on page 33 - Dell PowerConnect J-SRX100 | Hardware Guide - Page 50
PowerConnect J-SRX100 Services Gateway Hardware Guide 36 - Dell PowerConnect J-SRX100 | Hardware Guide - Page 51
, see "Clearance Requirements for Airflow and Hardware Maintenance of the J-SRX100 Services Gateway" on page 24. • Remove the services gateway chassis from the shipping carton. For unpacking instructions, see "Unpacking the J-SRX100 Services Gateway" on page 33. • Verify that you have the following - Dell PowerConnect J-SRX100 | Hardware Guide - Page 52
PowerConnect J-SRX100 Services Gateway Hardware Guide NOTE: The rack-mounting kit is not shipped with the device and must be ordered separately. Preparing the J-SRX100 Services Gateway for Desk-Mount Installation You can mount a J-SRX100 Services Gateway on a desk or other level surface horizontally - Dell PowerConnect J-SRX100 | Hardware Guide - Page 53
J-SRX100 Services Gateway for Installation • Remove the services gateway chassis from the shipping carton. For unpacking instructions, see "Unpacking the J-SRX100 Services Gateway" on page 33. • Verify that you have the following parts available in your wall-mounting kit for the J-SRX100 Services - Dell PowerConnect J-SRX100 | Hardware Guide - Page 54
PowerConnect J-SRX100 Services Gateway Hardware Guide 40 - Dell PowerConnect J-SRX100 | Hardware Guide - Page 55
of guidelines for working with electrical equipment is beyond the scope of this guide. Related • J-SRX100 Services Gateway General Safety Guidelines and Warnings on page 101 Documentation • J-SRX100 Services Gateway Electrical Safety Guidelines and Warnings on page 118 • Required Tools and Parts for - Dell PowerConnect J-SRX100 | Hardware Guide - Page 56
PowerConnect J-SRX100 Services Gateway Hardware Guide • Installing the J-SRX100 Services Gateway on a Desk on page 46 • Installing the J-SRX100 Services Gateway on a Wall on page 47 Installing the J-SRX100 Services Gateway in a Rack You can front-mount two J-SRX100 Services Gateways in a rack. Many - Dell PowerConnect J-SRX100 | Hardware Guide - Page 57
tray are aligned with the mounting screws on the opposite side and that the tray is level. Installing the J-SRX100 Services Gateway in a Non-Telco Rack The J-SRX100S and J-SRX100SU models can be installed in a non-telco rack. Use the following installation procedure to install the device in a non - Dell PowerConnect J-SRX100 | Hardware Guide - Page 58
g040634 PowerConnect J-SRX100 Services Gateway Hardware Guide Figure 8: Installing a Cage Nut Using a Cage-Nut-Insertion Tool d. Pull the tool and the cage nut back through the slot. e. Proceed to Step 2-Installing the J-SRX100 Services Gateway in a Non-Telco Rack. Step 1 - Attaching/Installing the - Dell PowerConnect J-SRX100 | Hardware Guide - Page 59
a hole in each rack rail as shown in Figure 11 on page 45, making sure the rack-mount tray is level. Figure 11: Hanging the J-SRX100 Services Gateway in a Non-Telco Rack e. Have a second person install the 10-32 screws with washers into each of the two aligned holes on the rack. Use - Dell PowerConnect J-SRX100 | Hardware Guide - Page 60
PowerConnect J-SRX100 Services Gateway Hardware Guide f. Install the second set of 10-32 screws with washers in each side of the rack-mount tray. g. Verify that the mounting screws on one - Dell PowerConnect J-SRX100 | Hardware Guide - Page 61
the device on a flat and level surface with the logo facing up, as shown in Figure 12 on page 47. Figure 12: Installing the J-SRX100 Services Gateway on a Desk J-SRX100 2. Attach the vertical stand to the right side of the chassis as shown in Figure 12 on page 47. 3. Place the chassis vertically on - Dell PowerConnect J-SRX100 | Hardware Guide - Page 62
PowerConnect J-SRX100 Services Gateway Hardware Guide 1. Place the device on a flat and level surface with the logo facing up. 2. Position a mounting bracket on each side of the chassis as shown in Figure 13 on page 48. Figure 13: Installing the J-SRX100 Services Gateway on a Wall J-SRX100 3. Use a - Dell PowerConnect J-SRX100 | Hardware Guide - Page 63
Installation on page 38 • J-SRX100 Services Gateway Safety Requirements, Warnings, and Guidelines on page 41 • Installing the J-SRX100 Services Gateway on a Desk on page 46 • Installing the J-SRX100 Services Gateway in a Rack on page 42 • Connecting the J-SRX100 Services Gateway to the Power Supply - Dell PowerConnect J-SRX100 | Hardware Guide - Page 64
PowerConnect J-SRX100 Services Gateway Hardware Guide 50 - Dell PowerConnect J-SRX100 | Hardware Guide - Page 65
Off the J-SRX100 Services Gateway on page 55 Connecting the J-SRX100 Services Gateway to the Power Supply NOTE: The power supply adapter (30 W) and the 2-prong power cord are shipped separately for the J-SRX100S and J-SRX100SU models. Contact your Dell customer service representative for more - Dell PowerConnect J-SRX100 | Hardware Guide - Page 66
g031032 PowerConnect J-SRX100 Services Gateway Hardware Guide Figure 15: Connecting the Services Gateway to Power Supply NOTE: The device must be connected to earth ground during normal operation. The protective earthing terminal on the rear of the chassis - Dell PowerConnect J-SRX100 | Hardware Guide - Page 67
On the J-SRX100 Services Gateway transmit data. You must configure each network supporting their own weight as they hang to the floor. • Place excess cable out of the way in neatly coiled loops. • Use fasteners to maintain the shape of cable loops. Related • Connecting the J-SRX100 Services Gateway - Dell PowerConnect J-SRX100 | Hardware Guide - Page 68
PowerConnect J-SRX100 Services Gateway Hardware Guide CAUTION: Before device installation begins, a licensed on page 54 lists the grounding components of the J-SRX100 Services Gateway. Table 19: J-SRX100 Services Gateway Grounding Components Number Component 1 Grounding point on the chassis - Dell PowerConnect J-SRX100 | Hardware Guide - Page 69
Powering Off the J-SRX100 Services Gateway on page 55 • Using the Reset Config Button on the J-SRX100 Services Gateway on page 93 • Changing the Reset Config Button Behavior on the J-SRX100 Services Gateway on page 94 Powering On and Powering Off the J-SRX100 Services Gateway This topic describes - Dell PowerConnect J-SRX100 | Hardware Guide - Page 70
PowerConnect J-SRX100 Services Gateway Hardware Guide • Graceful shutdown-Press and immediately release the Power button. The device begins gracefully shutting down the operating system and then powers itself off. WARNING: Use the graceful shutdown method to power off or reboot the services gateway. - Dell PowerConnect J-SRX100 | Hardware Guide - Page 71
Guide. Related • J-SRX100 Services Gateway Front Panel and Back Panel Views on page 9 Documentation • Connecting the J-SRX100 Services Gateway to the Power Supply on page 51 • Grounding the J-SRX100 Services Gateway on page 53 • Using the Reset Config Button on the J-SRX100 Services Gateway - Dell PowerConnect J-SRX100 | Hardware Guide - Page 72
PowerConnect J-SRX100 Services Gateway Hardware Guide 58 - Dell PowerConnect J-SRX100 | Hardware Guide - Page 73
license. You can install the memory license using the CLI configuration editor. For more information, see the Junos OS Administration Guide. NOTE: When you install the memory upgrade license on a J-SRX100 Services Gateway Low Memory device, the device reboots automatically. When the device is - Dell PowerConnect J-SRX100 | Hardware Guide - Page 74
PowerConnect J-SRX100 Services Gateway Hardware Guide For more information on generating, installing, and managing licenses, see the Junos OS Administration Guide. To obtain a memory license, contact Dell Support. Related • J-SRX100 Services Gateway Features and Functions on page 5 Documentation • - Dell PowerConnect J-SRX100 | Hardware Guide - Page 75
for IP address acquisition. For more information about configuring autoinstallation, see the Junos OS Administration Guide. Related • Connecting the J-SRX100 Services Gateway to the Power Supply on page 51 Documentation • Grounding the J-SRX100 Services Gateway on page 53 • Powering On and Powering - Dell PowerConnect J-SRX100 | Hardware Guide - Page 76
PowerConnect J-SRX100 Services Gateway Hardware Guide 62 - Dell PowerConnect J-SRX100 | Hardware Guide - Page 77
68 • Connecting to the CLI at the User End for the J-SRX100 Services Gateway on page 69 Connecting a J-SRX100 Services Gateway to the J-Web Interface If you plan to use the J-Web interface to configure the J-SRX100 Services Gateway, you must connect through one of the built-in Ethernet management - Dell PowerConnect J-SRX100 | Hardware Guide - Page 78
PowerConnect J-SRX100 Services Gateway Hardware Guide Figure 17: Connecting to the Ethernet Port on a J-SRX100 Services Gateway 1. From the management device configured to use DHCP. NOTE: After connecting the management device to the services gateway, the DHCP server process on the services gateway - Dell PowerConnect J-SRX100 | Hardware Guide - Page 79
connection to the services gateway if you have not manually configured the IP address. If you lose the connection through the management interface, you must connect through the Console port. Related • Performing Initial Software Configuration on the J-SRX100 Services Gateway Using Documentation the - Dell PowerConnect J-SRX100 | Hardware Guide - Page 80
PowerConnect J-SRX100 Services Gateway Hardware Guide NOTE: Figure 18 on page 65 shows a connection to a local management device. A remote connection to the services gateway through a modem requires the cable and connector shown (provided in the services gateway accessory box), plus a DB-9 female - Dell PowerConnect J-SRX100 | Hardware Guide - Page 81
• Connecting a J-SRX100 Services Gateway to the J-Web Interface on page 63 • J-SRX100 Services Gateway Software Configuration Overview on page 71 • J-SRX100 Services Gateway Secure Web Access Overview on page 81 Connecting the Modem at the J-SRX100 Services Gateway End NOTE: These instructions use - Dell PowerConnect J-SRX100 | Hardware Guide - Page 82
PowerConnect J-SRX100 Services Gateway Hardware Guide Table 22: Port Settings for Configuring the Modem on the Services Gateway End (continued) Port Settings Value Flow control None 5. In the HyperTerminal window, enter AT. For more information on the AT commands, see the Junos OS - Dell PowerConnect J-SRX100 | Hardware Guide - Page 83
• Connecting to the CLI at the User End for the J-SRX100 Services Gateway on page 69 • J-SRX100 Services Gateway Software Configuration Overview on page 71 Connecting to the CLI at the User End for the J-SRX100 Services Gateway To remotely connect to the CLI through a dial-up modem connected - Dell PowerConnect J-SRX100 | Hardware Guide - Page 84
PowerConnect J-SRX100 Services Gateway Hardware Guide The services gateway login prompt appears. 7. Log in as the user root. No password is required at initial connection, but you must assign a root password before committing any configuration settings. Related Documentation • Connecting the - Dell PowerConnect J-SRX100 | Hardware Guide - Page 85
Ports on page 72 • Mapping the Chassis Cluster Ports on page 72 • Understanding Management Access on page 73 Preparing J-SRX100 Services Gateway for Configuration When the J-SRX100 services gateway powers on, it tries to boot the Junos OS from the default storage media. If the device fails to boot - Dell PowerConnect J-SRX100 | Hardware Guide - Page 86
J-SRX100 Services Gateway Hardware Guide NOTE: The J-SRX100 Services Gateway that ship with JUNOS Release 10.0 or later are formatted with dual-root partitions from the factory. For more information on dual-root partitioning, see the Junos OS Administration Guide for Security Devices. You configure - Dell PowerConnect J-SRX100 | Hardware Guide - Page 87
fxp1 interfaces on these ports when the J-SRX100 Services Gateway is operating in chassis cluster mode. For more information, see the following guides: • Junos OS Interfaces and Routing Configuration Guide • Junos OS Security Configuration Guide Understanding Management Access Telnet allows you to - Dell PowerConnect J-SRX100 | Hardware Guide - Page 88
PowerConnect J-SRX100 Services Gateway Hardware Guide NOTE: Information sent in cleartext is not encrypted and therefore can be intercepted. If the device is operating in a Common Criteria environment, see the Secure Configuration Guide for Common Criteria and JUNOS-FIPS. Related • Connecting a J- - Dell PowerConnect J-SRX100 | Hardware Guide - Page 89
Chapter 13: Performing Initial Software Configuration on the J-SRX100 Services Gateway 7. Commit the configuration to activate it on the device. [edit] root@# commit 8. Log in as the administrative user you configured in Step 6. 9. Configure the name of the device. If the name includes spaces, - Dell PowerConnect J-SRX100 | Hardware Guide - Page 90
PowerConnect J-SRX100 Services Gateway Hardware Guide system { host-name devicea; domain-name SRX100 Services Gateway to the CLI on page 65 Documentation • J-SRX100 Services Gateway Software Configuration Overview on page 71 • Performing Initial Software Configuration on the J-SRX100 Services Gateway - Dell PowerConnect J-SRX100 | Hardware Guide - Page 91
Configuration on the J-SRX100 Services Gateway • J-SRX100 Services Gateway Secure Web Access Overview on page 81 Performing Initial Software Configuration on the J-SRX100 Services Gateway address is not assigned to the management device, manually configure an IP address in the 192.168.1.0/24 - Dell PowerConnect J-SRX100 | Hardware Guide - Page 92
PowerConnect J-SRX100 Services Gateway Hardware Guide NOTE: All network and management access settings are optional. 6. Click Apply to apply the configuration. NOTE: After configuring the basic settings, the Web session may timeout. Refresh or relaunch the page if the applied configuration page is - Dell PowerConnect J-SRX100 | Hardware Guide - Page 93
Chapter 13: Performing Initial Software Configuration on the J-SRX100 Services Gateway Table 27: Basic Configuration Summary (Management Access) Field Function Your Action Default Gateway Defines a default gateway through which to direct packets addressed to networks not explicitly listed in - Dell PowerConnect J-SRX100 | Hardware Guide - Page 94
PowerConnect J-SRX100 Services Gateway Hardware Guide To configure basic system properties: 1. In the J-Web interface, select Configure> System properties and select the required tab and proceed with configuring the other settings. See Table 26 on page 78 through Table 28 on page 79 for details. 2. - Dell PowerConnect J-SRX100 | Hardware Guide - Page 95
to apply the configuration and other pending changes (if any) and click Discard to discard pending changes. For more instructions on managing users and operations, monitoring network performance, upgrading software, and diagnosing common problems on a J-SRX100 Series Services Gateway, see the Junos - Dell PowerConnect J-SRX100 | Hardware Guide - Page 96
PowerConnect J-SRX100 Services Gateway Hardware Guide Without SSL encryption, communication between your services gateway and the browser is sent in the open and can be intercepted. We recommend that you enable HTTPS access on your WAN interfaces. For more information about configuring secure Web - Dell PowerConnect J-SRX100 | Hardware Guide - Page 97
PART 3 Maintaining and Monitoring the J-SRX100 Services Gateway • Maintaining the J-SRX100 Services Gateway Hardware Components on page 85 • Monitoring the J-SRX100 Services Gateway on page 87 83 - Dell PowerConnect J-SRX100 | Hardware Guide - Page 98
PowerConnect J-SRX100 Services Gateway Hardware Guide 84 - Dell PowerConnect J-SRX100 | Hardware Guide - Page 99
describes how to maintain the hardware components of the J-SRX100 Services Gateway. This chapter includes the following section: • Maintaining the J-SRX100 Services Gateway Hardware Components on page 85 Maintaining the J-SRX100 Services Gateway Hardware Components Table 29 on page 85 describes the - Dell PowerConnect J-SRX100 | Hardware Guide - Page 100
PowerConnect J-SRX100 Services Gateway Hardware Guide • Monitoring the J-SRX100 Services Gateway Components Using LEDs on page 89 • Monitoring the J-SRX100 Services Gateway Using Chassis Alarm Conditions on page 91 • Monitoring the J-SRX100 Services Gateway Power System on page 92 86 - Dell PowerConnect J-SRX100 | Hardware Guide - Page 101
the Hardware Components on the J-SRX100 Services Gateway on page 87 • Resetting the Configuration File When the J-SRX100 Services Gateway Is Inaccessible on page 93 • Dell Support on page 95 Monitoring the Hardware Components on the J-SRX100 Services Gateway This topic includes the following - Dell PowerConnect J-SRX100 | Hardware Guide - Page 102
PowerConnect J-SRX100 Services Gateway Hardware Guide Examples: The following examples provide the sample output of commands: • show chassis hardware user@host > show chassis hardware Item Chassis J-SRX100S Routing Engine RE-SRX100-HM FPC 0 PIC 0 PIC Power Supply 0 Version Part number Serial - Dell PowerConnect J-SRX100 | Hardware Guide - Page 103
Monitoring the J-SRX100 Services Gateway Power System on page 92 • Maintaining the J-SRX100 Services Gateway Hardware Components on page 85 • Using the Reset Config Button on the J-SRX100 Services Gateway on page 93 • Dell Support on page 95 Monitoring the J-SRX100 Services Gateway Components Using - Dell PowerConnect J-SRX100 | Hardware Guide - Page 104
the Reset Config button is pressed. Normal condition. No action is required. Indicates that an error is detected in the device. Contact Dell Support. See "Dell Support" on page 95. Alarm LED Red Indicates a major alarm. Major alarm indicates a critical situation on the services gateway that - Dell PowerConnect J-SRX100 | Hardware Guide - Page 105
the J-SRX100 Services Gateway Power System on page 92 • Using the Reset Config Button on the J-SRX100 Services Gateway on page 93 • Changing the Reset Config Button Behavior on the J-SRX100 Services Gateway on page 94 • Dell Support on page 95 Monitoring the J-SRX100 Services Gateway Using Chassis - Dell PowerConnect J-SRX100 | Hardware Guide - Page 106
page 92 • Using the Reset Config Button on the J-SRX100 Services Gateway on page 93 • Changing the Reset Config Button Behavior on the J-SRX100 Services Gateway on page 94 • Dell Support on page 95 Monitoring the J-SRX100 Services Gateway Power System The LEDs on the services gateway enable you to - Dell PowerConnect J-SRX100 | Hardware Guide - Page 107
on page 91 • Using the Reset Config Button on the J-SRX100 Services Gateway on page 93 • Changing the Reset Config Button Behavior on the J-SRX100 Services Gateway on page 94 • Dell Support on page 95 Resetting the Configuration File When the J-SRX100 Services Gateway Is Inaccessible This topic - Dell PowerConnect J-SRX100 | Hardware Guide - Page 108
loads and commits the factory configuration. For details about factory default settings, see the Junos OS Administration Guide. Related • Changing the Reset Config Button Behavior on the J-SRX100 Services Gateway on Documentation page 94 • Monitoring the J-SRX100 Services Gateway Chassis Using the - Dell PowerConnect J-SRX100 | Hardware Guide - Page 109
Chapter 15: Monitoring the J-SRX100 Services Gateway You can still press and hold the button for 15 seconds or more to reset the gateway to the factory defaults. • To disable the button and prevent the device from resetting to either configuration: admin@host# set chassis config-button no-clear no- - Dell PowerConnect J-SRX100 | Hardware Guide - Page 110
PowerConnect J-SRX100 Services Gateway Hardware Guide 96 - Dell PowerConnect J-SRX100 | Hardware Guide - Page 111
PART 4 Appendixes • Safety and Regulatory Compliance Information on page 99 • J-SRX100 Services Gateway Power Guidelines, Requirements, and Specifications on page 123 • J-SRX100 Services Gateway Interface Cable Specifications and Connector Pinouts on page 127 • Getting Help on page 131 97 - Dell PowerConnect J-SRX100 | Hardware Guide - Page 112
PowerConnect J-SRX100 Services Gateway Hardware Guide 98 - Dell PowerConnect J-SRX100 | Hardware Guide - Page 113
Services Gateway Agency Approvals on page 119 • J-SRX100 Services Gateway Compliance Statements for EMC Requirements on page 120 • J-SRX100 Services Gateway Compliance Statements for Environmental Requirements on page 121 J-SRX100 Services Gateway Definition of Safety Warning Levels This guide - Dell PowerConnect J-SRX100 | Hardware Guide - Page 114
PowerConnect J-SRX100 Services Gateway Hardware Guide involved with electrical circuitry and conoscere i pericoli relativi ai circuiti elettrici ed essere al corrente delle pratiche standard per la prevenzione di incidenti. Advarsel Dette varselsymbolet Innan du utför arbete på någon utrustning 100 - Dell PowerConnect J-SRX100 | Hardware Guide - Page 115
SRX100 Services Gateway Fire Safety Requirements on page 104 • J-SRX100 Services Gateway Installation Safety Guidelines and Warnings on page 105 • J-SRX100 Services Gateway chassis covers or sheet metal parts unless instructions are provided in this guide. Such an action could cause severe electrical - Dell PowerConnect J-SRX100 | Hardware Guide - Page 116
PowerConnect J-SRX100 Services Gateway Hardware Guide Qualified Personnel Warning WARNING: Only trained and qualified personnel should install or replace the services gateway. Waarschuwing Installatie en reparaties mogen uitsluitend door getraind en bevoegd personeel uitgevoerd worden. Varoitus - Dell PowerConnect J-SRX100 | Hardware Guide - Page 117
installer dans des zones d'accès réservé. Ces dernières sont des zones auxquelles seul le personnel de service peut accéder en utilisant un outil spécial, un mécanisme de verrouillage et une clé, ou som ansvarar för området. Preventing Electrostatic Discharge Damage to the Services Gateway 103 - Dell PowerConnect J-SRX100 | Hardware Guide - Page 118
PowerConnect J-SRX100 Services Gateway Hardware Guide Many services gateway hardware components are sensitive to damage from static electricity. Some components can be impaired by voltages as low as 30 V. You can easily generate potentially damaging static voltages whenever you handle plastic or - Dell PowerConnect J-SRX100 | Hardware Guide - Page 119
101 Documentation • J-SRX100 Services Gateway Installation Safety Guidelines and Warnings on page 105 J-SRX100 Services Gateway Installation Safety Guidelines and Warnings Installation Instructions Warning WARNING: Read the installation instructions before you connect the services gateway to a power - Dell PowerConnect J-SRX100 | Hardware Guide - Page 120
PowerConnect J-SRX100 Services Gateway Hardware Guide Attention Avant de brancher le système sur la source d' and Warnings Ensure that the equipment rack into which the services gateway is installed is evenly and securely supported to avoid the hazardous condition that could result from uneven - Dell PowerConnect J-SRX100 | Hardware Guide - Page 121
la stabilité du système. Les directives ci-dessous sont destinées à assurer la protection du personnel: • Le rack sur lequel est monté le J-SRX Series services gateway doit être fixé à la structure du bâtiment. • Si cette unité constitue la seule unité montée en casier, elle doit être placée dans le - Dell PowerConnect J-SRX100 | Hardware Guide - Page 122
PowerConnect J-SRX100 Services Gateway Hardware Guide • Der J-SRX Series services gateway muß in einem Gestell installiert werden, sicurezza personale: • Il J-SRX Series services gateway deve essere installato in un telaio, il quale deve essere fissato alla struttura dell'edificio. • Questa unità - Dell PowerConnect J-SRX100 | Hardware Guide - Page 123
garantizar su seguridad, proceda según las siguientes instrucciones: • El J-SRX Series services gateway debe instalarse en un bastidor fijado a la estructura del edificio. eller underhålls på ställningen. Related • J-SRX100 Services Gateway Fire Safety Requirements on page 104 Documentation 109 - Dell PowerConnect J-SRX100 | Hardware Guide - Page 124
PowerConnect J-SRX100 Services Gateway Hardware Guide • J-SRX100 Services Gateway Laser and LED Safety Guidelines and Warnings on page 110 J-SRX100 Services Gateway Laser and LED Safety Guidelines and Warnings Observe the following guidelines and warnings when working around the J-SRX100 Services low - Dell PowerConnect J-SRX100 | Hardware Guide - Page 125
Appendix A: Safety and Regulatory Compliance Information Class 1 LED Product Warning WARNING: Class 1 LED product. Waarschuwing Klasse 1 LED-product. Varoitus Luokan 1 valodiodituote. Attention Alarme de produit LED Class I. Warnung Class 1 LED-Produktwarnung. Avvertenza Avvertenza prodotto LED di - Dell PowerConnect J-SRX100 | Hardware Guide - Page 126
PowerConnect J-SRX100 Services Gateway Hardware Guide Radiation from Open Port Apertures Warning WARNING: Because invisible radiation may be emitted from the aperture of the port when no fiber cable is connected, - Dell PowerConnect J-SRX100 | Hardware Guide - Page 127
Information J-SRX100 Services Gateway Maintenance and Operational Safety Guidelines and Warnings As you maintain the services gateway, observe par le fabricant. Jeter les piles usagées conformément aux instructions du fabricant. Warnung Bei Einsetzen einer falschen Batterie besteht Explosionsgefahr. - Dell PowerConnect J-SRX100 | Hardware Guide - Page 128
PowerConnect J-SRX100 Services Gateway Hardware Guide equivalente recomendado por el fabricante. Desechar las baterías gastadas según las instrucciones del fabricante. Varning! Explosionsfara vid felaktigt batteribyte. Ersätt endast batteriet med - Dell PowerConnect J-SRX100 | Hardware Guide - Page 129
Appendix A: Safety and Regulatory Compliance Information Aviso Antes de trabalhar em equipamento que esteja ligado a linhas de corrente, retire todas as jóias que estiver a usar (incluindo anéis, fios e relógios). Os objectos metálicos aquecerão em contacto com a corrente e em contacto com a ligação - Dell PowerConnect J-SRX100 | Hardware Guide - Page 130
PowerConnect J-SRX100 Services Gateway Hardware Guide Operating Temperature Warning WARNING: To prevent the services gateway from overheating, do not cm di fronte alle aperture delle ventole. Advarsel Unngå overoppheting av eventuelle rutere i J-SRX Series services gateway Disse skal ikke brukes på - Dell PowerConnect J-SRX100 | Hardware Guide - Page 131
alrededor de las aperturas para ventilación. Varning! Förhindra att en J-SRX Series services gateway överhettas genom att inte använda den i ett område • J-SRX100 Services Gateway Laser and LED Safety Guidelines and Warnings on page 110 Documentation • J-SRX100 Services Gateway Electrical Safety - Dell PowerConnect J-SRX100 | Hardware Guide - Page 132
PowerConnect J-SRX100 Services Gateway Hardware Guide J-SRX100 Services Gateway Electrical Safety Guidelines and Warnings When working grounds. • Operate the services gateway within marked electrical ratings and product usage instructions. • For the services gateway and peripheral equipment to - Dell PowerConnect J-SRX100 | Hardware Guide - Page 133
and Operational Safety Guidelines and Warnings on page 113 • J-SRX100 Services Gateway Agency Approvals on page 119 • Grounding the J-SRX100 Services Gateway on page 53 J-SRX100 Services Gateway Agency Approvals The services gateway complies with the following standards: • Safety • CSA 60950-1 (2003 - Dell PowerConnect J-SRX100 | Hardware Guide - Page 134
PowerConnect J-SRX100 Services Gateway Hardware Guide • Immunity • EN 55024 +A1+A2 (1998) Information Technology Equipment Immunity Characteristics • EN-61000-3-2 (2006) Power Line Harmonics • EN-61000-3-3 +A1 +A2 +A3 (1995) Power Line - Dell PowerConnect J-SRX100 | Hardware Guide - Page 135
use the equipment according to the instruction manual. United States This equipment has instructional information about the proper method of reclamation and recycling. Related • J-SRX100 Services Gateway Compliance Statements for EMC Requirements on page 120 Documentation • J-SRX100 Services Gateway - Dell PowerConnect J-SRX100 | Hardware Guide - Page 136
PowerConnect J-SRX100 Services Gateway Hardware Guide 122 - Dell PowerConnect J-SRX100 | Hardware Guide - Page 137
and Specifications This appendix includes the following sections: • J-SRX100 Services Gateway Site Electrical Wiring Guidelines on page 123 • J-SRX100 Services Gateway Power Specifications and Requirements on page 124 J-SRX100 Services Gateway Site Electrical Wiring Guidelines Table 34 on page 123 - Dell PowerConnect J-SRX100 | Hardware Guide - Page 138
PowerConnect J-SRX100 Services Gateway Hardware Guide Table 34: Site Electrical Wiring Guidelines for the Services Gateway (continued) Site Wiring Factor in an electrical hazard NOTE: If your site is susceptible to problems with EMC, particularly from lightning or radio transmitters, you may want - Dell PowerConnect J-SRX100 | Hardware Guide - Page 139
J-SRX100 Services Gateway on page 24 • J-SRX100 Services Gateway Site Electrical Wiring Guidelines on page 123 • Site Preparation Checklist for the J-SRX100 Services Gateway on page 19 • Monitoring the J-SRX100 Services Gateway Power System on page 92 • Maintaining the J-SRX100 Services Gateway - Dell PowerConnect J-SRX100 | Hardware Guide - Page 140
PowerConnect J-SRX100 Services Gateway Hardware Guide 126 - Dell PowerConnect J-SRX100 | Hardware Guide - Page 141
RJ-45/RJ-45 connectors 328 ft (100 m) RJ-45 Related • RJ-45 Connector Pinouts for the J-SRX100 Services Gateway Ethernet Port on page 127 Documentation • RJ-45 Connector Pinouts for the J-SRX100 Services Gateway Console Port on page 128 • J-SRX100 Services Gateway Front Panel and Back Panel Views - Dell PowerConnect J-SRX100 | Hardware Guide - Page 142
PowerConnect J-SRX100 Services Gateway Hardware Guide Figure 20: Ethernet Cable Connector (RJ-45) Table 37 on page 128 describes the RJ-45 connector pinouts for the Ethernet port. Table 37: RJ-45 Connector Pinouts for the Services Gateway Ethernet Port Pin Signal 1 TX+ 2 TX - 3 RX+ 4 - Dell PowerConnect J-SRX100 | Hardware Guide - Page 143
5 Ground Signal Ground 6 RXD Receive Data 7 DSR/DCD Data Set Ready 8 CTS Clear to Send Related • Interface Cable and Wire Specifications for the J-SRX100 Services Gateway on page 127 Documentation • RJ-45 Connector Pinouts for the J-SRX100 Services Gateway Ethernet Port on page 127 129 - Dell PowerConnect J-SRX100 | Hardware Guide - Page 144
PowerConnect J-SRX100 Services Gateway Hardware Guide 130 - Dell PowerConnect J-SRX100 | Hardware Guide - Page 145
page 135 • Packing the J-SRX100 Services Gateway and Components for Shipment on page 136 • Dell Support on page 138 Obtaining Assistance If you experience a problem with your services gateway, you can complete the following steps to diagnose and troubleshoot the problem: 1. Fill out the diagnostics - Dell PowerConnect J-SRX100 | Hardware Guide - Page 146
PowerConnect J-SRX100 Services Gateway Hardware Guide Online Services NOTE: Dell's Express Service Code system may not be available in all countries. When prompted by Dell's automated telephone system, enter your Express Service Code to route the call directly to the proper support personnel. For - Dell PowerConnect J-SRX100 | Hardware Guide - Page 147
For the telephone number to call for your region, see "Contacting Dell" on page 135. Support Service Dell's support service is available 24 hours a day, 7 days a week, to answer your questions about Dell hardware. Our support staff use computer-based diagnostics to provide fast, accurate answers. To - Dell PowerConnect J-SRX100 | Hardware Guide - Page 148
PowerConnect J-SRX100 Services Gateway Hardware Guide Before You Call 4. Include any accessories that belong with the item(s) being returned (such as power cables, media such as CDs, and guides) if the return is for credit. 5. Pack the equipment to be returned in the original (or equivalent) - Dell PowerConnect J-SRX100 | Hardware Guide - Page 149
and regions, click All. 3. In the Support menu, click All Support. 4. Choose the method of contacting Dell that is convenient for you. Locating the J-SRX100 Services Gateway Component Serial Number and Agency Labels Listing the J-SRX100 Services Gateway and Component Details with the CLI Before - Dell PowerConnect J-SRX100 | Hardware Guide - Page 150
PowerConnect J-SRX100 Services Gateway Hardware Guide FPC 0 FPC PIC 0 8x FE Base PIC Power Supply 0 J-SRX100 Services Gateway Chassis Serial Number and Agency Labels The J-SRX100 Services Gateway has a serial number ID and agency labels on the bottom of the chassis as shown in Figure 22 on - Dell PowerConnect J-SRX100 | Hardware Guide - Page 151
on a wall or rack, have one person support the weight of the device while another person services gateway components during packing. Related • Required Tools and Parts for Installing and Maintaining the J-SRX100 Services Gateway Documentation on page 31 • Locating the J-SRX100 Services Gateway - Dell PowerConnect J-SRX100 | Hardware Guide - Page 152
PowerConnect J-SRX100 Services Gateway Hardware Guide Dell Support • Dell Support on page 95 If you need assistance while troubleshooting a services gateway, please go to the Dell Support website at http://www.support.dell.com. 138 - Dell PowerConnect J-SRX100 | Hardware Guide - Page 153
PART 5 Index • Index on page 141 139 - Dell PowerConnect J-SRX100 | Hardware Guide - Page 154
PowerConnect J-SRX100 Services Gateway Hardware Guide 140 - Dell PowerConnect J-SRX100 | Hardware Guide - Page 155
25 CLI show commands 87 compliance EMC requirements 120 Environmental requirements 121 general standards 119 components, packing for shipment 136 configuration Services Gateway 71 connecting to CLI 65 locally 65 remotely 65 connectivity through J-Web 63 console port adapter (chassis 68 - Dell PowerConnect J-SRX100 | Hardware Guide - Page 156
PowerConnect J-SRX100 Services Gateway Hardware Guide Ethernet cable connecting the services gateway to a management device 64 connecting the services gateway to a modem 68 Ethernet port cable specifications 127 RJ-45 128 F factory default configuration 93 fire safety specifications 104 G - Dell PowerConnect J-SRX100 | Hardware Guide - Page 157
24 power 26 rack size 23 rack strength 23 spacing mounting brackets 23 rescue configuration 93 Reset Config button CLI commands 94 set chassis commands 94 using 93 returning components 136 returning services gateway 136 RJ-45 pinouts console port 128 fast Ethernet port 127 RJ-45 to - Dell PowerConnect J-SRX100 | Hardware Guide - Page 158
PowerConnect J-SRX100 Services Gateway Hardware Guide parts 31 power supply 16, 55 powering off 55 powering on 55 rack installation 42 SSL access 81 tools 31 unpacking 33 use 3 verifying parts 34 wall installation 47 Services Gateway configuration 71 services gateway features High
-
 1
1 -
 2
2 -
 3
3 -
 4
4 -
 5
5 -
 6
6 -
 7
7 -
8
-
9
-
10
-
11
-
12
-
13
-
14
-
15
-
16
-
17
-
18
-
19
-
20
-
21
-
22
-
23
-
24
-
25
-
26
-
27
-
28
-
29
-
30
-
31
-
32
-
33
-
34
-
35
-
36
-
37
-
38
-
39
-
40
-
41
-
42
-
43
-
44
-
45
-
46
-
47
-
48
-
49
-
50
-
51
-
52
-
53
-
54
-
55
-
56
-
57
-
58
-
59
-
60
-
61
-
62
-
63
-
64
-
65
-
66
-
67
-
68
-
69
-
70
-
71
-
72
-
73
-
74
-
75
-
76
-
77
-
78
-
79
-
80
-
81
-
82
-
83
-
84
-
85
-
86
-
87
-
88
-
89
-
90
-
91
-
92
-
93
-
94
-
95
-
96
-
97
-
98
-
99
-
100
-
101
-
102
-
103
-
104
-
105
-
106
-
107
-
108
-
109
-
110
-
111
-
112
-
113
-
114
-
115
-
116
-
117
-
118
-
119
-
120
-
121
-
122
-
123
-
124
-
125
-
126
-
127
-
128
-
129
-
130
-
131
-
132
-
133
-
134
-
135
-
136
-
137
-
138
-
139
-
140
-
141
-
142
-
143
-
144
-
145
-
146
-
147
-
148
-
149
-
150
-
151
-
152
-
153
-
154
-
155
-
156
-
157
-
158
 |
 |

Dell PowerConnect J-Series
J-SRX100 Services Gateway
Hardware Guide
Published: 2010-10-28