Dell PowerConnect J-SRX100 Hardware Guide - Page 78
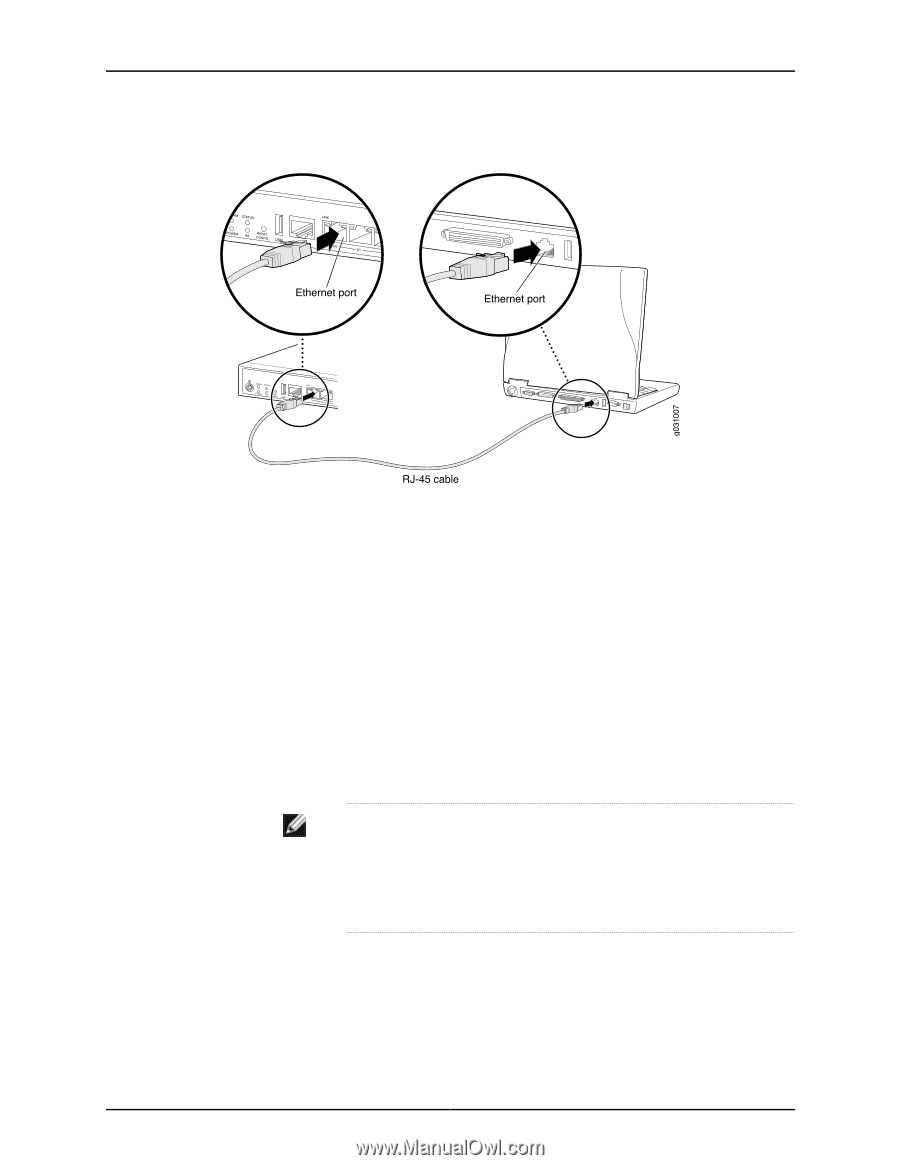
Connecting to the Ethernet Port on a J-SRX100 Services Gateway
 |
View all Dell PowerConnect J-SRX100 manuals
Add to My Manuals
Save this manual to your list of manuals |
Page 78 highlights
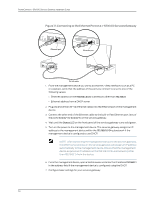
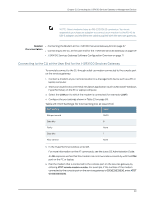
PowerConnect J-SRX100 Services Gateway Hardware Guide Figure 17: Connecting to the Ethernet Port on a J-SRX100 Services Gateway 1. From the management device you use to access the J-Web interface (such as a PC or a laptop), verify that the address of the port you connect to is set to one of the following values: • Ethernet address on the 192.168.1.0/24 subnetwork other than 192.168.1.1 • Ethernet address from a DHCP server 2. Plug one end of the CAT-5e (Ethernet cable) into the Ethernet port on the management device. 3. Connect the other end of the Ethernet cable to the built-in Fast Ethernet port (any of the ports fe-0/0/1 to fe-0/0/7) on the services gateway. 4. Wait until the Status LED on the front panel of the services gateway turns solid green. 5. Turn on the power to the management device. The services gateway assigns an IP address to the management device within the 192.168.1.0/24 subnetwork if the management device is configured to use DHCP. NOTE: After connecting the management device to the services gateway, the DHCP server process on the services gateway will assign an IP address automatically to the management device. Ensure that the management device acquires an IP address on the 192.168.1.0/24 subnetwork (other than 192.168.1.1) from the device. 6. From the management device, open a Web browser and enter the IP address 192.168.1.1 in the address field if the management device is configured using the DHCP. 7. Configure basic settings for your services gateway. 64
-
 1
1 -
2
-
3
-
4
-
5
-
6
-
7
-
8
-
9
-
10
-
11
-
12
-
13
-
14
-
15
-
16
-
17
-
18
-
19
-
20
-
21
-
22
-
23
-
24
-
25
-
26
-
27
-
28
-
29
-
30
-
31
-
32
-
33
-
34
-
35
-
36
-
37
-
38
-
39
-
40
-
41
-
42
-
43
-
44
-
45
-
46
-
47
-
48
-
49
-
50
-
51
-
52
-
53
-
54
-
55
-
56
-
57
-
58
-
59
-
60
-
61
-
62
-
63
-
64
-
65
-
66
-
67
-
68
-
69
-
70
-
71
-
72
-
 73
73 -
 74
74 -
 75
75 -
 76
76 -
 77
77 -
 78
78 -
 79
79 -
 80
80 -
 81
81 -
 82
82 -
 83
83 -
84
-
85
-
86
-
87
-
88
-
89
-
90
-
91
-
92
-
93
-
94
-
95
-
96
-
97
-
98
-
99
-
100
-
101
-
102
-
103
-
104
-
105
-
106
-
107
-
108
-
109
-
110
-
111
-
112
-
113
-
114
-
115
-
116
-
117
-
118
-
119
-
120
-
121
-
122
-
123
-
124
-
125
-
126
-
127
-
128
-
129
-
130
-
131
-
132
-
133
-
134
-
135
-
136
-
137
-
138
-
139
-
140
-
141
-
142
-
143
-
144
-
145
-
146
-
147
-
148
-
149
-
150
-
151
-
152
-
153
-
154
-
155
-
156
-
157
-
158
 |
 |