Dell PowerConnect J-SRX100 Hardware Guide - Page 107
Resetting the Configuration File When the J-SRX100 Services Gateway Is Inaccessible
 |
View all Dell PowerConnect J-SRX100 manuals
Add to My Manuals
Save this manual to your list of manuals |
Page 107 highlights
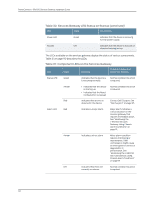
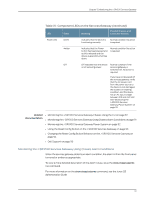
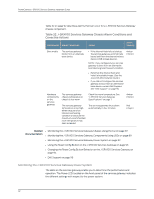
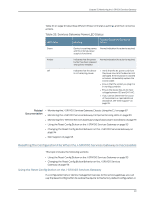
Chapter 15: Monitoring the J-SRX100 Services Gateway Table 33 on page 93 describes different Power LED status settings and their corrective actions. Table 33: Services Gateway Power LED Status LED Status Meaning Possible Cause and Corrective Action Green Device is receiving power, and the internal power supply is functional. Normal indication. No action is required. Amber Indicates that the power button has been pressed and quickly released. Normal indication. No action is required. Off Indicates that the device • Verify that the AC power cord from is not receiving power. the power source to the device is not damaged. If the insulation is cracked or broken, immediately replace the cord or cable. • Ensure that the socket you plug in is in working condition. • Ensure the device has an AC input voltage between 100 and 240 VAC. • If you cannot determine the cause of the problem or need additional assistance, see "Dell Support" on page 95. Related • Monitoring the J-SRX100 Services Gateway Chassis Using the CLI on page 87 Documentation • Monitoring the J-SRX100 Services Gateway Components Using LEDs on page 89 • Monitoring the J-SRX100 Services Gateway Using Chassis Alarm Conditions on page 91 • Using the Reset Config Button on the J-SRX100 Services Gateway on page 93 • Changing the Reset Config Button Behavior on the J-SRX100 Services Gateway on page 94 • Dell Support on page 95 Resetting the Configuration File When the J-SRX100 Services Gateway Is Inaccessible This topic includes the following sections: • Using the Reset Config Button on the J-SRX100 Services Gateway on page 93 • Changing the Reset Config Button Behavior on the J-SRX100 Services Gateway on page 94 Using the Reset Config Button on the J-SRX100 Services Gateway If a configuration fails or denies management access to the services gateway, you can use the Reset Config button to restore the device to the factory default configuration or 93
-
 1
1 -
2
-
3
-
4
-
5
-
6
-
7
-
8
-
9
-
10
-
11
-
12
-
13
-
14
-
15
-
16
-
17
-
18
-
19
-
20
-
21
-
22
-
23
-
24
-
25
-
26
-
27
-
28
-
29
-
30
-
31
-
32
-
33
-
34
-
35
-
36
-
37
-
38
-
39
-
40
-
41
-
42
-
43
-
44
-
45
-
46
-
47
-
48
-
49
-
50
-
51
-
52
-
53
-
54
-
55
-
56
-
57
-
58
-
59
-
60
-
61
-
62
-
63
-
64
-
65
-
66
-
67
-
68
-
69
-
70
-
71
-
72
-
73
-
74
-
75
-
76
-
77
-
78
-
79
-
80
-
81
-
82
-
83
-
84
-
85
-
86
-
87
-
88
-
89
-
90
-
91
-
92
-
93
-
94
-
95
-
96
-
97
-
98
-
99
-
100
-
101
-
 102
102 -
 103
103 -
 104
104 -
 105
105 -
 106
106 -
 107
107 -
 108
108 -
 109
109 -
 110
110 -
 111
111 -
 112
112 -
113
-
114
-
115
-
116
-
117
-
118
-
119
-
120
-
121
-
122
-
123
-
124
-
125
-
126
-
127
-
128
-
129
-
130
-
131
-
132
-
133
-
134
-
135
-
136
-
137
-
138
-
139
-
140
-
141
-
142
-
143
-
144
-
145
-
146
-
147
-
148
-
149
-
150
-
151
-
152
-
153
-
154
-
155
-
156
-
157
-
158
 |
 |