Dell PowerConnect J-SRX100 Hardware Guide - Page 151
Required Tools and Parts for Installing and Maintaining the J-SRX100 Services Gateway
 |
View all Dell PowerConnect J-SRX100 manuals
Add to My Manuals
Save this manual to your list of manuals |
Page 151 highlights
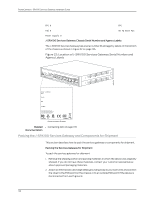
Appendix D: Getting Help 3. On the console or other management device such as a PC or laptop connected to the services gateway, enter CLI operational mode and issue the following command to shut down the services gateway software: user@host> request system power-off Wait until a message appears on the console confirming that the operating system has halted. 4. Shut down power to the device by pressing the Power button on the front panel of the device. 5. Disconnect power from the device. 6. Remove the cables that connect to all external devices. 7. Remove all field-replaceable units (FRUs) from the device. 8. If the device is installed on a wall or rack, have one person support the weight of the device while another person unscrews and removes the mounting screws. 9. Place the device in the shipping carton. 10. Cover the device with an ESD bag, and place the packing foam on top of and around the device. 11. Replace the accessory box on top of the packing foam. 12. Securely tape the box closed. 13. Write the Return Materials Authorization (RMA) number on the exterior of the box to ensure proper tracking. Packing the Components for Shipment Follow these guidelines for packing and shipping individual components of the services gateway: • When you return a component, make sure that it is adequately protected with packing materials and packed so that the pieces are prevented from moving around inside the carton. • Use the original shipping materials if they are available. • Write the Return Materials Authorization (RMA) number on the exterior of the box to ensure proper tracking. CAUTION: Do not stack any of the services gateway components during packing. Related • Required Tools and Parts for Installing and Maintaining the J-SRX100 Services Gateway Documentation on page 31 • Locating the J-SRX100 Services Gateway Component Serial Number and Agency Labels on page 135 137
-
 1
1 -
2
-
3
-
4
-
5
-
6
-
7
-
8
-
9
-
10
-
11
-
12
-
13
-
14
-
15
-
16
-
17
-
18
-
19
-
20
-
21
-
22
-
23
-
24
-
25
-
26
-
27
-
28
-
29
-
30
-
31
-
32
-
33
-
34
-
35
-
36
-
37
-
38
-
39
-
40
-
41
-
42
-
43
-
44
-
45
-
46
-
47
-
48
-
49
-
50
-
51
-
52
-
53
-
54
-
55
-
56
-
57
-
58
-
59
-
60
-
61
-
62
-
63
-
64
-
65
-
66
-
67
-
68
-
69
-
70
-
71
-
72
-
73
-
74
-
75
-
76
-
77
-
78
-
79
-
80
-
81
-
82
-
83
-
84
-
85
-
86
-
87
-
88
-
89
-
90
-
91
-
92
-
93
-
94
-
95
-
96
-
97
-
98
-
99
-
100
-
101
-
102
-
103
-
104
-
105
-
106
-
107
-
108
-
109
-
110
-
111
-
112
-
113
-
114
-
115
-
116
-
117
-
118
-
119
-
120
-
121
-
122
-
123
-
124
-
125
-
126
-
127
-
128
-
129
-
130
-
131
-
132
-
133
-
134
-
135
-
136
-
137
-
138
-
139
-
140
-
141
-
142
-
143
-
144
-
145
-
 146
146 -
 147
147 -
 148
148 -
 149
149 -
 150
150 -
 151
151 -
 152
152 -
 153
153 -
 154
154 -
 155
155 -
 156
156 -
157
-
158
 |
 |