Dell PowerConnect J-SRX100 Hardware Guide - Page 68
Table 19: J-SRX100 Services Gateway Grounding Components
 |
View all Dell PowerConnect J-SRX100 manuals
Add to My Manuals
Save this manual to your list of manuals |
Page 68 highlights
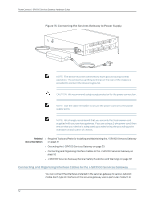
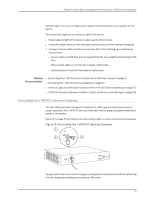
PowerConnect J-SRX100 Services Gateway Hardware Guide CAUTION: Before device installation begins, a licensed electrician must attach a cable lug to the grounding and power cables that you use. A cable with an incorrectly attached lug can damage the device (for example, by causing a short circuit). Table 19 on page 54 lists the grounding components of the J-SRX100 Services Gateway. Table 19: J-SRX100 Services Gateway Grounding Components Number Component 1 Grounding point on the chassis 2 Grounding lug 3 Grounding screw (M3 screw) Table 20 on page 54 lists the specifications of the grounding cable used with the device. Table 20: Grounding Cable Specifications for the Services Gateway Grounding Requirement Specification Grounding cable 14 AWG single-strand wire cable Amperage of grounding cable Up to 4 A Grounding lug Ring-type, vinyl-insulated TV14-6R lug or equivalent To ground the device: 1. Connect the grounding cable to a proper earth ground. 2. Verify that a licensed electrician has attached the cable lug to the grounding cable. 3. Place the grounding cable lug over the grounding point on the middle rear of the chassis. 4. Secure the grounding cable lug to the grounding point with the screw as shown in Figure 16 on page 53. 5. Dress the grounding cable and verify that it does not touch or block access to the services gateway components and that it does not drape where people could trip on it. NOTE: The device should be permanently connected to ground during operation. 54
-
 1
1 -
2
-
3
-
4
-
5
-
6
-
7
-
8
-
9
-
10
-
11
-
12
-
13
-
14
-
15
-
16
-
17
-
18
-
19
-
20
-
21
-
22
-
23
-
24
-
25
-
26
-
27
-
28
-
29
-
30
-
31
-
32
-
33
-
34
-
35
-
36
-
37
-
38
-
39
-
40
-
41
-
42
-
43
-
44
-
45
-
46
-
47
-
48
-
49
-
50
-
51
-
52
-
53
-
54
-
55
-
56
-
57
-
58
-
59
-
60
-
61
-
62
-
 63
63 -
 64
64 -
 65
65 -
 66
66 -
 67
67 -
 68
68 -
 69
69 -
 70
70 -
 71
71 -
 72
72 -
 73
73 -
74
-
75
-
76
-
77
-
78
-
79
-
80
-
81
-
82
-
83
-
84
-
85
-
86
-
87
-
88
-
89
-
90
-
91
-
92
-
93
-
94
-
95
-
96
-
97
-
98
-
99
-
100
-
101
-
102
-
103
-
104
-
105
-
106
-
107
-
108
-
109
-
110
-
111
-
112
-
113
-
114
-
115
-
116
-
117
-
118
-
119
-
120
-
121
-
122
-
123
-
124
-
125
-
126
-
127
-
128
-
129
-
130
-
131
-
132
-
133
-
134
-
135
-
136
-
137
-
138
-
139
-
140
-
141
-
142
-
143
-
144
-
145
-
146
-
147
-
148
-
149
-
150
-
151
-
152
-
153
-
154
-
155
-
156
-
157
-
158
 |
 |