Dell PowerConnect J-SRX100 Hardware Guide - Page 65
Connecting, Grounding, and Powering On the J-SRX100 Services Gateway, Connecting the J-
 |
View all Dell PowerConnect J-SRX100 manuals
Add to My Manuals
Save this manual to your list of manuals |
Page 65 highlights
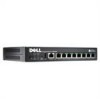
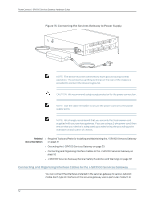
CHAPTER 9 Connecting, Grounding, and Powering On the J-SRX100 Services Gateway This chapter includes the following sections: • Connecting the J-SRX100 Services Gateway to the Power Supply on page 51 • Connecting and Organizing Interface Cables to the J-SRX100 Services Gateway on page 52 • Grounding the J-SRX100 Services Gateway on page 53 • Powering On and Powering Off the J-SRX100 Services Gateway on page 55 Connecting the J-SRX100 Services Gateway to the Power Supply NOTE: The power supply adapter (30 W) and the 2-prong power cord are shipped separately for the J-SRX100S and J-SRX100SU models. Contact your Dell customer service representative for more information. To connect the device to the power supply: CAUTION: Before connecting the device to the power supply, attach an ESD strap to an ESD point and place the other end of the strap around your bare wrist. 1. Plug the DC connector end of the power cable into the power connector on the back of the device (see Figure 15 on page 52). 2. Plug the AC adapter end of the power cable into an AC power outlet. 51
-
 1
1 -
2
-
3
-
4
-
5
-
6
-
7
-
8
-
9
-
10
-
11
-
12
-
13
-
14
-
15
-
16
-
17
-
18
-
19
-
20
-
21
-
22
-
23
-
24
-
25
-
26
-
27
-
28
-
29
-
30
-
31
-
32
-
33
-
34
-
35
-
36
-
37
-
38
-
39
-
40
-
41
-
42
-
43
-
44
-
45
-
46
-
47
-
48
-
49
-
50
-
51
-
52
-
53
-
54
-
55
-
56
-
57
-
58
-
59
-
 60
60 -
 61
61 -
 62
62 -
 63
63 -
 64
64 -
 65
65 -
 66
66 -
 67
67 -
 68
68 -
 69
69 -
 70
70 -
71
-
72
-
73
-
74
-
75
-
76
-
77
-
78
-
79
-
80
-
81
-
82
-
83
-
84
-
85
-
86
-
87
-
88
-
89
-
90
-
91
-
92
-
93
-
94
-
95
-
96
-
97
-
98
-
99
-
100
-
101
-
102
-
103
-
104
-
105
-
106
-
107
-
108
-
109
-
110
-
111
-
112
-
113
-
114
-
115
-
116
-
117
-
118
-
119
-
120
-
121
-
122
-
123
-
124
-
125
-
126
-
127
-
128
-
129
-
130
-
131
-
132
-
133
-
134
-
135
-
136
-
137
-
138
-
139
-
140
-
141
-
142
-
143
-
144
-
145
-
146
-
147
-
148
-
149
-
150
-
151
-
152
-
153
-
154
-
155
-
156
-
157
-
158
 |
 |