Dell PowerConnect J-SRX100 Hardware Guide - Page 108
Changing the Reset Config Button Behavior on the J-SRX100 Services Gateway
 |
View all Dell PowerConnect J-SRX100 manuals
Add to My Manuals
Save this manual to your list of manuals |
Page 108 highlights
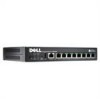
PowerConnect J-SRX100 Services Gateway Hardware Guide a rescue configuration. For example, if someone inadvertently commits a configuration that denies management access to a services gateway, you can delete the invalid configuration and replace it with a rescue configuration by pressing the Reset Config button. NOTE: The Reset Config button is recessed to prevent it from being pressed accidentally. The rescue configuration is a previously committed, valid configuration. You must have previously set the rescue configuration through the J-Web interface or the CLI. To press the Reset Config button, insert a small probe (such as a straightened paper clip) into the pinhole on the front panel. • By default, pressing and quickly releasing the Reset Config button loads and commits the rescue configuration through the J-Web interface or the CLI. The Status LED glows amber during this time. For details, see the Junos OS CLI User Guide. • By default, pressing and holding the Reset Config button for 15 seconds or more-until the Status LED glows amber-deletes all configurations on the device, including the backup configurations and rescue configuration, and loads and commits the factory configuration. For details about factory default settings, see the Junos OS Administration Guide. Related • Changing the Reset Config Button Behavior on the J-SRX100 Services Gateway on Documentation page 94 • Monitoring the J-SRX100 Services Gateway Chassis Using the CLI on page 87 • Monitoring the J-SRX100 Services Gateway Components Using LEDs on page 89 • Monitoring the J-SRX100 Services Gateway Using Chassis Alarm Conditions on page 91 • Monitoring the J-SRX100 Services Gateway Power System on page 92 • Dell Support on page 95 Changing the Reset Config Button Behavior on the J-SRX100 Services Gateway You can change the default operation of the Reset Config button by limiting how the button resets the services gateway: • To prevent the Reset Config button from setting the device to the factory default configuration and deleting all other configurations: admin@host# set chassis config-button no-clear You can still press and quickly release the button to reset it to the rescue configuration. • To prevent the Reset Config button from setting the device to the rescue configuration: admin@host# set chassis config-button no-rescue 94
-
 1
1 -
2
-
3
-
4
-
5
-
6
-
7
-
8
-
9
-
10
-
11
-
12
-
13
-
14
-
15
-
16
-
17
-
18
-
19
-
20
-
21
-
22
-
23
-
24
-
25
-
26
-
27
-
28
-
29
-
30
-
31
-
32
-
33
-
34
-
35
-
36
-
37
-
38
-
39
-
40
-
41
-
42
-
43
-
44
-
45
-
46
-
47
-
48
-
49
-
50
-
51
-
52
-
53
-
54
-
55
-
56
-
57
-
58
-
59
-
60
-
61
-
62
-
63
-
64
-
65
-
66
-
67
-
68
-
69
-
70
-
71
-
72
-
73
-
74
-
75
-
76
-
77
-
78
-
79
-
80
-
81
-
82
-
83
-
84
-
85
-
86
-
87
-
88
-
89
-
90
-
91
-
92
-
93
-
94
-
95
-
96
-
97
-
98
-
99
-
100
-
101
-
102
-
 103
103 -
 104
104 -
 105
105 -
 106
106 -
 107
107 -
 108
108 -
 109
109 -
 110
110 -
 111
111 -
 112
112 -
 113
113 -
114
-
115
-
116
-
117
-
118
-
119
-
120
-
121
-
122
-
123
-
124
-
125
-
126
-
127
-
128
-
129
-
130
-
131
-
132
-
133
-
134
-
135
-
136
-
137
-
138
-
139
-
140
-
141
-
142
-
143
-
144
-
145
-
146
-
147
-
148
-
149
-
150
-
151
-
152
-
153
-
154
-
155
-
156
-
157
-
158
 |
 |
