HP 3500 HP Color LaserJet 3500 Series Printer - Software Technical Reference, - Page 186
Setting a default printer, Windows 3.1x, Table 66: Windows servers with Windows clients - color laserjet driver windows 10
 |
View all HP 3500 manuals
Add to My Manuals
Save this manual to your list of manuals |
Page 186 highlights
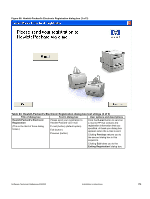
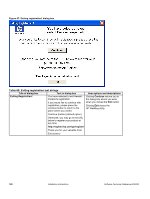
For all operating systems, use the Add Printer Wizard to install the appropriate operating system driver on the server and client machines, as shown in the following table. Table 66: Windows servers with Windows clients Computer function Server and clients Server and clients Server only Server and clients Server and clients Server only Server only Server only Client only Steps 1. Click Start, click Settings, and then click Printers. 2. In the Printers folder, double-click the Add Printer icon to start the Add Printer Wizard. 3. Click Next, and then click Local Printer. Click Next. If your operating system is Windows 98 or Windows Me, go to step 6. 4. Select the appropriate port in the list of ports, or click Add Port to connect to a network port that is not in the list of available ports. 5. Select the printer model in the list of available printers, or click Have Disk if you are installing the driver from an alternative source, such as disk, CD-ROM, or software download. If you are installing from a software download, you must know the path to where the software has been downloaded. 6. After the installation is complete, highlight the Printer icon and click File, and then click Properties. In the Printer Properties window, click the Sharing tab. 7. You must enable the File and Print Sharing service for either Microsoft networks or Novell networks on the server. 8. To exit Properties, click OK. A hand appears beneath the Printer icon in the Printers folder, indicating that the printer is shared. 9. You can install the driver using Point and Print in one of the following four ways: • In Network Neighborhood, locate the server and double-click the printer share name. • In Network Neighborhood, locate the server, and then drag and drop the icon for the shared printer into your Printers folder. • In the Printers folder, open the Add Printer Wizard. The next action depends on the operating system: • For Windows 98, and Windows Me, click Network Printer. • For Windows NT 4.0, Windows 2000, Windows XP, and Windows Server 2003, click Network printer server. Client only 10. Click Next. Type the network path or queue name, or select Browse to search the network to locate the appropriate path. Client only Client only 11. In Network Neighborhood, locate the server and double-click. Then locate the printer share name and right-click. 12. Click Install to complete the installation through the Add Printer Wizard. Setting a default printer This section applies to the Windows 98, Windows Me, Windows NT 4.0, Windows 2000, Windows XP, and Windows Server 2003 operating systems. 1. In Windows 98, Windows Me, Windows NT 4.0, and and Windows 2000 OSs, click Start, click Settings, and then click Printers. In Windows XP and Windows Server 2003, click Start, click Control Panel, click Printers and Faxes (Windows XP Professional) or Printers and other hardware devices (Windows XP Home). 2. Select the printer that you want to set as the default printer. 3. From the File menu, click Set As Default. A check mark appears next to the menu option. 4. Click Close. Windows 3.1x The HP Color LaserJet 3500 series printer has not been tested with and is not supported in Windows 3.1x. 184 Installation instructions Software Technical Reference ENWW
-
 1
1 -
2
-
3
-
4
-
5
-
6
-
7
-
8
-
9
-
10
-
11
-
12
-
13
-
14
-
15
-
16
-
17
-
18
-
19
-
20
-
21
-
22
-
23
-
24
-
25
-
26
-
27
-
28
-
29
-
30
-
31
-
32
-
33
-
34
-
35
-
36
-
37
-
38
-
39
-
40
-
41
-
42
-
43
-
44
-
45
-
46
-
47
-
48
-
49
-
50
-
51
-
52
-
53
-
54
-
55
-
56
-
57
-
58
-
59
-
60
-
61
-
62
-
63
-
64
-
65
-
66
-
67
-
68
-
69
-
70
-
71
-
72
-
73
-
74
-
75
-
76
-
77
-
78
-
79
-
80
-
81
-
82
-
83
-
84
-
85
-
86
-
87
-
88
-
89
-
90
-
91
-
92
-
93
-
94
-
95
-
96
-
97
-
98
-
99
-
100
-
101
-
102
-
103
-
104
-
105
-
106
-
107
-
108
-
109
-
110
-
111
-
112
-
113
-
114
-
115
-
116
-
117
-
118
-
119
-
120
-
121
-
122
-
123
-
124
-
125
-
126
-
127
-
128
-
129
-
130
-
131
-
132
-
133
-
134
-
135
-
136
-
137
-
138
-
139
-
140
-
141
-
142
-
143
-
144
-
145
-
146
-
147
-
148
-
149
-
150
-
151
-
152
-
153
-
154
-
155
-
156
-
157
-
158
-
159
-
160
-
161
-
162
-
163
-
164
-
165
-
166
-
167
-
168
-
169
-
170
-
171
-
172
-
173
-
174
-
175
-
176
-
177
-
178
-
179
-
180
-
 181
181 -
 182
182 -
 183
183 -
 184
184 -
 185
185 -
 186
186 -
 187
187 -
 188
188 -
 189
189 -
 190
190 -
 191
191 -
192
-
193
-
194
-
195
-
196
-
197
-
198
-
199
-
200
-
201
-
202
-
203
-
204
-
205
-
206
-
207
-
208
-
209
-
210
-
211
-
212
-
213
-
214
-
215
-
216
-
217
-
218
-
219
-
220
-
221
-
222
-
223
-
224
-
225
-
226
 |
 |