HP 3500 HP Color LaserJet 3500 Series Printer - Software Technical Reference, - Page 66
Printer messages during firmware update, Table 9: Update messages
 |
View all HP 3500 manuals
Add to My Manuals
Save this manual to your list of manuals |
Page 66 highlights
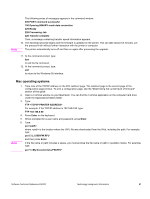
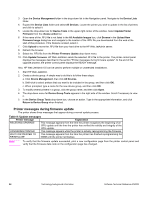
3. Open the Device Management folder in the drop-down list in the Navigation panel. Navigate to the Device Lists folder. 4. Expand the Device Lists folder and select All Devices. Locate the printer you wish to update in the list of printers and click to select it. 5. Locate the drop-down box for Device Tools in the upper right corner of the window. Select Update Printer Firmware from the choose action list. 6. If the name of the .RFU file is not listed in the All Available Images box, click Browse in the Upload New Firmware Image dialog box and navigate to the location of the .RFU file you downloaded from the web at the start of this procedure. If the filename is listed, select it. 7. Click Upload to move the .RFU file from your hard drive to the HP Web JetAdmin server. 8. Refresh the browser. 9. Select the .RFU file from the Printer Firmware Update drop-down menu. 10. Click Update Firmware. HP Web JetAdmin sends the selected .RFU file to the printer. The printer control panel displays the messages described in the section "Printer messages during firmware update". At the end of the upgrade process, the printer control panel displays the READY message. Also, HP Web JetAdmin 6.5 can be used to perform multiple or unattended installations. 1. Start HP Web JetAdmin. 2. Create a device group. A simple way to do this is to follow these steps: a. Click Device Management, then click All Devices. b. Shift-click to select printers that you want to be included in the group, and then click OK. c. When prompted, type a name for the new device group, and then click OK. 3. To modify several printers in a group, click the group name, and then click Open. 4. The drop-down menu for Device Group Tools appears in the right side of the window. Scroll if necessary to view it. 5. In the Device Group Tools drop-down box, choose an action. Type in the appropriate information, and click Return to Device Group when finished. Printer messages during firmware update The printer shows three messages that appear during a normal update process. Table 9: Update messages Printer message Explanation RECEIVING UPGRADE This message appears from the time the printer recognizes the beginning of an .RFU update until the time the printer has verified the validity and integrity of the .RFU update. UPGRADING PRINTER This message appears while the printer is actually reprogramming the firmware. WAIT FOR PRINTER TO This message appears from the time the printer has finished reprogramming the REINITIALIZE DIMM until the printer reinitializes. Note To verify that the firmware update succeeded, print a new configuration page from the printer control panel and verify that the firmware date code on the configuration page has changed. 64 Technology background information Software Technical Reference ENWW
-
 1
1 -
2
-
3
-
4
-
5
-
6
-
7
-
8
-
9
-
10
-
11
-
12
-
13
-
14
-
15
-
16
-
17
-
18
-
19
-
20
-
21
-
22
-
23
-
24
-
25
-
26
-
27
-
28
-
29
-
30
-
31
-
32
-
33
-
34
-
35
-
36
-
37
-
38
-
39
-
40
-
41
-
42
-
43
-
44
-
45
-
46
-
47
-
48
-
49
-
50
-
51
-
52
-
53
-
54
-
55
-
56
-
57
-
58
-
59
-
60
-
 61
61 -
 62
62 -
 63
63 -
 64
64 -
 65
65 -
 66
66 -
 67
67 -
 68
68 -
 69
69 -
 70
70 -
 71
71 -
72
-
73
-
74
-
75
-
76
-
77
-
78
-
79
-
80
-
81
-
82
-
83
-
84
-
85
-
86
-
87
-
88
-
89
-
90
-
91
-
92
-
93
-
94
-
95
-
96
-
97
-
98
-
99
-
100
-
101
-
102
-
103
-
104
-
105
-
106
-
107
-
108
-
109
-
110
-
111
-
112
-
113
-
114
-
115
-
116
-
117
-
118
-
119
-
120
-
121
-
122
-
123
-
124
-
125
-
126
-
127
-
128
-
129
-
130
-
131
-
132
-
133
-
134
-
135
-
136
-
137
-
138
-
139
-
140
-
141
-
142
-
143
-
144
-
145
-
146
-
147
-
148
-
149
-
150
-
151
-
152
-
153
-
154
-
155
-
156
-
157
-
158
-
159
-
160
-
161
-
162
-
163
-
164
-
165
-
166
-
167
-
168
-
169
-
170
-
171
-
172
-
173
-
174
-
175
-
176
-
177
-
178
-
179
-
180
-
181
-
182
-
183
-
184
-
185
-
186
-
187
-
188
-
189
-
190
-
191
-
192
-
193
-
194
-
195
-
196
-
197
-
198
-
199
-
200
-
201
-
202
-
203
-
204
-
205
-
206
-
207
-
208
-
209
-
210
-
211
-
212
-
213
-
214
-
215
-
216
-
217
-
218
-
219
-
220
-
221
-
222
-
223
-
224
-
225
-
226
 |
 |