HP 4650 HP Color LaserJet 4650 - Software Technical Reference (External) - Page 126
Product image, Job Storage tab features - color laserjet parts
 |
UPC - 829160046426
View all HP 4650 manuals
Add to My Manuals
Save this manual to your list of manuals |
Page 126 highlights
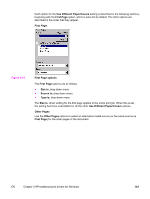
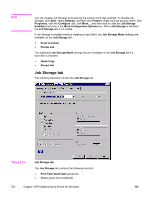
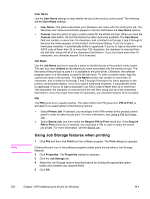
Product image The bitmap image in the lower-right portion of the Paper tab represents the current physical configuration of the product and corresponds to its configuration data. It should look the same as the image that appears in the same location on the Configure tab in the Printer Properties. On the Paper tab, the product image contains hot spots where you can select a media source. When you use the mouse to move the pointer over a hot spot, the arrow reverts to a gloved hand. The current media source tray, whether selected from the drop-down menu or from a product image hot spot, is highlighted on the product image. The following points are worth noting: ● The Automatically Select setting in the Source is: drop-down menu does not have a corresponding area to highlight in the product image. Selecting other settings in this menu highlights the corresponding part in the product image. ● Selecting the area that represents a tray in the image always selects the corresponding tray in the Source is: option. Manual Feed in Tray 1, which is available from the Source is: drop-down menu, cannot be selected by selecting the image. ● On the Paper tab, only source trays have product image hot spots and can be highlighted. Job Storage tab features The HP Color LaserJet 4650 printer lets you store print jobs in the product's memory for printing at a later time. These job-storage features are described in the following sections. The Job Storage tab appears among the driver tabs only if Job Storage is enabled. To support job-storage features for complex jobs, or if you often print complex graphics, print postscript (.PS) documents, or use many downloaded fonts, HP recommends that you install additional memory, install a hard disk, or both. Added memory also gives you more flexibility in supporting job storage features. A minimum total memory of 288 MB is required to use Job Storage features. After a hard disk or additional memory is installed, the driver must be configured to reflect the changes in the product. If bidirectional communication is enabled in your environment, the Update Now feature can be used to update the drivers. For more information, see the Configure tab features in this chapter. To configure the drivers manually after installing a hard disk or additional memory, follow these steps: 1 Click Start, select Settings, and then click Printers. 2 Right-click the product name, click Properties, and then click the Configure tab. 3 Under Other Options, click More.... 4 If additional memory has been installed, change the setting in the Total Memory: drop- down menu. If you select a minimum of 288 MB, this also selects the Job Storage Enabled check box. 5 If a hard disk has been installed, select the Printer Hard Disk check box in the Storage group box. This also selects the Job Storage Enabled check box. 6 Click OK to make the printer hard disk and job-storage features available. 106 Job Storage tab features EN
-
 1
1 -
2
-
3
-
4
-
5
-
6
-
7
-
8
-
9
-
10
-
11
-
12
-
13
-
14
-
15
-
16
-
17
-
18
-
19
-
20
-
21
-
22
-
23
-
24
-
25
-
26
-
27
-
28
-
29
-
30
-
31
-
32
-
33
-
34
-
35
-
36
-
37
-
38
-
39
-
40
-
41
-
42
-
43
-
44
-
45
-
46
-
47
-
48
-
49
-
50
-
51
-
52
-
53
-
54
-
55
-
56
-
57
-
58
-
59
-
60
-
61
-
62
-
63
-
64
-
65
-
66
-
67
-
68
-
69
-
70
-
71
-
72
-
73
-
74
-
75
-
76
-
77
-
78
-
79
-
80
-
81
-
82
-
83
-
84
-
85
-
86
-
87
-
88
-
89
-
90
-
91
-
92
-
93
-
94
-
95
-
96
-
97
-
98
-
99
-
100
-
101
-
102
-
103
-
104
-
105
-
106
-
107
-
108
-
109
-
110
-
111
-
112
-
113
-
114
-
115
-
116
-
117
-
118
-
119
-
120
-
 121
121 -
 122
122 -
 123
123 -
 124
124 -
 125
125 -
 126
126 -
 127
127 -
 128
128 -
 129
129 -
 130
130 -
 131
131 -
132
-
133
-
134
-
135
-
136
-
137
-
138
-
139
-
140
-
141
-
142
-
143
-
144
-
145
-
146
-
147
-
148
-
149
-
150
-
151
-
152
-
153
-
154
-
155
-
156
-
157
-
158
-
159
-
160
-
161
-
162
-
163
-
164
-
165
-
166
-
167
-
168
-
169
-
170
-
171
-
172
-
173
-
174
-
175
-
176
-
177
-
178
-
179
-
180
-
181
-
182
-
183
-
184
-
185
-
186
-
187
-
188
-
189
-
190
-
191
-
192
-
193
-
194
-
195
-
196
-
197
-
198
-
199
-
200
-
201
-
202
-
203
-
204
-
205
-
206
-
207
-
208
-
209
-
210
-
211
-
212
-
213
-
214
-
215
-
216
-
217
-
218
-
219
-
220
-
221
-
222
-
223
-
224
-
225
-
226
-
227
-
228
-
229
-
230
-
231
-
232
-
233
-
234
-
235
-
236
-
237
-
238
-
239
-
240
-
241
-
242
-
243
-
244
-
245
-
246
-
247
-
248
-
249
-
250
-
251
-
252
-
253
-
254
-
255
-
256
-
257
-
258
-
259
-
260
-
261
-
262
-
263
-
264
-
265
-
266
-
267
-
268
-
269
-
270
-
271
-
272
-
273
-
274
-
275
-
276
-
277
-
278
-
279
-
280
-
281
-
282
-
283
-
284
-
285
-
286
-
287
-
288
-
289
-
290
-
291
-
292
-
293
-
294
-
295
-
296
-
297
-
298
-
299
-
300
-
301
-
302
-
303
-
304
-
305
-
306
-
307
-
308
-
309
 |
 |