HP 4650 HP Color LaserJet 4650 - Software Technical Reference (External) - Page 185
Size is, Custom paper sizes, Use different paper, Source Is, Printers and Other
 |
UPC - 829160046426
View all HP 4650 manuals
Add to My Manuals
Save this manual to your list of manuals |
Page 185 highlights
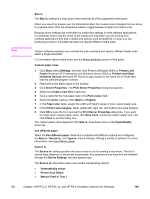
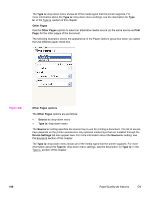
Note Size is The Size is: setting is a drop-down menu that lists all of the supported media sizes. When you move the mouse over the dimensions label, the mouse cursor changes from an arrow to a gloved hand. Click the dimensions label to toggle between English and metric units. Because driver settings are overridden by media-size settings in most software applications, it is generally best to use the driver to set media size only when you are printing from software applications that lack a media-size setting, such as NotePad, or when you are producing a book or a booklet that does not require different media sizes. Certain software programs can override the size command and specify different media sizes within a single document. For information about media sizes, see the Media attributes section of this guide. Custom paper sizes 1 Click Start, select Settings, and then click Printers (Windows 2000) or Printers and Faxes (Windows XP Professional and Windows Server 2003) or Printers and Other Hardware Devices (Windows XP Home) to gain access to the same set of driver tabs that the software program controls. 2 Right-click in the blank space in the window. 3 Click Server Properties. The Print Server Properties dialog box appears. 4 Select the Create a new form check box. 5 Type a name for the new paper size in the Form name: field. 6 Select the Units: setting, either Metric or English. 7 In the Paper size: fields, assign the width and height values of your custom paper size. 8 In the Printer area margins: fields, assign left, right, top, and bottom print-area margins. 9 Click OK to save the form and exit the Print Server Properties dialog box. If you want to create other custom paper sizes, click Save Form, create the custom paper size, and click Close to exit the dialog box. The custom paper name appears in the Size is: drop-down menu in the Paper/Quality driver tab. Use different paper When the Use different paper check box is selected and different options are configured, the Size is:, Source is:, and Type is: menus change, offering a variety of options. For more information, see Use different paper. Source Is The Source is: setting specifies the source tray to use for printing a document. The list of source trays depends on the printer accessories. Any optional source trays that are installed through the Device Settings tab also appear here. The Source is: drop-down menu can contain the following options: ● Automatically select ● Printer Auto Select ● Manual Feed in Tray 1 EN Chapter 4 HP PCL 6, HP PCL 5c, and HP PS 3 emulation unidrivers for Windows 165
-
 1
1 -
2
-
3
-
4
-
5
-
6
-
7
-
8
-
9
-
10
-
11
-
12
-
13
-
14
-
15
-
16
-
17
-
18
-
19
-
20
-
21
-
22
-
23
-
24
-
25
-
26
-
27
-
28
-
29
-
30
-
31
-
32
-
33
-
34
-
35
-
36
-
37
-
38
-
39
-
40
-
41
-
42
-
43
-
44
-
45
-
46
-
47
-
48
-
49
-
50
-
51
-
52
-
53
-
54
-
55
-
56
-
57
-
58
-
59
-
60
-
61
-
62
-
63
-
64
-
65
-
66
-
67
-
68
-
69
-
70
-
71
-
72
-
73
-
74
-
75
-
76
-
77
-
78
-
79
-
80
-
81
-
82
-
83
-
84
-
85
-
86
-
87
-
88
-
89
-
90
-
91
-
92
-
93
-
94
-
95
-
96
-
97
-
98
-
99
-
100
-
101
-
102
-
103
-
104
-
105
-
106
-
107
-
108
-
109
-
110
-
111
-
112
-
113
-
114
-
115
-
116
-
117
-
118
-
119
-
120
-
121
-
122
-
123
-
124
-
125
-
126
-
127
-
128
-
129
-
130
-
131
-
132
-
133
-
134
-
135
-
136
-
137
-
138
-
139
-
140
-
141
-
142
-
143
-
144
-
145
-
146
-
147
-
148
-
149
-
150
-
151
-
152
-
153
-
154
-
155
-
156
-
157
-
158
-
159
-
160
-
161
-
162
-
163
-
164
-
165
-
166
-
167
-
168
-
169
-
170
-
171
-
172
-
173
-
174
-
175
-
176
-
177
-
178
-
179
-
 180
180 -
 181
181 -
 182
182 -
 183
183 -
 184
184 -
 185
185 -
 186
186 -
 187
187 -
 188
188 -
 189
189 -
 190
190 -
191
-
192
-
193
-
194
-
195
-
196
-
197
-
198
-
199
-
200
-
201
-
202
-
203
-
204
-
205
-
206
-
207
-
208
-
209
-
210
-
211
-
212
-
213
-
214
-
215
-
216
-
217
-
218
-
219
-
220
-
221
-
222
-
223
-
224
-
225
-
226
-
227
-
228
-
229
-
230
-
231
-
232
-
233
-
234
-
235
-
236
-
237
-
238
-
239
-
240
-
241
-
242
-
243
-
244
-
245
-
246
-
247
-
248
-
249
-
250
-
251
-
252
-
253
-
254
-
255
-
256
-
257
-
258
-
259
-
260
-
261
-
262
-
263
-
264
-
265
-
266
-
267
-
268
-
269
-
270
-
271
-
272
-
273
-
274
-
275
-
276
-
277
-
278
-
279
-
280
-
281
-
282
-
283
-
284
-
285
-
286
-
287
-
288
-
289
-
290
-
291
-
292
-
293
-
294
-
295
-
296
-
297
-
298
-
299
-
300
-
301
-
302
-
303
-
304
-
305
-
306
-
307
-
308
-
309
 |
 |