HP 915 User Guide - Page 131
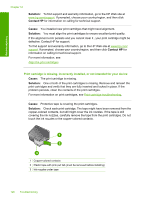
Solution, To resolve the problem, If the Check Print Cartridge light is still flashing
 |
View all HP 915 manuals
Add to My Manuals
Save this manual to your list of manuals |
Page 131 highlights
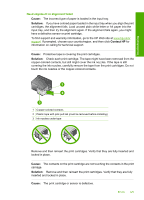
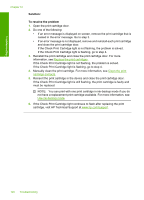
Troubleshooting Chapter 12 Solution: To resolve the problem 1. Open the print cartridge door. 2. Do one of the following: • If an error message is displayed on screen, remove the print cartridge that is named in the error message. Go to step 3. • If an error message is not displayed, remove and reinstall each print cartridge and close the print cartridge door. If the Check Print Cartridge light is not flashing, the problem is solved. If the Check Print Cartridge light is flashing, go to step 4. 3. Reinstall the print cartridge and close the print cartridge door. For more information, see Replace the print cartridges. If the Check Print Cartridge light is not flashing, the problem is solved. If the Check Print Cartridge light is flashing, go to step 4. 4. Manually clean the print cartridge. For more information, see Clean the print cartridge contacts. 5. Reinsert the print cartridge in the device and close the print cartridge door. If the Check Print Cartridge light is still flashing, the print cartridge is faulty and must be replaced. NOTE: You can print with one print cartridge in ink-backup mode if you do not have a replacement print cartridge available. For more information, see Use ink-backup mode. 6. If the Check Print Cartridge light continues to flash after replacing the print cartridge, visit HP Technical Support at www.hp.com/support. 128 Troubleshooting
-
 1
1 -
2
-
3
-
4
-
5
-
6
-
7
-
8
-
9
-
10
-
11
-
12
-
13
-
14
-
15
-
16
-
17
-
18
-
19
-
20
-
21
-
22
-
23
-
24
-
25
-
26
-
27
-
28
-
29
-
30
-
31
-
32
-
33
-
34
-
35
-
36
-
37
-
38
-
39
-
40
-
41
-
42
-
43
-
44
-
45
-
46
-
47
-
48
-
49
-
50
-
51
-
52
-
53
-
54
-
55
-
56
-
57
-
58
-
59
-
60
-
61
-
62
-
63
-
64
-
65
-
66
-
67
-
68
-
69
-
70
-
71
-
72
-
73
-
74
-
75
-
76
-
77
-
78
-
79
-
80
-
81
-
82
-
83
-
84
-
85
-
86
-
87
-
88
-
89
-
90
-
91
-
92
-
93
-
94
-
95
-
96
-
97
-
98
-
99
-
100
-
101
-
102
-
103
-
104
-
105
-
106
-
107
-
108
-
109
-
110
-
111
-
112
-
113
-
114
-
115
-
116
-
117
-
118
-
119
-
120
-
121
-
122
-
123
-
124
-
125
-
 126
126 -
 127
127 -
 128
128 -
 129
129 -
 130
130 -
 131
131 -
 132
132 -
 133
133 -
 134
134 -
 135
135 -
 136
136 -
137
-
138
-
139
-
140
-
141
-
142
-
143
-
144
-
145
 |
 |
