HP 915 User Guide - Page 93
Clean the Print Cartridges, Start Copy Color
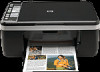 |
View all HP 915 manuals
Add to My Manuals
Save this manual to your list of manuals |
Page 93 highlights
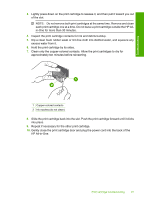
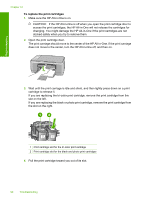
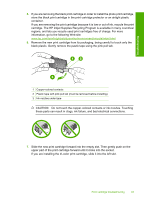
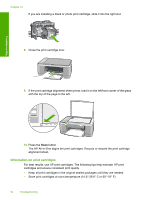
Chapter 12 To print a self-test report 1. Load letter or A4 unused plain white paper into the input tray. 2. Press and hold the Cancel button and then press the Start Copy Color button. The HP All-in-One prints a self-test report, which might indicate the source of the printing problem. A sample of the ink test area of the report is shown below. Troubleshooting 3. Make sure the test patterns show a complete grid and the thick color lines are complete. • If more than a few lines in a pattern are broken, this might indicate a problem with the nozzles. You might need to clean the print cartridges. • If the black line is missing, faded, streaked, or shows lines, this might indicate a problem with the black print cartridge in the right slot. • If any of the color lines are missing, faded, streaked, or show lines, this might indicate a problem with the tri-color print cartridge in the left slot. To clean the print cartridges from the HP Photosmart Software 1. Load letter, A4, or legal unused plain white paper into the input tray. 2. In the HP Solution Center, click Settings, point to Print Settings, and then click Printer Toolbox. NOTE: You can also open the Printer Toolbox from the Print Properties dialog box. In the Print Properties dialog box, click the Services tab, and then click Service this device. The Printer Toolbox appears. 3. Click the Device Services tab. 4. Click Clean the Print Cartridges. 5. Follow the prompts until you are satisfied with the quality of the output, and then click Done. If copy or print quality still seems poor after you clean the print cartridges, try cleaning the print cartridge contacts before replacing the affected print cartridge. To clean the print cartridge contacts 1. Turn on the HP All-in-One and open the print cartridge door. The print carriage moves to the center of the HP All-in-One. 2. Wait until the print carriage is idle and silent, and then unplug the power cord from the back of the HP All-in-One. 90 Troubleshooting
-
 1
1 -
2
-
3
-
4
-
5
-
6
-
7
-
8
-
9
-
10
-
11
-
12
-
13
-
14
-
15
-
16
-
17
-
18
-
19
-
20
-
21
-
22
-
23
-
24
-
25
-
26
-
27
-
28
-
29
-
30
-
31
-
32
-
33
-
34
-
35
-
36
-
37
-
38
-
39
-
40
-
41
-
42
-
43
-
44
-
45
-
46
-
47
-
48
-
49
-
50
-
51
-
52
-
53
-
54
-
55
-
56
-
57
-
58
-
59
-
60
-
61
-
62
-
63
-
64
-
65
-
66
-
67
-
68
-
69
-
70
-
71
-
72
-
73
-
74
-
75
-
76
-
77
-
78
-
79
-
80
-
81
-
82
-
83
-
84
-
85
-
86
-
87
-
 88
88 -
 89
89 -
 90
90 -
 91
91 -
 92
92 -
 93
93 -
 94
94 -
 95
95 -
 96
96 -
 97
97 -
 98
98 -
99
-
100
-
101
-
102
-
103
-
104
-
105
-
106
-
107
-
108
-
109
-
110
-
111
-
112
-
113
-
114
-
115
-
116
-
117
-
118
-
119
-
120
-
121
-
122
-
123
-
124
-
125
-
126
-
127
-
128
-
129
-
130
-
131
-
132
-
133
-
134
-
135
-
136
-
137
-
138
-
139
-
140
-
141
-
142
-
143
-
144
-
145
 |
 |