HP 915 User Guide - Page 134
Additional warranty options, HP Korea customer support, Prepare the HP All-in-One for shipment
 |
View all HP 915 manuals
Add to My Manuals
Save this manual to your list of manuals |
Page 134 highlights
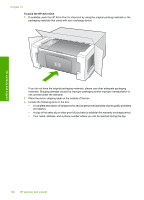
HP warranty and support Additional warranty options Extended service plans are available for the HP All-in-One at additional costs. Go to www.hp.com/ support, select your country/region and language, then explore the services and warranty area for information about the extended service plans. HP Korea customer support Prepare the HP All-in-One for shipment If after contacting HP Customer Support or returning to the point of purchase you are requested to send the HP All-in-One in for service, make sure you remove and keep the following items before returning your device: • The print cartridges • The power cord, USB cable, and any other cable connected to the HP All-in-One • Any paper loaded in the input tray • Any originals loaded in the HP All-in-One To remove print cartridges before shipment 1. Turn on the HP All-in-One and wait until the print carriage is idle and silent. If the HP All-in-One will not turn on, skip this step and go to step 2. 2. Open the print cartridge door. 3. Remove the print cartridges from their slots. NOTE: If the HP All-in-One does not turn on, you can unplug the power cord and then manually slide the print carriage to the center to remove the print cartridges. 4. Place the print cartridges in an airtight plastic container so they will not dry out, and put them aside. Do not send them with the HP All-in-One unless the HP customer support call agent instructs you to. 5. Close the print cartridge door and wait a few minutes for the print carriage to move back to its home position (on the left side). NOTE: Make sure the scanner is idle and has returned to its parked position before turning off the HP All-in-One. 6. Press the On button to turn off the HP All-in-One. Pack the HP All-in-One Complete the following steps once you have removed the print cartridges, turned off the HP All-inOne, and unplugged it. Additional warranty options 131
-
 1
1 -
2
-
3
-
4
-
5
-
6
-
7
-
8
-
9
-
10
-
11
-
12
-
13
-
14
-
15
-
16
-
17
-
18
-
19
-
20
-
21
-
22
-
23
-
24
-
25
-
26
-
27
-
28
-
29
-
30
-
31
-
32
-
33
-
34
-
35
-
36
-
37
-
38
-
39
-
40
-
41
-
42
-
43
-
44
-
45
-
46
-
47
-
48
-
49
-
50
-
51
-
52
-
53
-
54
-
55
-
56
-
57
-
58
-
59
-
60
-
61
-
62
-
63
-
64
-
65
-
66
-
67
-
68
-
69
-
70
-
71
-
72
-
73
-
74
-
75
-
76
-
77
-
78
-
79
-
80
-
81
-
82
-
83
-
84
-
85
-
86
-
87
-
88
-
89
-
90
-
91
-
92
-
93
-
94
-
95
-
96
-
97
-
98
-
99
-
100
-
101
-
102
-
103
-
104
-
105
-
106
-
107
-
108
-
109
-
110
-
111
-
112
-
113
-
114
-
115
-
116
-
117
-
118
-
119
-
120
-
121
-
122
-
123
-
124
-
125
-
126
-
127
-
128
-
 129
129 -
 130
130 -
 131
131 -
 132
132 -
 133
133 -
 134
134 -
 135
135 -
 136
136 -
 137
137 -
 138
138 -
 139
139 -
140
-
141
-
142
-
143
-
144
-
145
 |
 |