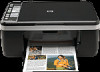
HP 915 User Guide - Page 67
To replace the print cartridges, CAUTION
 |
View all HP 915 manuals
Add to My Manuals
Save this manual to your list of manuals |
Page 67 highlights
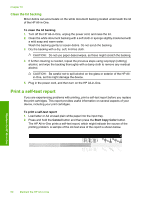
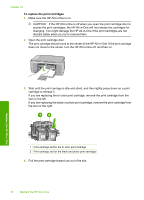
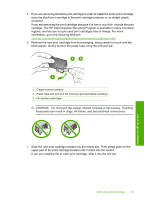
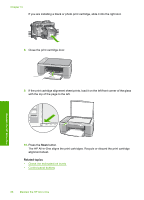
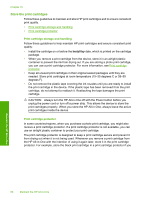
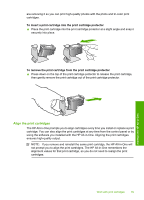
Chapter 10 To replace the print cartridges 1. Make sure the HP All-in-One is on. CAUTION: If the HP All-in-One is off when you open the print cartridge door to access the print cartridges, the HP All-in-One will not release the cartridges for changing. You might damage the HP All-in-One if the print cartridges are not docked safely when you try to remove them. 2. Open the print cartridge door. The print carriage should move to the center of the HP All-in-One. If the print carriage does not move to the center, turn the HP All-in-One off, and then on. 3. Wait until the print carriage is idle and silent, and then lightly press down on a print cartridge to release it. If you are replacing the tri-color print cartridge, remove the print cartridge from the slot on the left. If you are replacing the black or photo print cartridge, remove the print cartridge from the slot on the right. Maintain the HP All-in-One 1 Print cartridge slot for the tri-color print cartridge 2 Print cartridge slot for the black and photo print cartridges 4. Pull the print cartridge toward you out of its slot. 64 Maintain the HP All-in-One
-
 1
1 -
2
-
3
-
4
-
5
-
6
-
7
-
8
-
9
-
10
-
11
-
12
-
13
-
14
-
15
-
16
-
17
-
18
-
19
-
20
-
21
-
22
-
23
-
24
-
25
-
26
-
27
-
28
-
29
-
30
-
31
-
32
-
33
-
34
-
35
-
36
-
37
-
38
-
39
-
40
-
41
-
42
-
43
-
44
-
45
-
46
-
47
-
48
-
49
-
50
-
51
-
52
-
53
-
54
-
55
-
56
-
57
-
58
-
59
-
60
-
61
-
 62
62 -
 63
63 -
 64
64 -
 65
65 -
 66
66 -
 67
67 -
 68
68 -
 69
69 -
 70
70 -
 71
71 -
 72
72 -
73
-
74
-
75
-
76
-
77
-
78
-
79
-
80
-
81
-
82
-
83
-
84
-
85
-
86
-
87
-
88
-
89
-
90
-
91
-
92
-
93
-
94
-
95
-
96
-
97
-
98
-
99
-
100
-
101
-
102
-
103
-
104
-
105
-
106
-
107
-
108
-
109
-
110
-
111
-
112
-
113
-
114
-
115
-
116
-
117
-
118
-
119
-
120
-
121
-
122
-
123
-
124
-
125
-
126
-
127
-
128
-
129
-
130
-
131
-
132
-
133
-
134
-
135
-
136
-
137
-
138
-
139
-
140
-
141
-
142
-
143
-
144
-
145
 |
 |
