HP d640 HP D640 High-Volume Printer - User Manual (Printer and Accessories), C - Page 124
Developer discharge, Please Wait, Start, Developer Replacement, Prepare new developer, and press Start
 |
View all HP d640 manuals
Add to My Manuals
Save this manual to your list of manuals |
Page 124 highlights
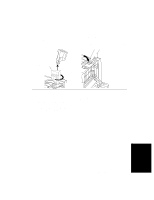
Replacing Developer 5. Press Select to display Developer instructions, as shown in Figure 4-12. Developer Replacement Prepare new developer and press Start to discharge old developer Start LTR LTR LTR Exit Figure 4-12 Discharge Developer 6. Press Start, as shown in Figure 4-12. 7. The old developer is cycled into the empty developer bottle. The process takes about 45 seconds. Do not open any covers or cycle power during this period. Follow the instructions on the Control Panel. Blinking Developer discharge Developer discharging Please Wait Online Figure 4-13 Developer discharging Consumables Ordering and Replacing Consumables 4-11
-
 1
1 -
2
-
3
-
4
-
5
-
6
-
7
-
8
-
9
-
10
-
11
-
12
-
13
-
14
-
15
-
16
-
17
-
18
-
19
-
20
-
21
-
22
-
23
-
24
-
25
-
26
-
27
-
28
-
29
-
30
-
31
-
32
-
33
-
34
-
35
-
36
-
37
-
38
-
39
-
40
-
41
-
42
-
43
-
44
-
45
-
46
-
47
-
48
-
49
-
50
-
51
-
52
-
53
-
54
-
55
-
56
-
57
-
58
-
59
-
60
-
61
-
62
-
63
-
64
-
65
-
66
-
67
-
68
-
69
-
70
-
71
-
72
-
73
-
74
-
75
-
76
-
77
-
78
-
79
-
80
-
81
-
82
-
83
-
84
-
85
-
86
-
87
-
88
-
89
-
90
-
91
-
92
-
93
-
94
-
95
-
96
-
97
-
98
-
99
-
100
-
101
-
102
-
103
-
104
-
105
-
106
-
107
-
108
-
109
-
110
-
111
-
112
-
113
-
114
-
115
-
116
-
117
-
118
-
 119
119 -
 120
120 -
 121
121 -
 122
122 -
 123
123 -
 124
124 -
 125
125 -
 126
126 -
 127
127 -
 128
128 -
 129
129 -
130
-
131
-
132
-
133
-
134
-
135
-
136
-
137
-
138
-
139
-
140
-
141
-
142
-
143
-
144
-
145
-
146
-
147
-
148
-
149
-
150
-
151
-
152
-
153
-
154
-
155
-
156
-
157
-
158
-
159
-
160
-
161
-
162
-
163
-
164
-
165
-
166
-
167
-
168
-
169
-
170
-
171
-
172
-
173
-
174
-
175
-
176
-
177
-
178
-
179
-
180
-
181
-
182
-
183
-
184
-
185
-
186
-
187
-
188
-
189
-
190
-
191
-
192
-
193
-
194
-
195
-
196
-
197
-
198
-
199
-
200
-
201
-
202
-
203
-
204
-
205
-
206
-
207
-
208
-
209
-
210
-
211
-
212
-
213
-
214
-
215
-
216
-
217
-
218
-
219
-
220
-
221
-
222
-
223
-
224
-
225
-
226
-
227
-
228
-
229
-
230
-
231
-
232
-
233
-
234
-
235
-
236
-
237
-
238
-
239
-
240
-
241
-
242
-
243
-
244
-
245
-
246
-
247
-
248
-
249
-
250
-
251
-
252
-
253
-
254
-
255
-
256
-
257
-
258
-
259
-
260
-
261
-
262
-
263
-
264
-
265
-
266
-
267
-
268
-
269
-
270
-
271
-
272
-
273
-
274
-
275
-
276
-
277
-
278
-
279
-
280
-
281
-
282
-
283
-
284
-
285
-
286
-
287
-
288
-
289
-
290
-
291
-
292
-
293
 |
 |

Replacing Developer
Ordering and Replacing Consumables
4-11
Consumables
5.
Press Select to display Developer instructions, as shown in Figure 4-12.
Figure 4-12
Discharge Developer
6.
Press Start, as shown in Figure 4-12.
7.
The old developer is cycled into the empty developer bottle. The process takes about 45
seconds. Do not open any covers or cycle power during this period. Follow the
instructions on the Control Panel.
Figure 4-13
Developer discharging
Start
Exit
LTR
LTR
LTR
Developer Replacement
Prepare new developer
and press Start
to discharge old developer
Online
Developer discharge
Developer discharging
Please Wait
Blinking