HP d640 HP D640 High-Volume Printer - User Manual (Printer and Accessories), C - Page 154
Installing the Covers and Trays
 |
View all HP d640 manuals
Add to My Manuals
Save this manual to your list of manuals |
Page 154 highlights
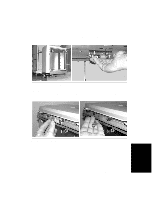
Printer Pick Roller Kit - Replacing the Tray Pick Rollers Installing the Covers and Trays 1. Attach the metal plate to the printer frame with the thumbscrew. Turn the thumbscrew clockwise several turns until it is snug. Do not overtighten. See Figure 4-53. Figure 4-53 Attaching Plate 2. Replace the three paper trays back into the printer, as shown in Figure 4-54. Figure 4-54 Installing Paper Trays 3. Press Done on the Control Panel. 4. Perform the Paper Path Alignment procedure described in "Adjusting Paper Path Alignment" on page 6-11. Ordering and Replacing Consumables 4-41 Consumables
-
 1
1 -
2
-
3
-
4
-
5
-
6
-
7
-
8
-
9
-
10
-
11
-
12
-
13
-
14
-
15
-
16
-
17
-
18
-
19
-
20
-
21
-
22
-
23
-
24
-
25
-
26
-
27
-
28
-
29
-
30
-
31
-
32
-
33
-
34
-
35
-
36
-
37
-
38
-
39
-
40
-
41
-
42
-
43
-
44
-
45
-
46
-
47
-
48
-
49
-
50
-
51
-
52
-
53
-
54
-
55
-
56
-
57
-
58
-
59
-
60
-
61
-
62
-
63
-
64
-
65
-
66
-
67
-
68
-
69
-
70
-
71
-
72
-
73
-
74
-
75
-
76
-
77
-
78
-
79
-
80
-
81
-
82
-
83
-
84
-
85
-
86
-
87
-
88
-
89
-
90
-
91
-
92
-
93
-
94
-
95
-
96
-
97
-
98
-
99
-
100
-
101
-
102
-
103
-
104
-
105
-
106
-
107
-
108
-
109
-
110
-
111
-
112
-
113
-
114
-
115
-
116
-
117
-
118
-
119
-
120
-
121
-
122
-
123
-
124
-
125
-
126
-
127
-
128
-
129
-
130
-
131
-
132
-
133
-
134
-
135
-
136
-
137
-
138
-
139
-
140
-
141
-
142
-
143
-
144
-
145
-
146
-
147
-
148
-
 149
149 -
 150
150 -
 151
151 -
 152
152 -
 153
153 -
 154
154 -
 155
155 -
 156
156 -
 157
157 -
 158
158 -
 159
159 -
160
-
161
-
162
-
163
-
164
-
165
-
166
-
167
-
168
-
169
-
170
-
171
-
172
-
173
-
174
-
175
-
176
-
177
-
178
-
179
-
180
-
181
-
182
-
183
-
184
-
185
-
186
-
187
-
188
-
189
-
190
-
191
-
192
-
193
-
194
-
195
-
196
-
197
-
198
-
199
-
200
-
201
-
202
-
203
-
204
-
205
-
206
-
207
-
208
-
209
-
210
-
211
-
212
-
213
-
214
-
215
-
216
-
217
-
218
-
219
-
220
-
221
-
222
-
223
-
224
-
225
-
226
-
227
-
228
-
229
-
230
-
231
-
232
-
233
-
234
-
235
-
236
-
237
-
238
-
239
-
240
-
241
-
242
-
243
-
244
-
245
-
246
-
247
-
248
-
249
-
250
-
251
-
252
-
253
-
254
-
255
-
256
-
257
-
258
-
259
-
260
-
261
-
262
-
263
-
264
-
265
-
266
-
267
-
268
-
269
-
270
-
271
-
272
-
273
-
274
-
275
-
276
-
277
-
278
-
279
-
280
-
281
-
282
-
283
-
284
-
285
-
286
-
287
-
288
-
289
-
290
-
291
-
292
-
293
 |
 |

Printer Pick Roller Kit - Replacing the Tray Pick Rollers
Ordering and Replacing Consumables
4-41
Consumables
Installing the Covers and Trays
1.
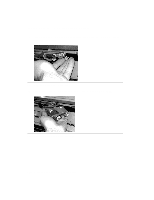
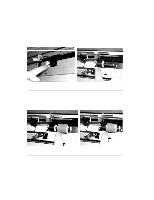
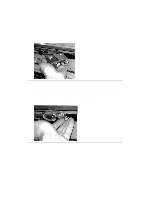
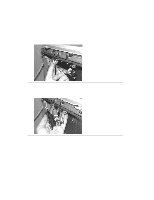
Attach the metal plate to the printer frame with the thumbscrew. Turn the thumbscrew
clockwise several turns until it is snug. Do not overtighten. See Figure 4-53.
Figure 4-53
Attaching Plate
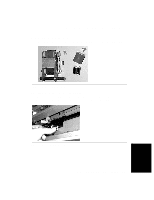
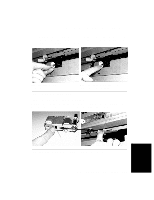
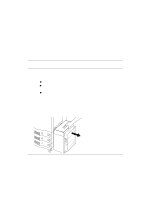
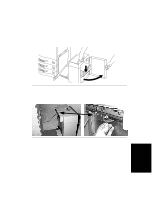
2.
Replace the three paper trays back into the printer, as shown in Figure 4-54.
Figure 4-54
Installing Paper Trays
3.
Press Done on the Control Panel.
4.
Perform the Paper Path Alignment procedure described in “Adjusting Paper Path
Alignment” on page
6-11.